Choose a theme for your candy buffet
My theme came from a children's book, but your theme could be anything--a color, a pattern, a season, even a specific type of candy. Having a theme unifies the candy and makes the table look cohesive.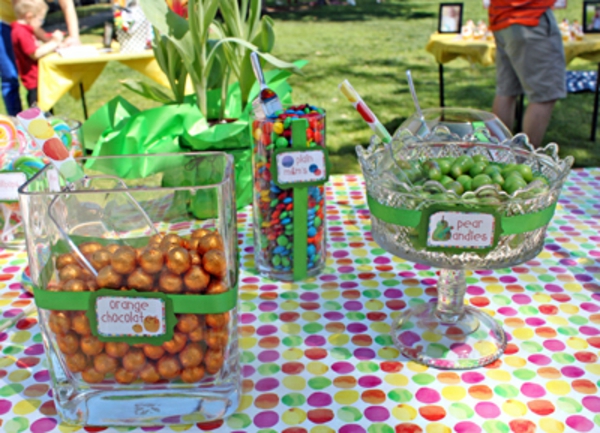 Since my theme was The Very Hungry Caterpillar, I wanted to accomplish two things: have bright, colorful candies that reflected the spirit and illustrations of the book, and have candies that referenced the food in the book. So not only were the candies I chose a rainbow of colors, but almost all of them were based on a fruit mentioned in the book.
Think about the location and set-up for your candy buffet
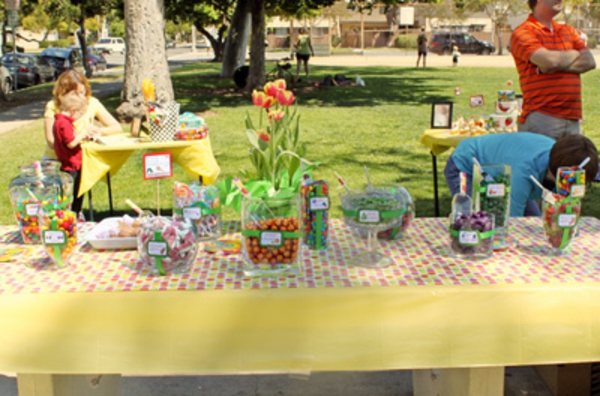
My party was fairy casual--it was picnic-style at a nearby park, and the candy buffet was available to guests throughout the whole party. Since the setting was so low-key, I didn't want the buffet to be too precious or styled. Plus, since children would be serving themselves, the set-up had to be fairly child-friendly. Candy buffets with towering glass goblets and tiered trays can be gorgeous, but they're not the most practical choice when small children are involved!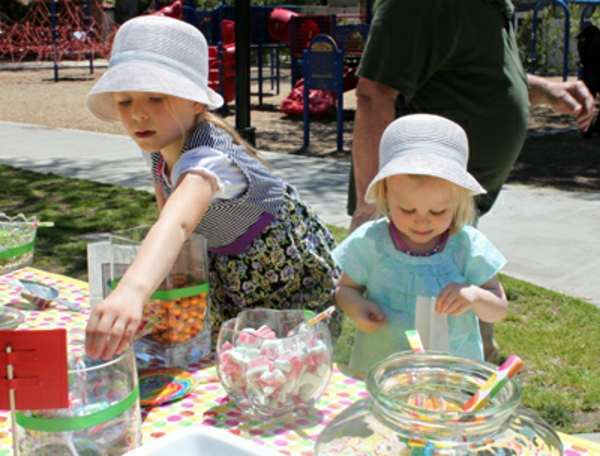
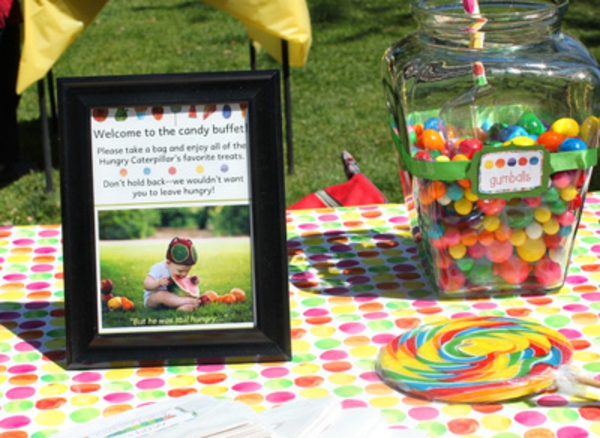
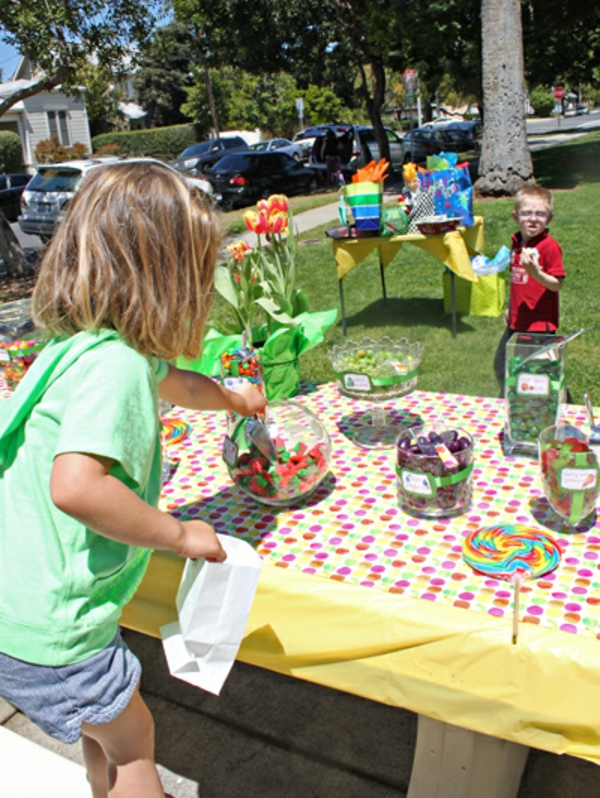 Additionally, think about how guests will approach the buffet. Will they know what to do? Will they know it's appropriate for them to serve themselves? Consider making a sign to welcome them to the buffet and give any special instructions you might have. This way everyone will know that it's available and feel comfortable digging in. Plus, signs add a nice touch and are a good chance to emphasize the theme! I made this sign using photo editing software and printed it as a 5x7 picture at a local photo shop:
Gather supplies for your candy buffet
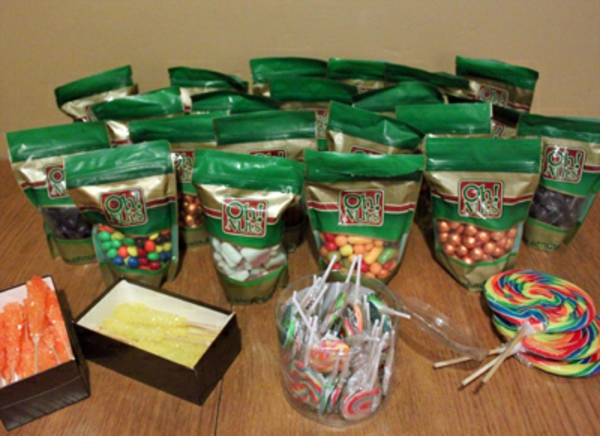
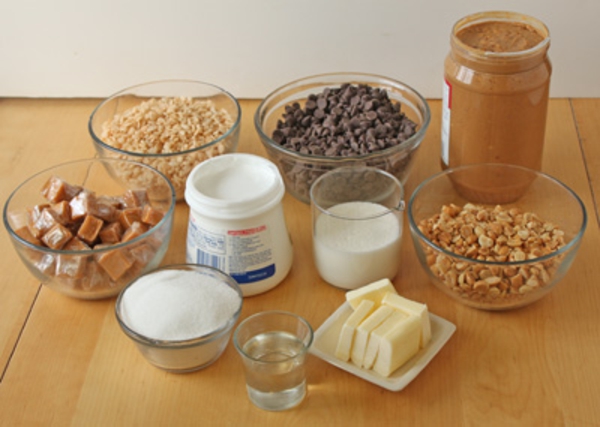
First, of course, you'll need candy. The amount you need depends on how many guests you have, how much candy you think they'll eat, and also on the containers you use. A good rule of thumb is to estimate one-third to one-half of a pound per person (so one pound will be good for two-three people). If you know that your guests will be enthusiastic candy eaters, or if you've purchased really large containers, you may want to buy more so that the buffet looks generous and full.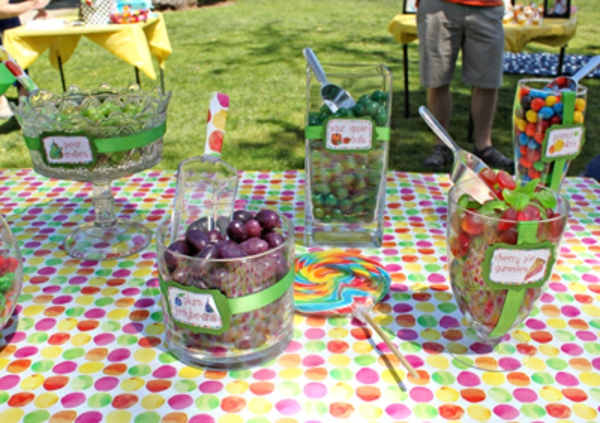 We had 45 guests at our party, including a large number of children. We set out about 22 pounds of candy, and had plenty for our guests and some leftovers too! This is what over 20 pounds of candy looks like:
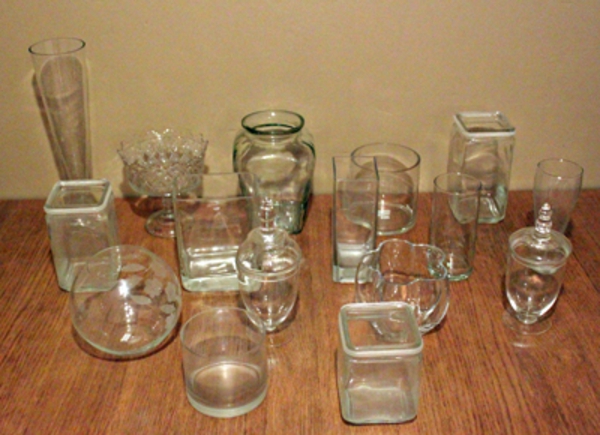
 Aside from candy, the other major purchase will be containers to hold the candy. Glass or other transparent containers are the best for showing it off and making and a dazzling display. Giant jars and goblets look stunning, but consider that you will need to fill those extra-large containers with candy (easily 10 pounds or more) and plan accordingly. Try to assemble a wide variety of different shapes and types of containers for the best visual appeal. Thrift stores and discount stores like Marshall's and TJ Maxx can be excellent sources for inexpensive bowls, jars, and vases. I used a mix of pieces I owned, items from friends, and then purchased a few containers from thrift stores to round out my collection:
 To keep things sanitary, you'll want to provide candy scoops or other serving implements. I found clear plastic ones at the 99-cent store, and decorated the handles with paper to match our table decorations. I also found some slightly nicer metal ones at Bed Bath & Beyond, and many websites also sell scoops.
Choose your candies wisely
Think about the environment of your candy buffet. Will the day be humid? Consider buying individually-wrapped candies and chocolates that won't stick together. Will it be hot? Opt for hard candies that won't melt, instead of soft gummies or chocolates.
Provide bags for your candy buffet
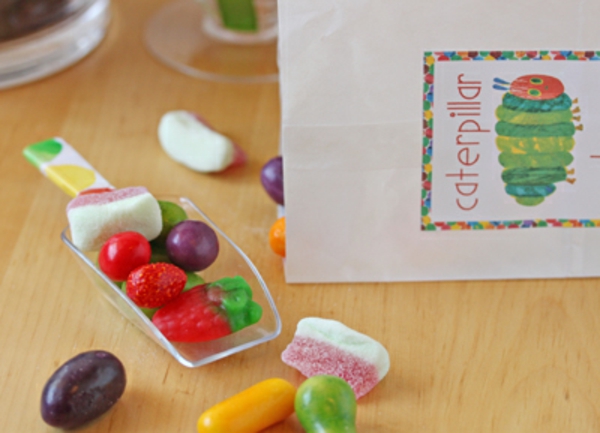
You probably don't want your guests to have to stuff the candy in their pockets, so you'll want to provide cute bags or containers for taking home the loot.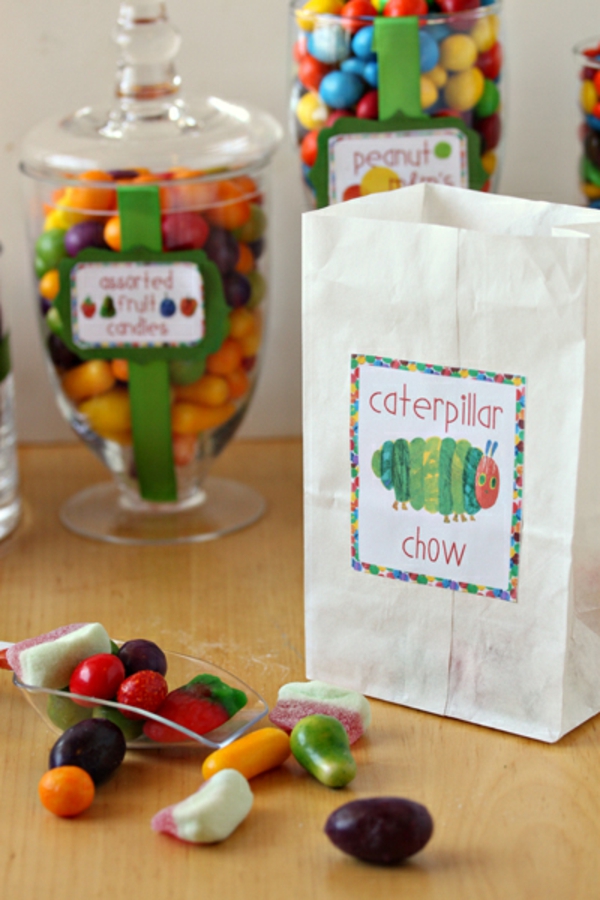 I used small plain white bags, known as "2 pound" size. I bought mine at Smart & Final, but you can also find them online. Another good option is to use "merchandise bags," which are flat paper bags. You can actually run those through your printer, so you can easily and cheaply customize them at home. Keep in mind that the bigger the bag, the more candy guests are likely to take, and size accordingly.
I customized my bags with labels that I designed and printed out on full-page label sheets. All I had to do was cut them apart and they were ready to stick on! If you're throwing a Very Hungry Caterpillar party, you can get a pdf copy of the goodie bag labels I used right here.
I used small plain white bags, known as "2 pound" size. I bought mine at Smart & Final, but you can also find them online. Another good option is to use "merchandise bags," which are flat paper bags. You can actually run those through your printer, so you can easily and cheaply customize them at home. Keep in mind that the bigger the bag, the more candy guests are likely to take, and size accordingly.
I customized my bags with labels that I designed and printed out on full-page label sheets. All I had to do was cut them apart and they were ready to stick on! If you're throwing a Very Hungry Caterpillar party, you can get a pdf copy of the goodie bag labels I used right here.
Label the candies in your candy buffet
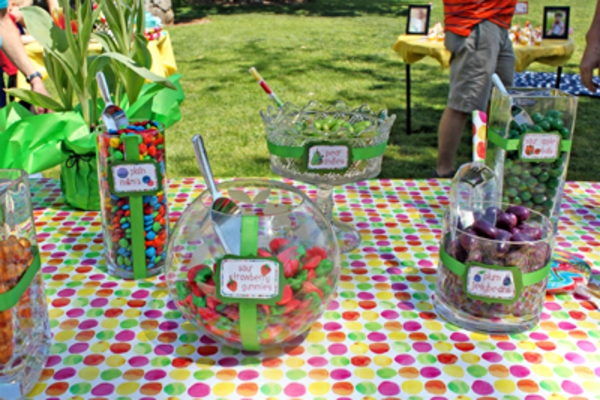
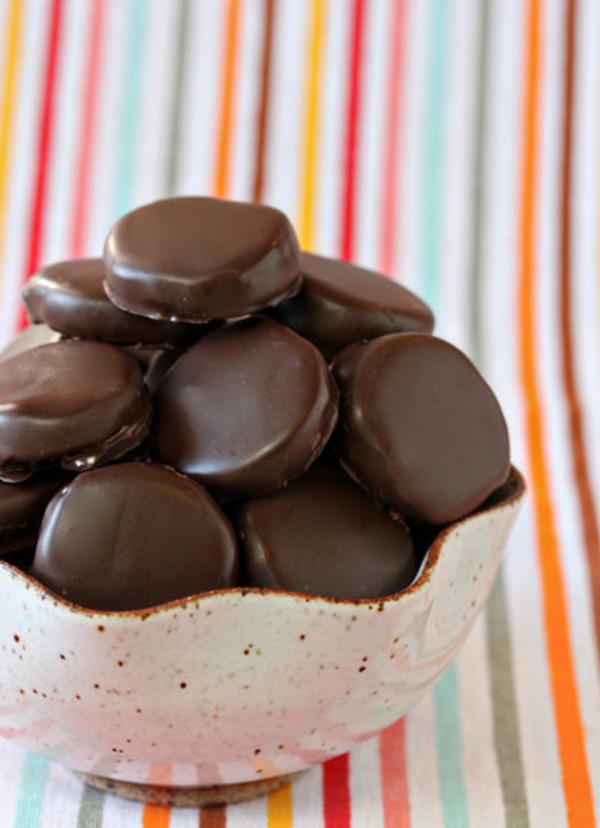
Labels are a must! Not only do they look cute, but they help your guests navigate the buffet and choose candies they like--and avoid ones they don't. In this age of food allergies, it's also a good precaution to make sure your guests know exactly what they're eating. Not only did I label the type and flavor of the candy, but I also made sure to label candies that tasted sour, since I wasn't sure if everyone would enjoy sour flavors. If you're throwing a Very Hungry Caterpillar party, you can get a copy of the buffet jar labels here.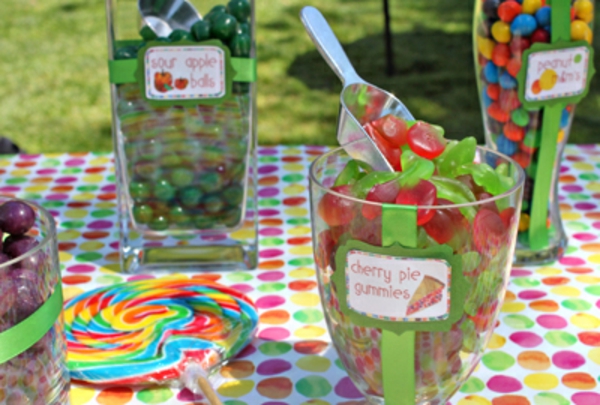
Candies used for a Very Hungry Caterpillar candy buffet
Here's a breakdown of the specific candies I used for our candy buffet, plus links to where you can buy them on the OhNuts.com website. The candies you choose might be different, but I hope this inspires you and gives you an idea of the variety and fun you can have with your candy choices!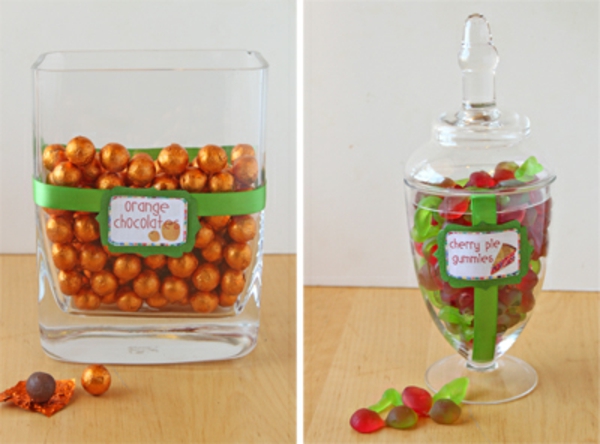 Orange Milk Chocolate Balls | Twin Cherry Gummies
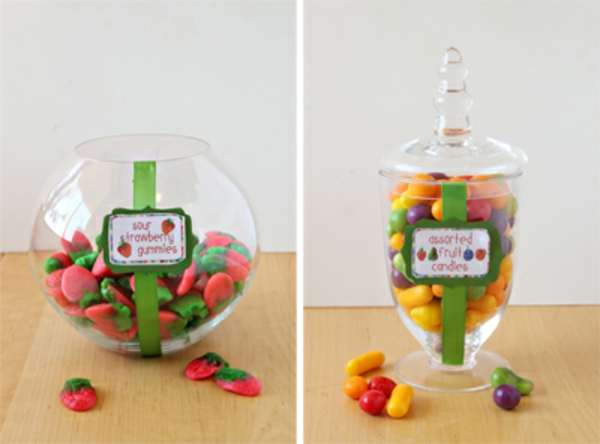 Wild Strawberry Gummies | Swiss Petite Assorted Fruit Candies
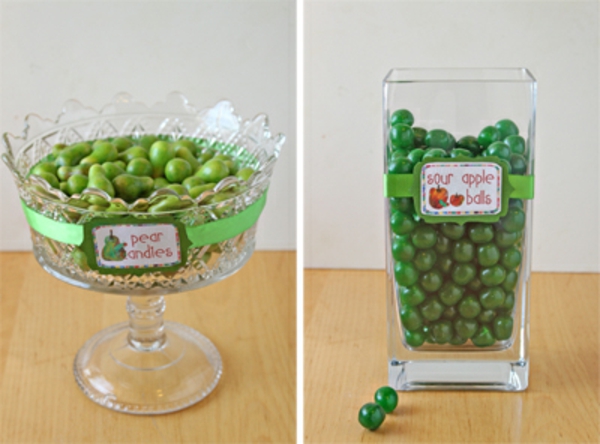 Swiss Petite Pear Candy | Fruit Sour Candy Balls - Green Apple (these were my favorite to eat!)
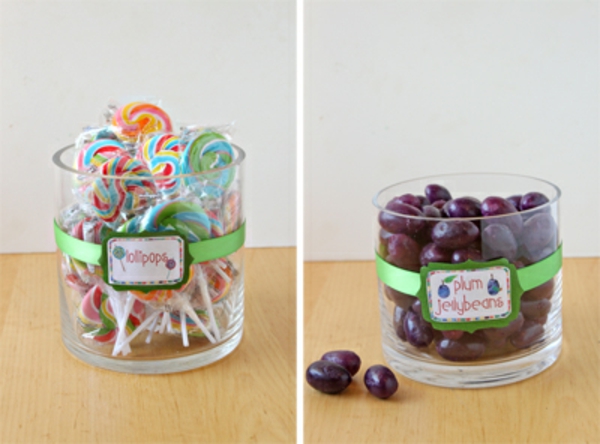 Swirl Round Lollipops | Huckleberry Jelly Beans (I cheated and called them "plum" since it's hard to find plum candy!)
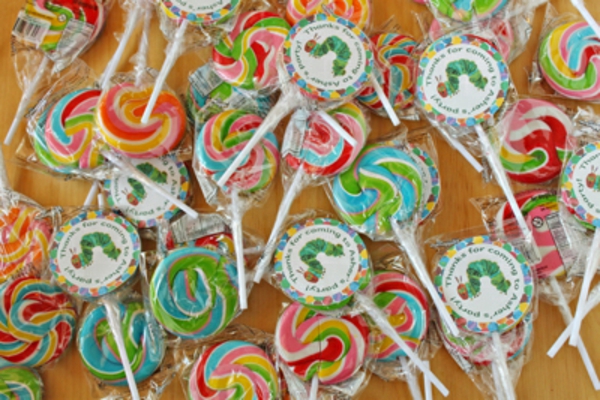 As a side note, I thought these 2" swirl lollipops were absolutely perfect. The looked cute, and they were the exact right size to fit with a 2" round label. I stuck a thank-you label on some of the pops and put them in the goody bags for the children.
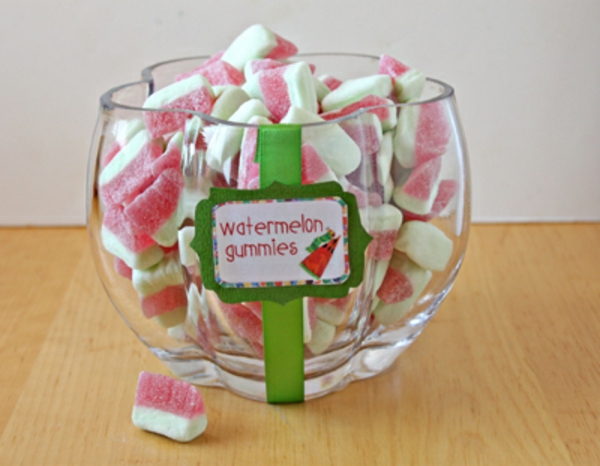 Watermelon Slices Gummy Candy
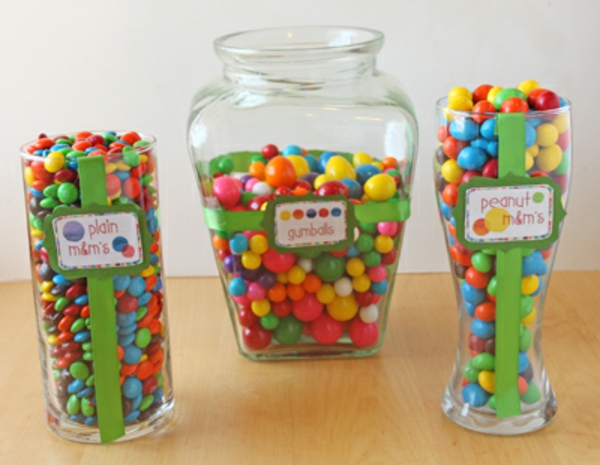 Finally, I chose an assortment of colorful rainbow candy, like large gumballs, mini gumballs, plain m&ms, and peanut m&ms and give it more variety and color.
Have fun putting together your own birthday candy buffet! If you're throwing a Very Hungry Caterpillar party, you might find the following resources helpful:
Very Hungry Caterpillar party ideas
Very Hungry Caterpillar cake recipe
Finally, I chose an assortment of colorful rainbow candy, like large gumballs, mini gumballs, plain m&ms, and peanut m&ms and give it more variety and color.
Have fun putting together your own birthday candy buffet! If you're throwing a Very Hungry Caterpillar party, you might find the following resources helpful:
Very Hungry Caterpillar party ideas
Very Hungry Caterpillar cake recipe
All text and images (c) Elizabeth LaBau ]]>
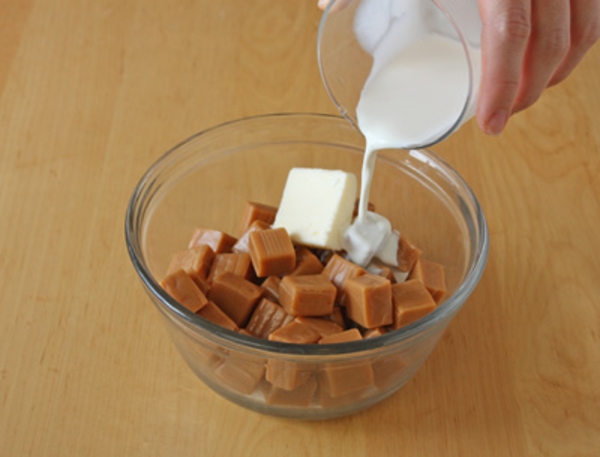
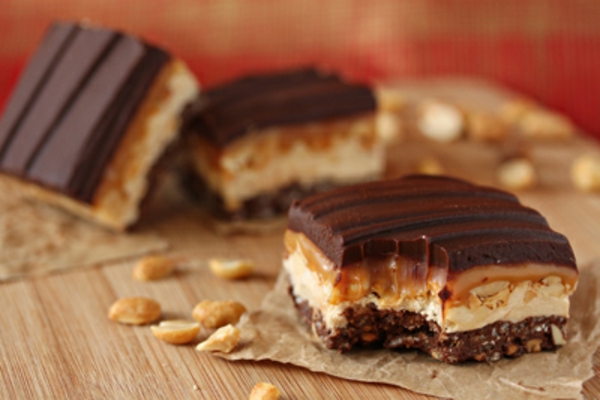
 These Crispy Candy Bars have four--FOUR!--layers of delicious sugary goodness. It starts with a base of crispy chocolate, then there's a soft peanut-packed nougat, followed by chewy, creamy caramel, and topped with a chocolate-peanut glaze. If you think that sounds intense, you're right. These are intensely good, and intensely addicting.
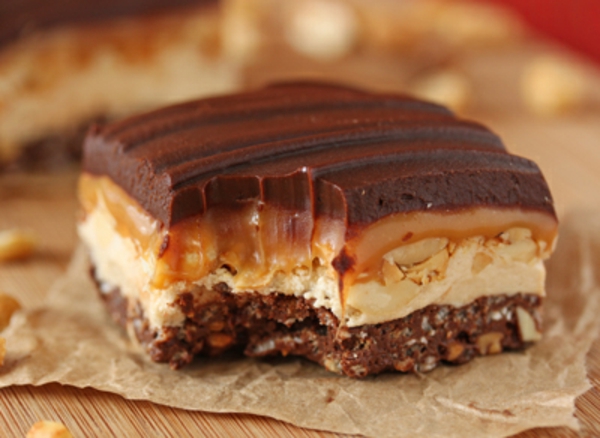 It's true that there are a lot of layers and a good many steps, but there's nothing difficult about this recipe. Almost every step uses a microwave, so most of the work involves microwaving and stirring ingredients. At the end you're rewarded with a whole pan of chocolately, peanutty, caramel bliss, so I think it's worth a few extra minutes of your time. Here's what you'll need:
 Crispy Candy Bars
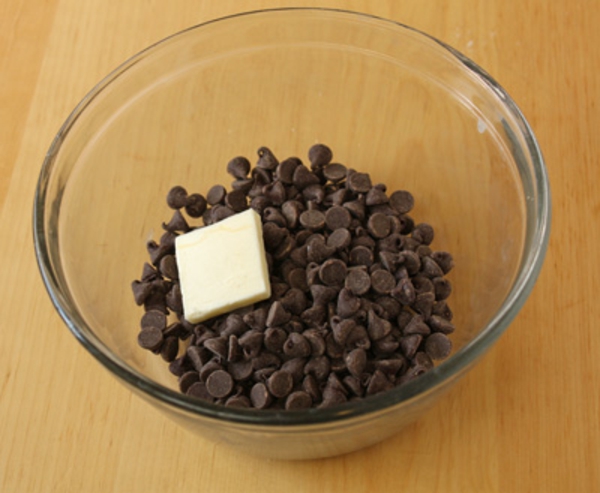 Combine 1 cup of chocolate chips with 1 tablespoon of butter in a microwave-safe bowl. Microwave in 30 second increments until the chocolate is melted and smooth.
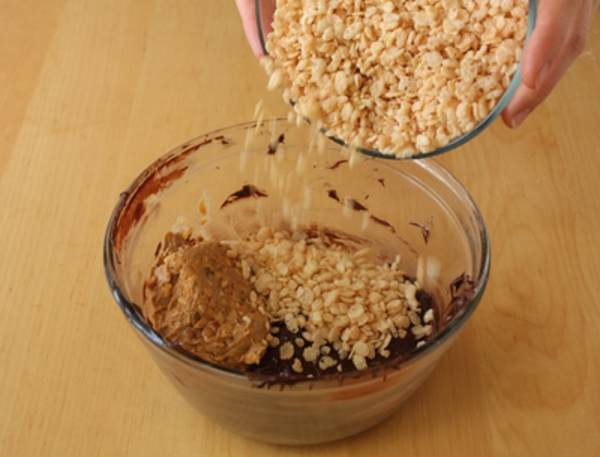 Add 1/2 cup of peanut butter and all of the crispy rice cereal. Stir until the peanut butter melts into the chocolate and the cereal is totally covered with the chocolate mixture.
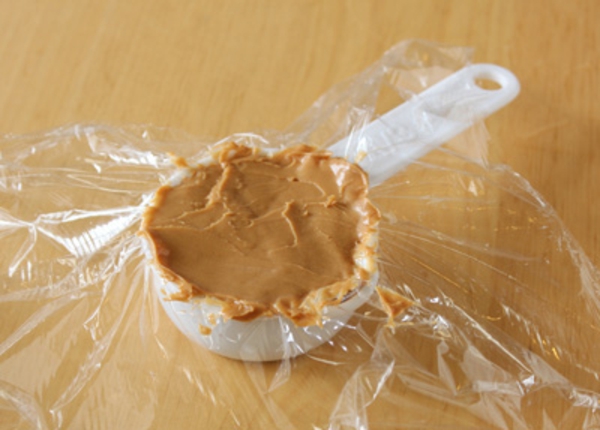 By the way, here's my favorite tip about baking with peanut butter. Line your measuring cup with cling wrap before you measure out the peanut butter. It keeps your cup clean, and it's easy to pre-measure the peanut butter and have it ready to go. When you need to use it, just flip the cling wrap upside down and the peanut butter will fall right out! No more scraping it from measuring cups then washing them afterwards!
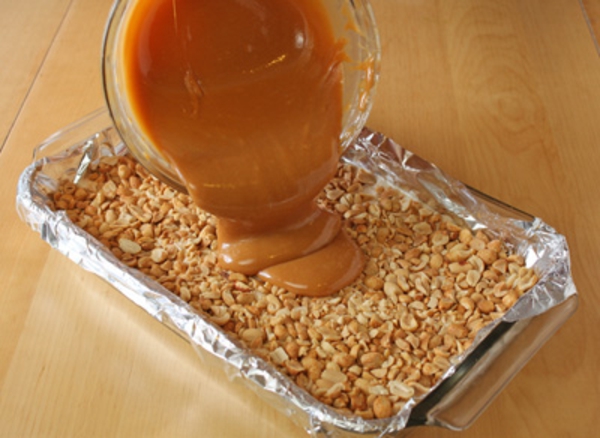
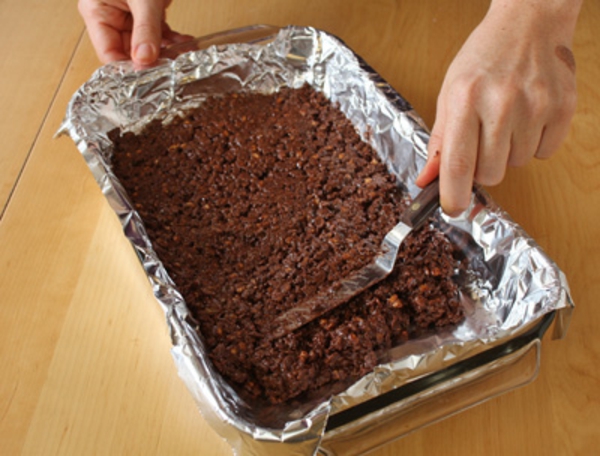 But back to the recipe. Line a 7x11-inch pan with foil, and spray the foil with nonstick cooking spray. (If you don't have this size, you can use a 9x13 pan and just have thinner bars, or you can try using two loaf pans or smaller square pans.) Scrape the cereal mixture into the pan and smooth it into an even layer. Refrigerate the pan to set the chocolate while you prepare the nougat layer.
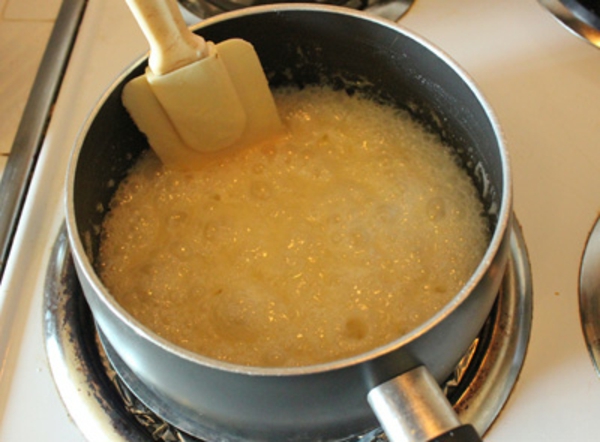 In a medium pan, combine 4 tablespoons of butter, the sugar, 1/4 cup of heavy cream, and 1 tablespoon of light corn syrup. Place the pan over medium heat and stir until the sugar melts. Bring the pot to a boil, then cook it for five minutes, stirring occasionally as it boils.
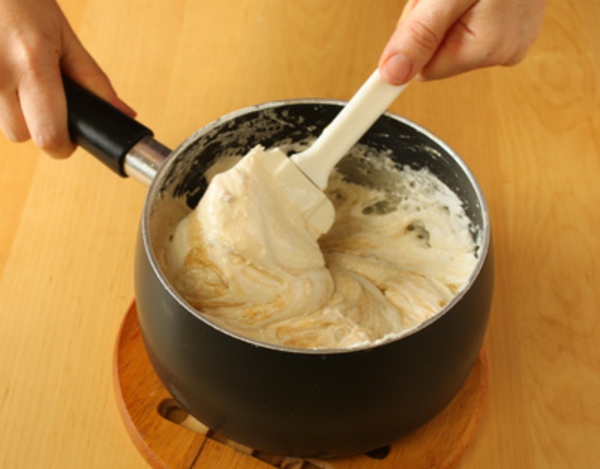 After five minutes, take the pan off the heat and add the marshmallow cream and 1/3 cup of peanut butter. Stir until everything is well-mixed, then spread the nougat on the chocolate layer.
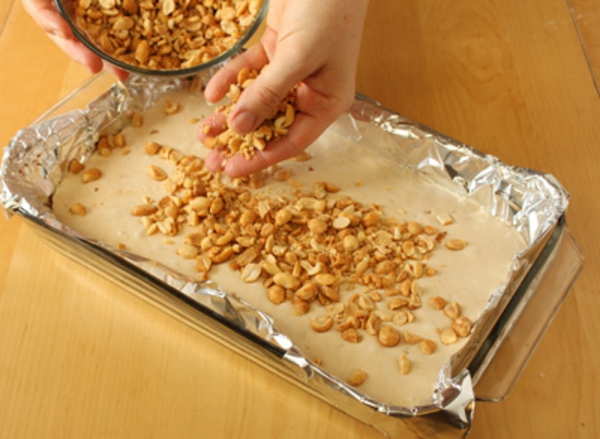 Immediately take the chopped peanuts and sprinkle them over the nougat, then press down gently to embed them in the top of the nougat. Refrigerate the tray again while you prepare the caramel.
 Place the unwrapped caramel candies in a microwave-safe bowl, along with 2 tablespoons of heavy cream and 1 tablespoon of butter. Microwave the caramels, stirring after every 30-40 seconds, until they're melted and smooth.
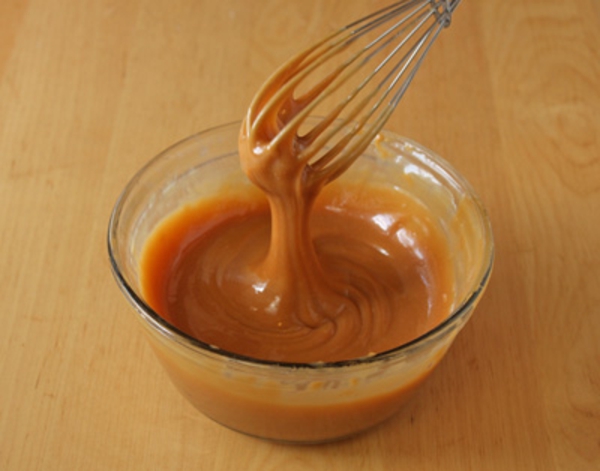 At first the caramels will resist melting, but keep heating and stirring them and they will eventually break down. The caramel is ready when it flow smoothly from the spoon.
 Pour the caramel over the peanut and nougat layer, and--you guessed it!--smooth it into an even layer. Refrigerate the tray for about 30 minutes, until the caramel is fairly set.
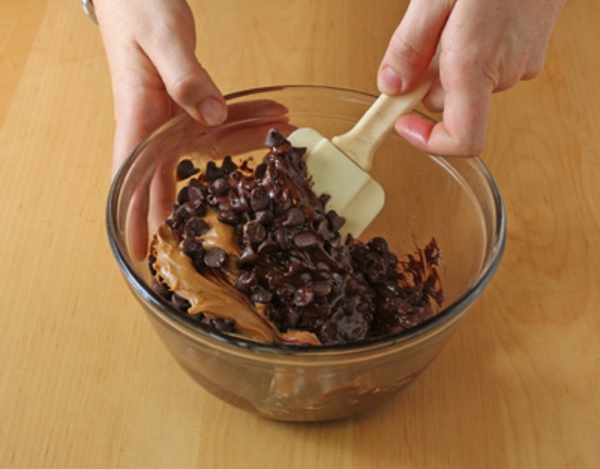 Time for the last layer! Combine the remaining 8 oz chocolate chips, 4 tablespoons peanut butter, and 2 tablespoons corn syrup. Microwave them all together in 30-second intervals until everything is melted. Add the remaining 1/4 cup of heavy cream and whisk it in until your mixture is shiny and smooth.
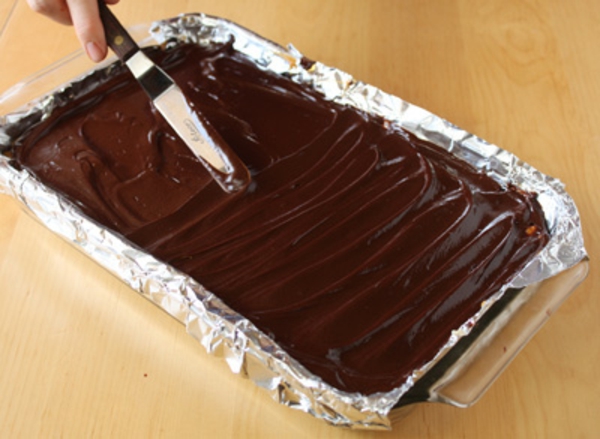 Pour the chocolate on top of the pan and smooth it into an even layer. Refrigerate the pan until everything is completely set, another 30-45 minutes.
 To cut the bars, lift them out of the pan using the foil as handles. Use a large sharp knife to cut them into small squares to serve.
 These beauties will get soft if they're left in warm temperatures for too long, so store them in an airtight container in the refrigerator. They should last 2 weeks, if you can resist eating them for that long. Enjoy!
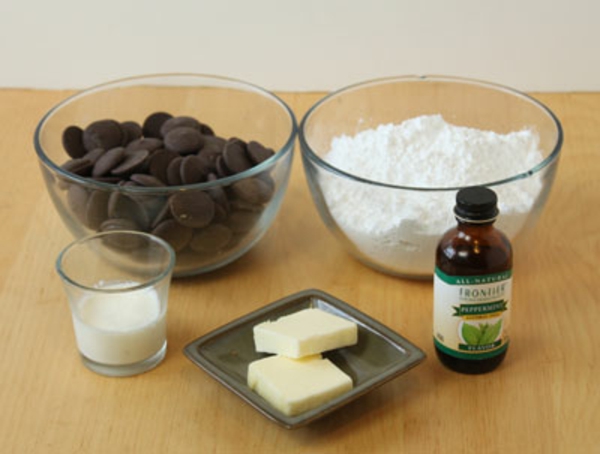
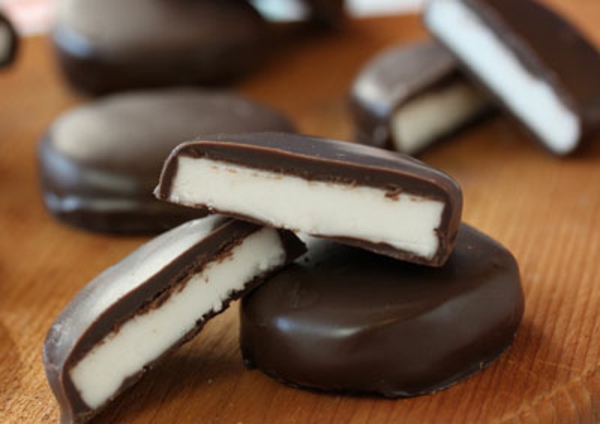
 Unlike store-bought peppermint patties, though, these don't contain corn syrup, artificial flavors, or something mysteriously called "PGRP." Chances are, you have all the ingredients to make homemade peppermint patties in your kitchen already! Read on if you want to learn how it's done...
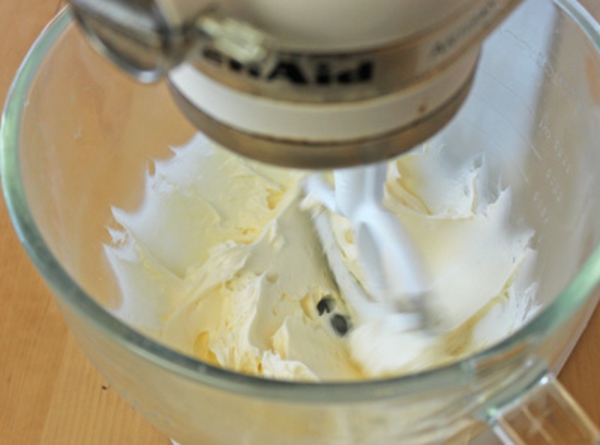
 Homemade Peppermint Patties
yield: 36 patties
Homemade Peppermint Patties
yield: 36 patties
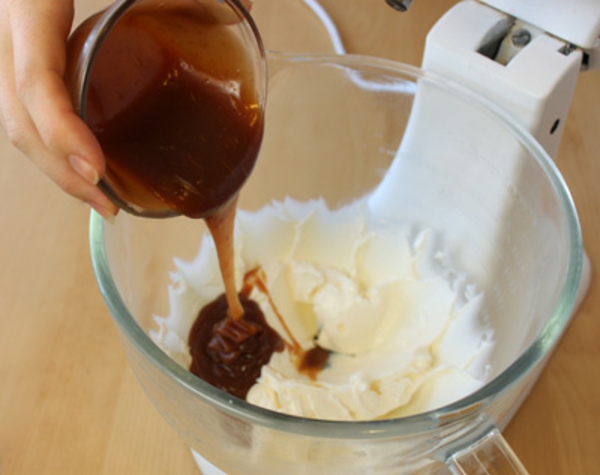
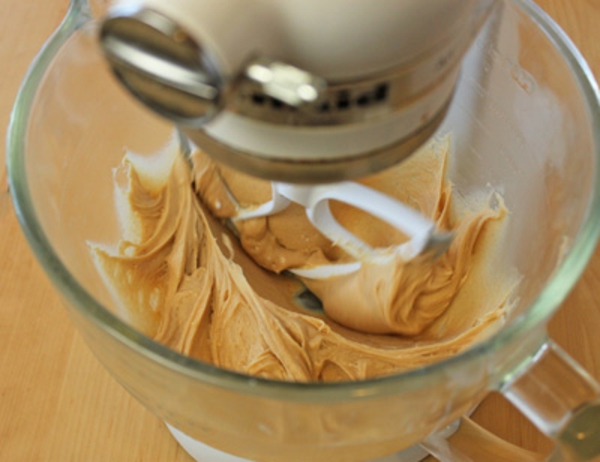
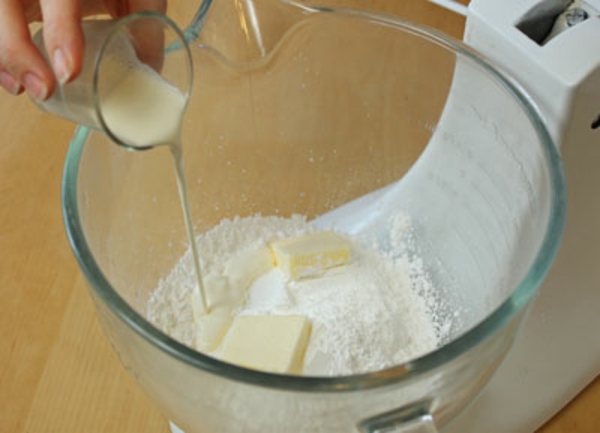 In a mixing bowl, combine the powdered sugar, butter, peppermint extract, and cream. Beat them with a paddle attachment until the mixture comes together.
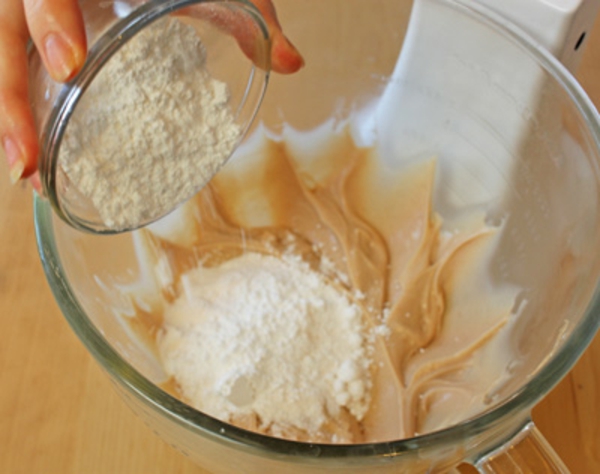
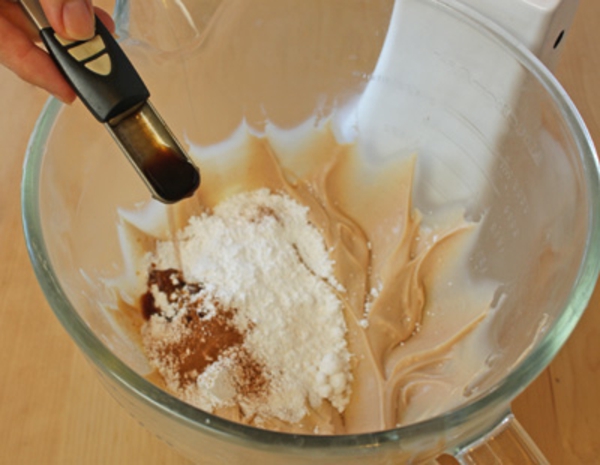
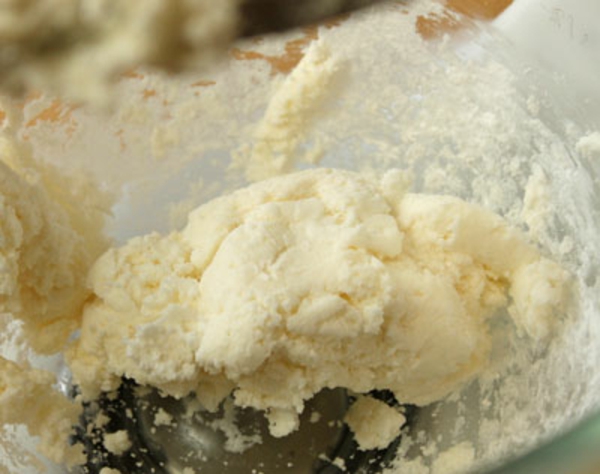 Don't be alarmed if it looks like this at first--it will be dry and crumbly as you start mixing it.
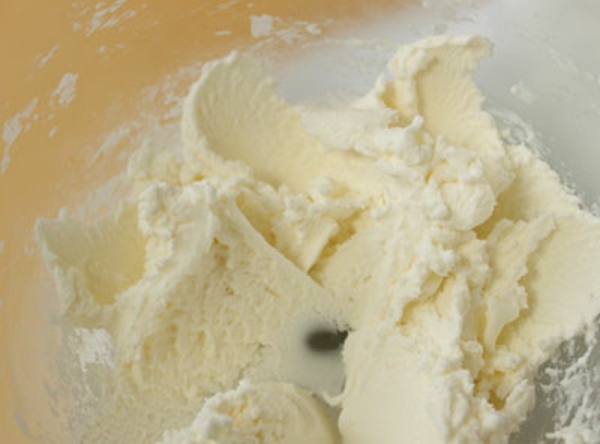 Turn the mixer speed higher and beat until the candy comes together and is light and creamy. When you touch it, it should be soft but not at all sticky. If it seems sticky, add a little more powdered sugar, a few tablespoons at a time, until it's no longer sticky. It should be very stiff, like Play-Doh.
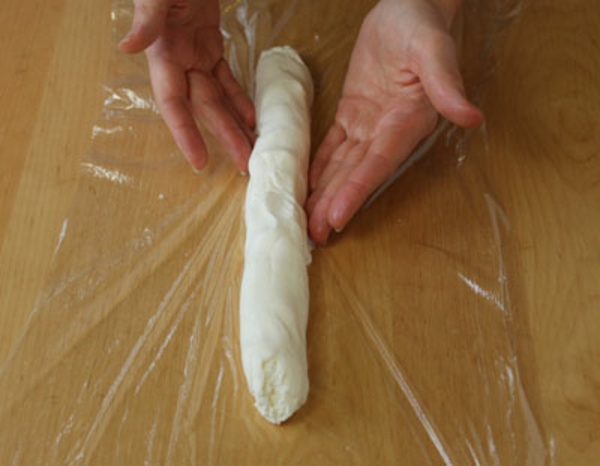 Scrape the candy paste out onto a long piece of cling wrap, and form it into a thin tube, about 1 1/2 inch in diameter. Wrap it well in cling wrap and twist the ends so that it stays in place.
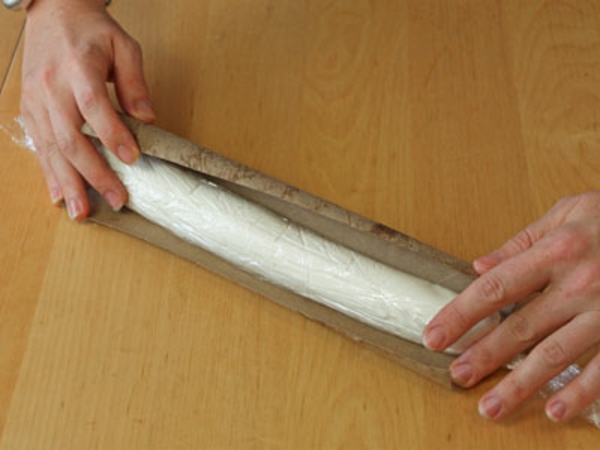 This step is optional, but it's a nice trick I've learned. To keep your candy round on the bottom, cut a slit in an old cardboard paper towel tube, and put the candy inside. This will help keep the bottom from flattening as it sits in the refrigerator. This also works for rolls of cookie dough!
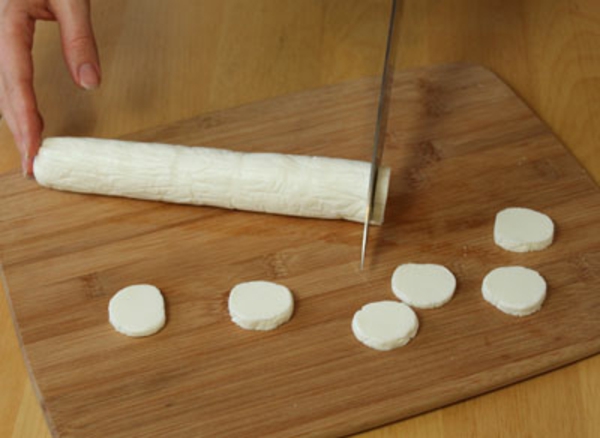 Chill the candy until it is very firm, about 45 minutes. Once firm, use a large sharp knife to slice off rounds about 1/4 inch thick. You should get about 36 candies from this recipe.
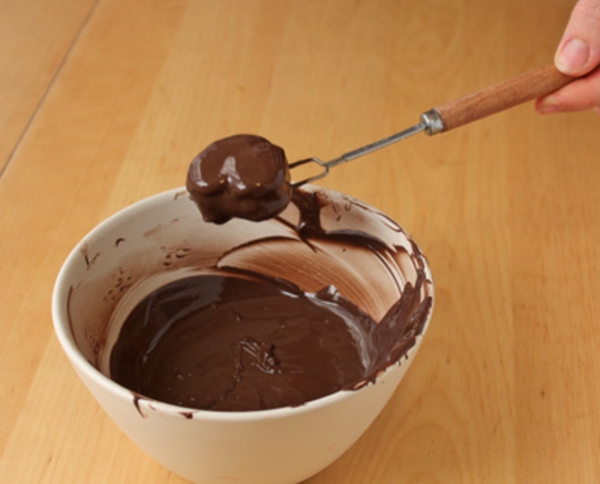
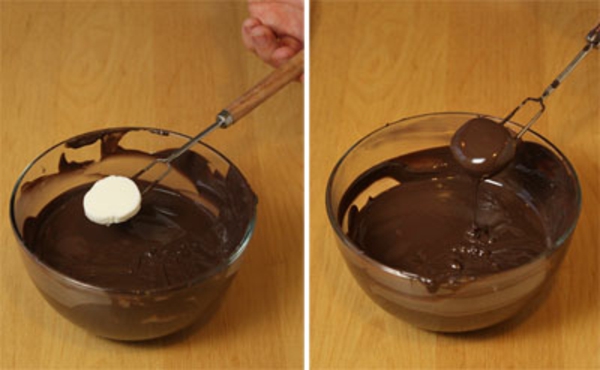 Melt the Melting Chocolate Wafers in the microwave. Melt in 30-second increments, stirring after every 30 seconds to prevent overheating.
Use a fork or dipping tools to dip a patty completely into the melted coating. (I like to drop it in, put the fork under it, flip it upside down, and then flip it again so the fork is on the bottom and bring it up out of the coating. I think the flipping method is easier than pushing the candy down into the chocolate and then fishing it out again.) Let the excess coating drip back into the bowl.
Melt the Melting Chocolate Wafers in the microwave. Melt in 30-second increments, stirring after every 30 seconds to prevent overheating.
Use a fork or dipping tools to dip a patty completely into the melted coating. (I like to drop it in, put the fork under it, flip it upside down, and then flip it again so the fork is on the bottom and bring it up out of the coating. I think the flipping method is easier than pushing the candy down into the chocolate and then fishing it out again.) Let the excess coating drip back into the bowl.
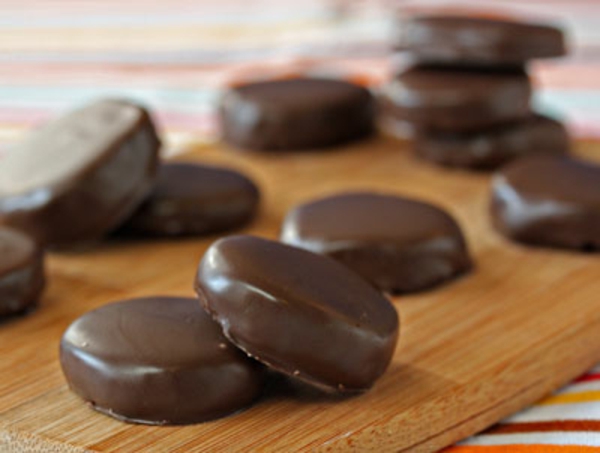
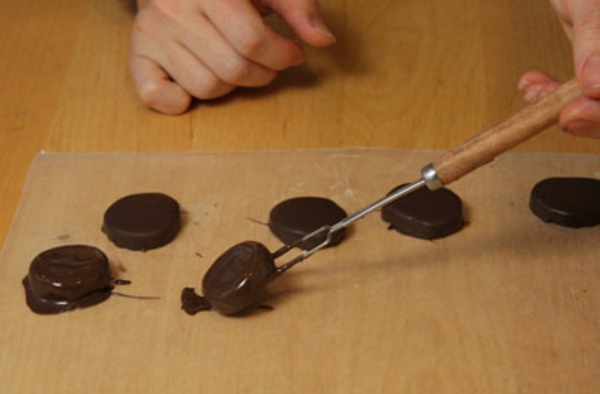 Set the dipped peppermint patty onto a piece of parchment or waxed paper, and repeat the dipping process with the remaining peppermint patties. If they get too soft to dip, chill them briefly in the refrigerator until they're firm again.
Let the patties set at room temperature. The great thing about using Melting Chocolate Wafers is that they always set quickly at room temperature, and always produce a nice shiny coating! If desired, you can trim any uneven edges or "feet" from your candies once they've set.
Set the dipped peppermint patty onto a piece of parchment or waxed paper, and repeat the dipping process with the remaining peppermint patties. If they get too soft to dip, chill them briefly in the refrigerator until they're firm again.
Let the patties set at room temperature. The great thing about using Melting Chocolate Wafers is that they always set quickly at room temperature, and always produce a nice shiny coating! If desired, you can trim any uneven edges or "feet" from your candies once they've set.
 Store your homemade peppermint patties in an airtight container at room temperature for up to two weeks. These are so tasty, I doubt they'll last that long! You can also use them in baking recipes, just like you would store-bought patties. Try chopping them up and adding them to brownies, cookies, or cupcakes.
 Another fun variation is to change the flavor of extract to make different flavored centers. Try vanilla, almond, or coconut! You'll find that the creamy texture and chocolate coating goes well with everything.
Here are a few more great candy recipes from the Oh Nuts blog:
Another fun variation is to change the flavor of extract to make different flavored centers. Try vanilla, almond, or coconut! You'll find that the creamy texture and chocolate coating goes well with everything.
Here are a few more great candy recipes from the Oh Nuts blog:
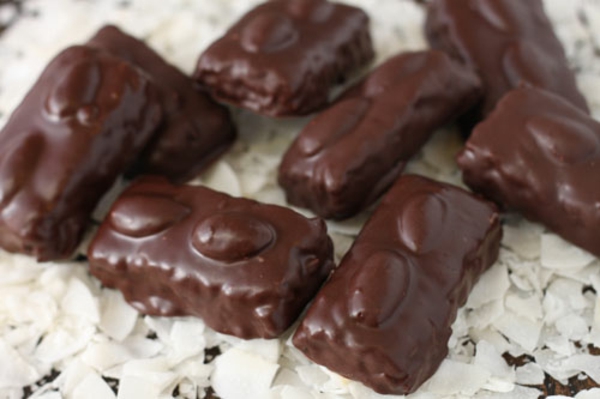
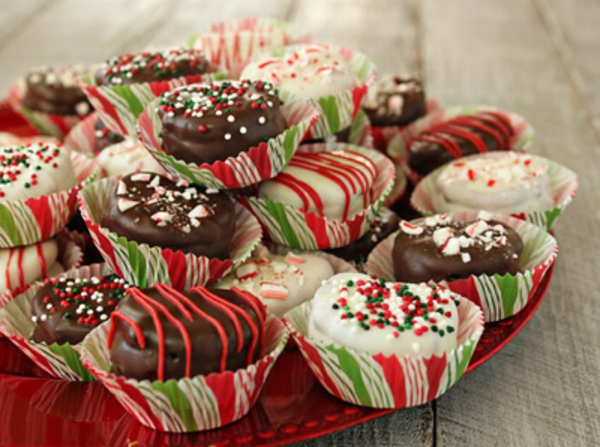 These are sweet and salty candies that are perfect for serving at parties, packaging as edible gifts, or leaving on a plate for Santa.
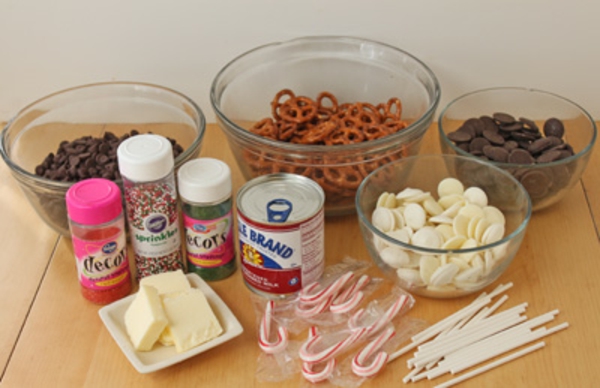 Fudge-Stuffed Pretzels
yield: 80 pieces
Fudge-Stuffed Pretzels
yield: 80 pieces
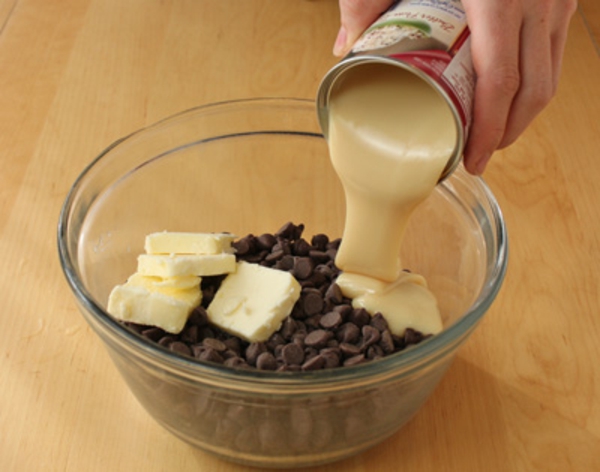 Start by making the fudge filling. Combine the semi-sweet chocolate chips, the condensed milk, and the butter in a large microwave-safe bowl.
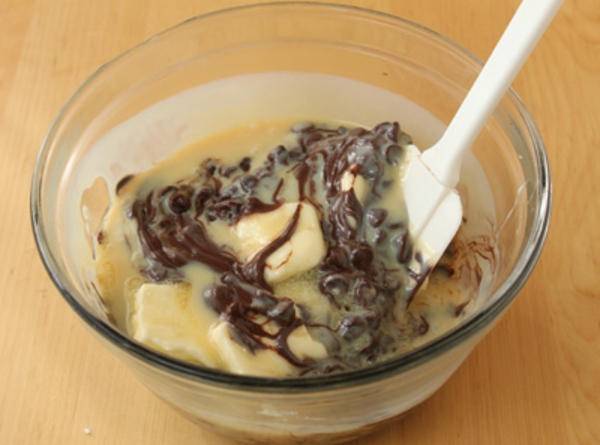 Microwave the mixture for one minute, and then stir. If the chips are not melted completely, place the bowl back in the microwave for an additional 20-30 seconds, then heat and stir it again. Continue to heat it in small bursts until the chips are melted and everything is well-mixed.
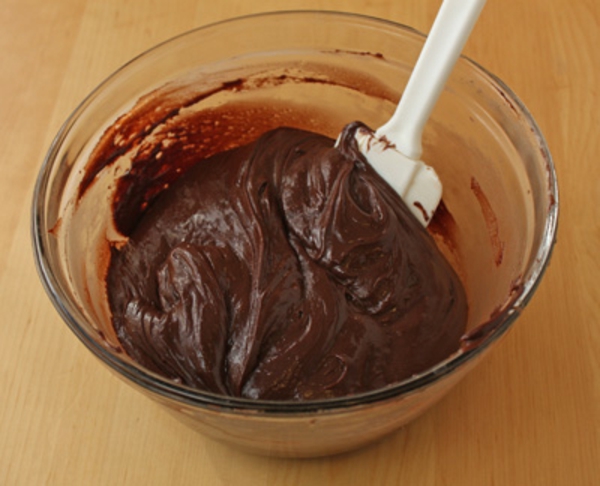 When your fudge is finished, it should be shiny, smooth, and thick. At this point it's a little too soft to use straight away, so press a layer of cling wrap on top of the fudge and refrigerate it for about 20 minutes. It should be the texture of thick peanut butter when you're ready to use it. If it's left in the refrigerator for too long, it will get very thick and hard to work with, so keep a close eye on it in the refrigerator.
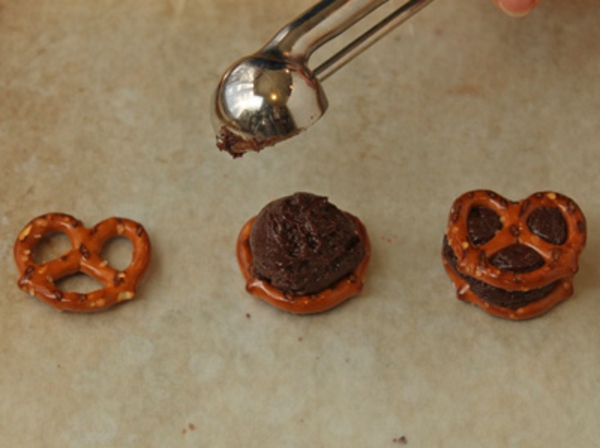 To assemble the Fudge-Stuffed Pretzels, place a pretzel on a baking sheet lined with parchment or waxed paper. Place a small spoonful of fudge on top of the pretzel--about a teaspoon, or a little less, is the perfect amount.
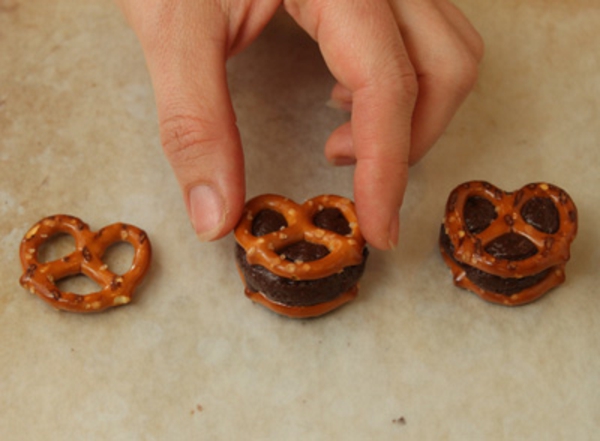 Add another pretzel on top and press down gently until the fudge is spread out to the sides and it's in an even layer.
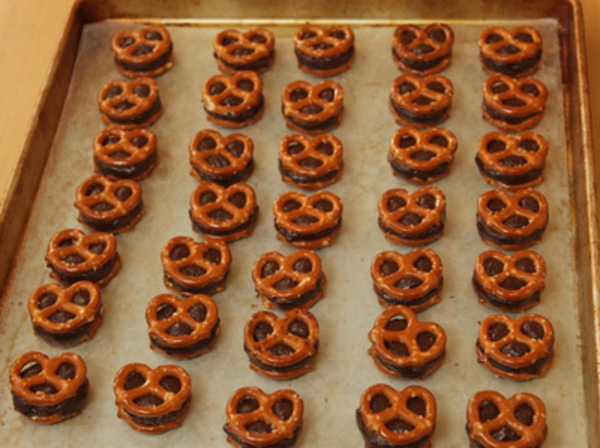 Continue to assemble the pretzel sandwiches until you've used all of the fudge filling. This recipe will make about 80 pieces, so you'll probably need 2 or 3 baking sheets to hold them all! Refrigerate the tray briefly until the fudge layer is firm, about 20 more minutes.
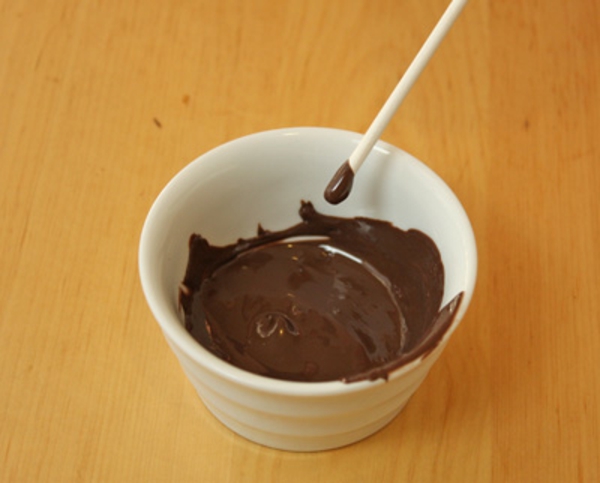 An alternate method is to make these into lollipops instead. If you'd like to turn these into pops, melt a small amount of the candy coating in the microwave, then dip the very tip of a lollipop stick into the coating.
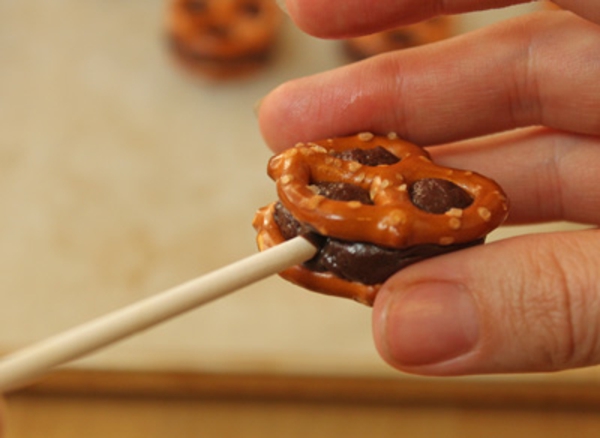 Press the chocolate-tipped stick into the fudge layer at the bottom of the pretzel. The chocolate will help the stick adhere and will make your lollipops secure. Rest the pretzel back on the baking sheet for a few moments until the coating has set, then proceed with the rest of the recipe.
 To dip the pretzels, melt each type of candy coating individually. Use forks or dipping tools to dip the pretzels one at a time in the coating, pressing them down so that they're submerged completely, then lifting them out of the coating and letting the extra drip back into the bowl. Scrape the bottom against the lip of the bowl, then set the pretzel back down on the baking sheet.
 If you've made pops, the process is even easier! Just hold one end of the lollipop stick and use it as a handle to dip the pretzels into the melted coating.
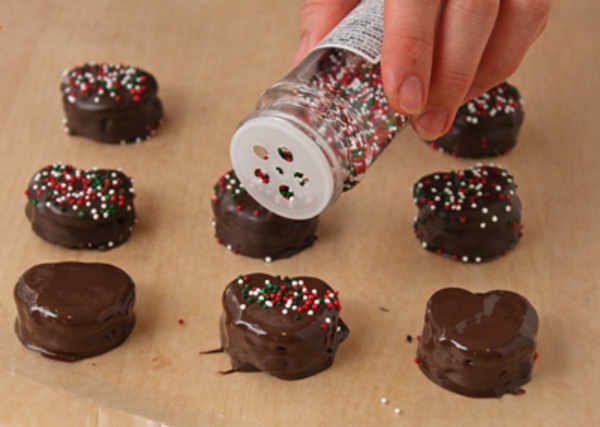 Dip about 4-6 pretzels at a time. While the coating is still wet, sprinkle the tops of the pretzels with holiday sprinkles, colored sugar, crushed candy canes, or any other decorations you'd like. A pinch of flaked sea salt is also delicious, and adds to the sweet-and-salty theme!
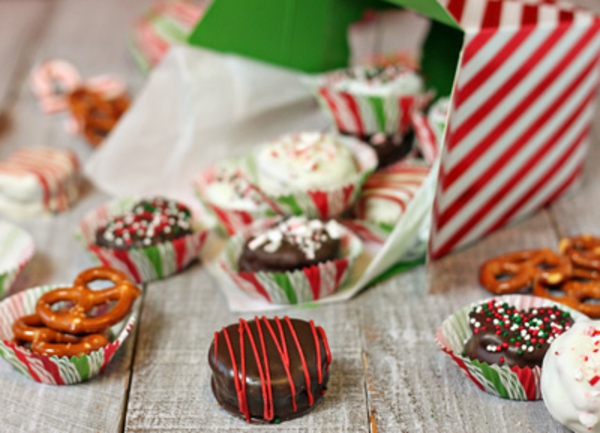 Fudge-Stuffed Pretzels will keep in an airtight container at room temperature for several weeks. Serve them in decorative candy cups, gift them in festive tins, or just eat them plain by the handful! Happy holidays!
 All text and images (c) Elizabeth LaBau]]>
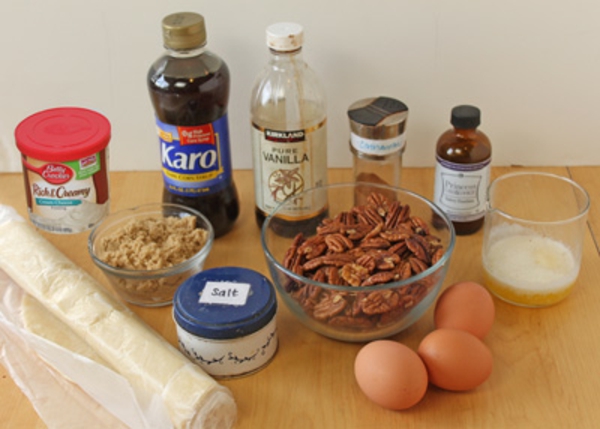
 Because time is at a premium around the holidays, this recipe takes some shortcuts and calls for premade pie dough and frosting. If you have extra time, though, feel free to make your own dough and frosting--it will only make the pie better!
 Cinnamon Bun Pecan Pie
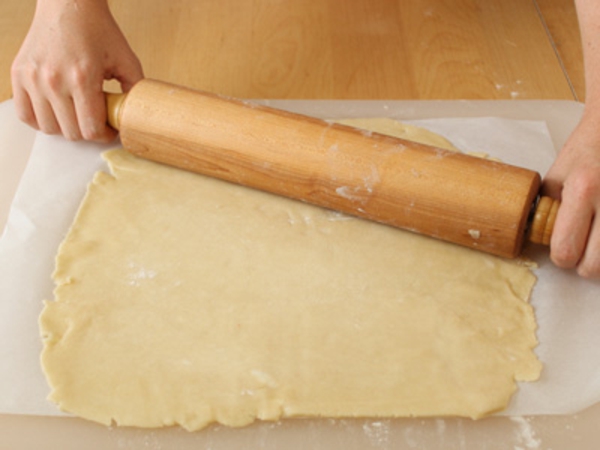 Start with dough that is slightly chilled but still pliable. Roll out the dough on a lightly floured piece of parchment or waxed paper until it's a little less than 1/4-inch thick.
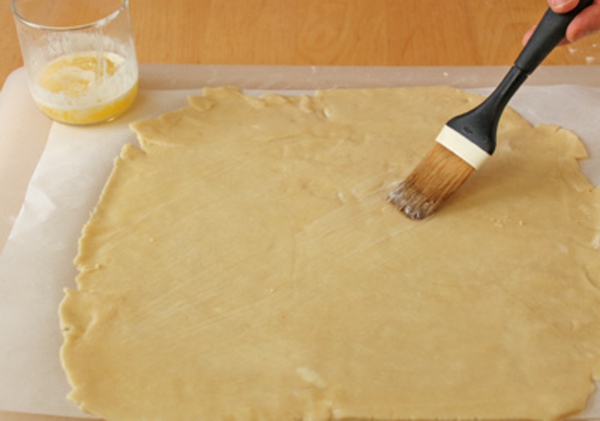 Brush 1 tablespoon of the butter on top of the crust--this is just a thin layer of butter for the cinnamon to stick to. Leave the rest of the melted butter to put in the filling.
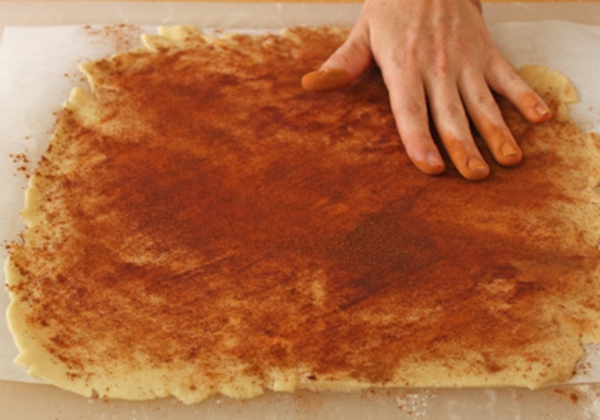 Sprinkle 2 teaspoons of the cinnamon on top of the crust, and spread it around with your hands. It would be really delicious if we could use cinnamon sugar, but the sugar would leak out and make a mess, and would probably glue the pie to the tin...so just plain cinnamon it is.
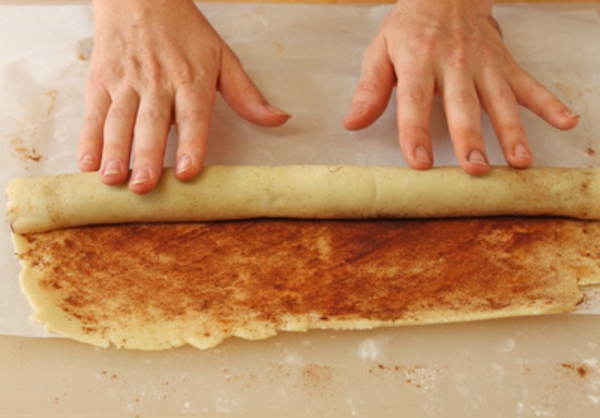 Use the edge of the parchment or waxed paper to start rolling the dough over onto itself. Roll it up into a tight spiral.
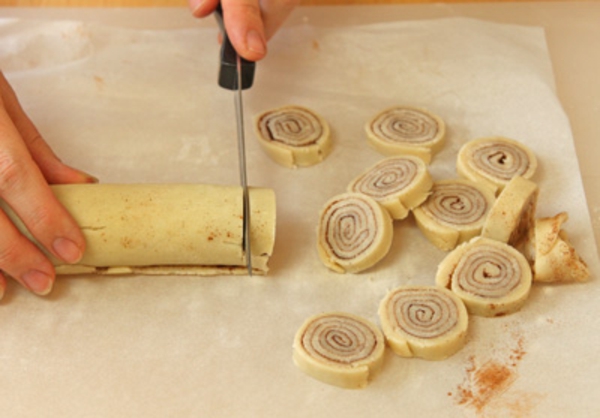 Use a sharp serrated knife to cut the spiral log into rounds, about 1/2-inch thick. If your dough has become too soft to cut cleanly, or is getting smashed down during the process, refrigerate or freeze it briefly until it is firm enough to cut.
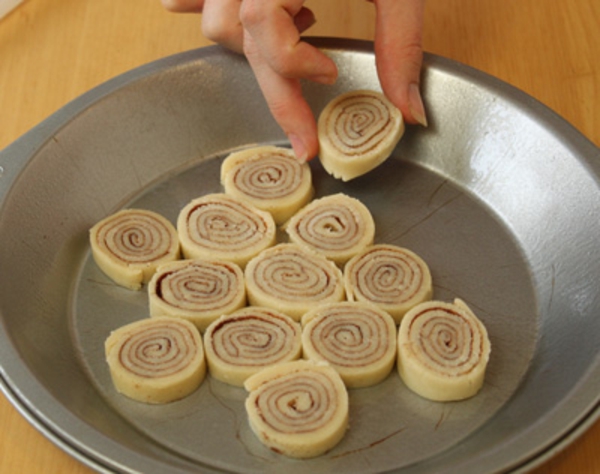 Spray a 9-inch pie tin with nonstick cooking spray, or rub it liberally with butter. Start placing the cinnamon swirl pie pieces in the pan so that they are touching each other. No need to be too precise or worry about a pattern or anything like that!
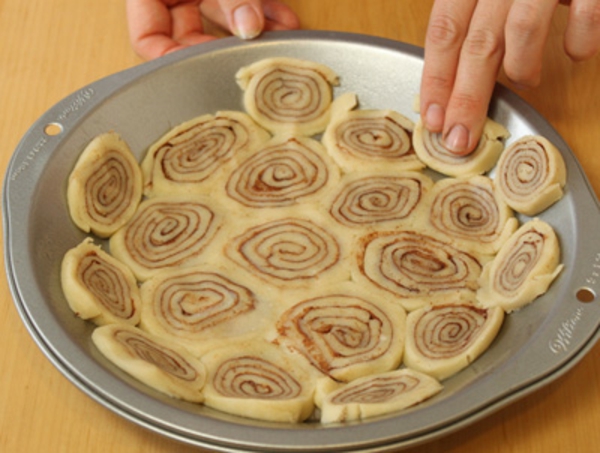 When you've put over half of the pieces in the pie tin, begin to flatten them with your fingers, pressing them down so that they expand and fill all of the gaps. You shouldn't see any empty space between the pieces! Try to get them all about the same depth.
Once you've started the process of pressing them together, you can see where you have gaps in the crust, or areas at the top that need to be filled in. So add the remaining pie rounds, and press everything together until you have a solid crust in an even thickness.
When you've put over half of the pieces in the pie tin, begin to flatten them with your fingers, pressing them down so that they expand and fill all of the gaps. You shouldn't see any empty space between the pieces! Try to get them all about the same depth.
Once you've started the process of pressing them together, you can see where you have gaps in the crust, or areas at the top that need to be filled in. So add the remaining pie rounds, and press everything together until you have a solid crust in an even thickness.
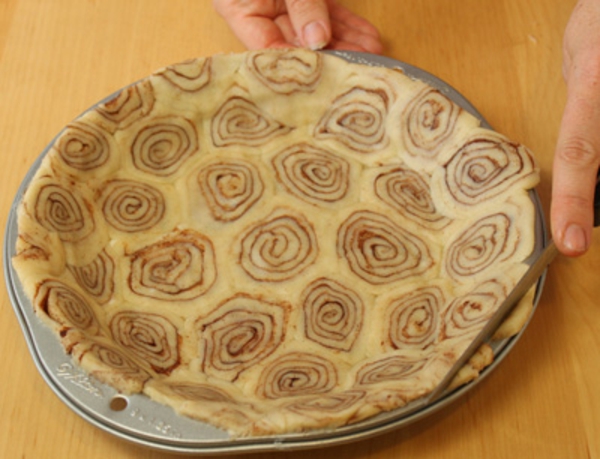 The top will be a little raggedy, so use a sharp paring knife to trim the edges so that they are smooth and even all the way around.
Once the crust is made, place it in the refrigerator to chill while you mix up the filling, and preheat the oven to 375 Fahrenheit.
The top will be a little raggedy, so use a sharp paring knife to trim the edges so that they are smooth and even all the way around.
Once the crust is made, place it in the refrigerator to chill while you mix up the filling, and preheat the oven to 375 Fahrenheit.
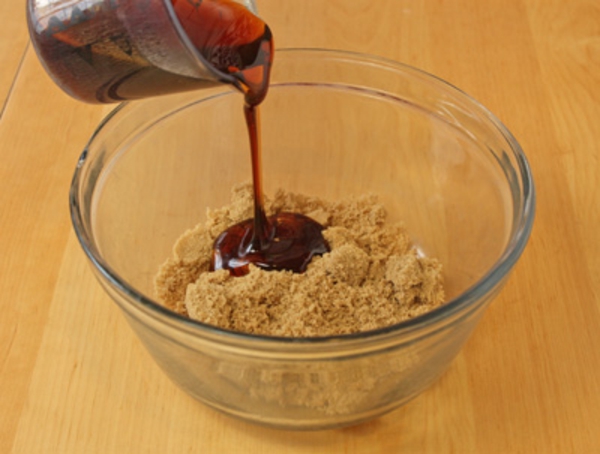 This filling is so easy and fast to make! All you need is one bowl and a whisk. In a large bowl, combine the corn syrup and the brown sugar. Whisk them together until there are no lumps of sugar. The mixture will be thick and sticky.
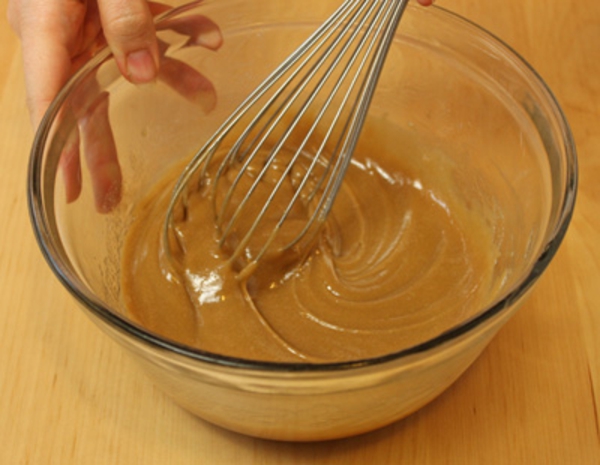 Add the remaining 3 tablespoons of melted butter and whisk it in. Much like your relatives after a nice turkey dinner, the mixture will loosen up a little bit.
 Add the eggs one at a time, whisking well after each addition, until you can't see any streaks of egg remaining.
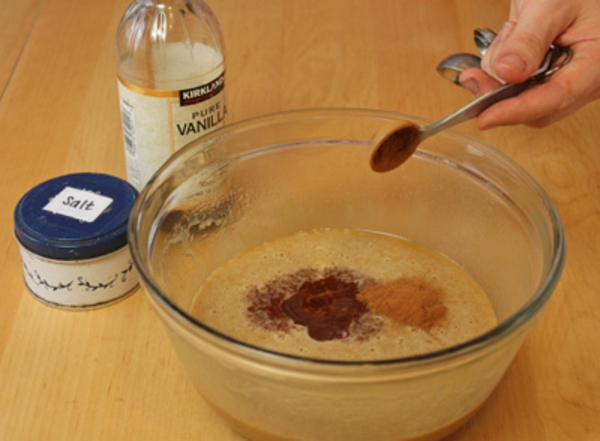 Finally, add all the flavorings: the vanilla, the salt, the remaining 2 teaspoons of cinnamon, and the cake and cooking flavoring, if you're using it. Whisk everything well until it's entirely blended.
 Just a quick note about the cake and cooking flavoring: this is a little trick to getting that signature "cookie" or "dough" taste! It's often used in commercial kitchens, so you will probably recognize the flavor even if you think you've never tasted it before. I use it in this pie to reinforce the flavors of cinnamon buns--it just adds a special something that reminds me of warm rolls. However, it is completely optional, and you won't be missing anything if you decide to skip it. If you are interested in finding it, it's often found in well-stocked cake or culinary supply stores, or it's readily available on the internet.
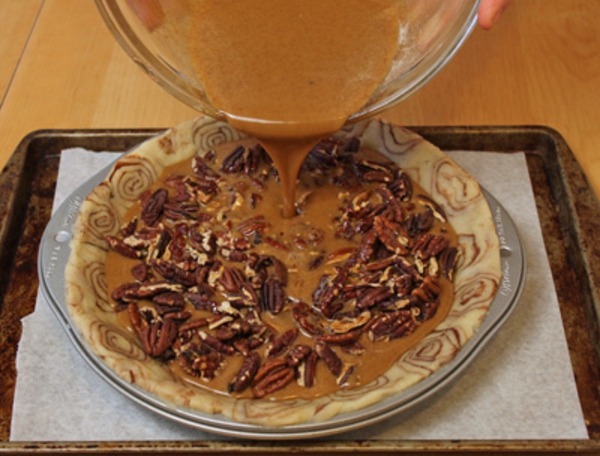 Once all of the filling ingredients are mixed together, place the toasted pecans in the bottom of the pie shell, then carefully pour the liquid filling on top.
Put the pie on a baking sheet lined with parchment or foil, to prevent any oven nastiness should it accidentally spill over. Bake the pie in the 375 F oven for 15 minutes.
Once all of the filling ingredients are mixed together, place the toasted pecans in the bottom of the pie shell, then carefully pour the liquid filling on top.
Put the pie on a baking sheet lined with parchment or foil, to prevent any oven nastiness should it accidentally spill over. Bake the pie in the 375 F oven for 15 minutes.
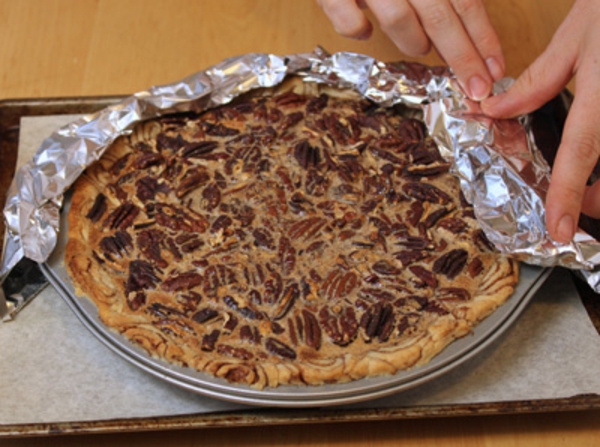 After 15 minutes, remove the pie from the oven.The crust should have some color and look cooked by now, although the center of the pie will be completely raw. The problem is that the crust has a tendency to burn before the filling is cooked through, so the solution is to cover it with foil to prevent burning. Tear off strips of aluminum foil and crimp them along the edges, covering the crust. The center of the pie should remain exposed, so it will cook properly.
Reduce the oven's temperature to 350 F and return the pie to the oven to continue cooking. Cook the pie for an additional 20-25 minutes.
After 15 minutes, remove the pie from the oven.The crust should have some color and look cooked by now, although the center of the pie will be completely raw. The problem is that the crust has a tendency to burn before the filling is cooked through, so the solution is to cover it with foil to prevent burning. Tear off strips of aluminum foil and crimp them along the edges, covering the crust. The center of the pie should remain exposed, so it will cook properly.
Reduce the oven's temperature to 350 F and return the pie to the oven to continue cooking. Cook the pie for an additional 20-25 minutes.
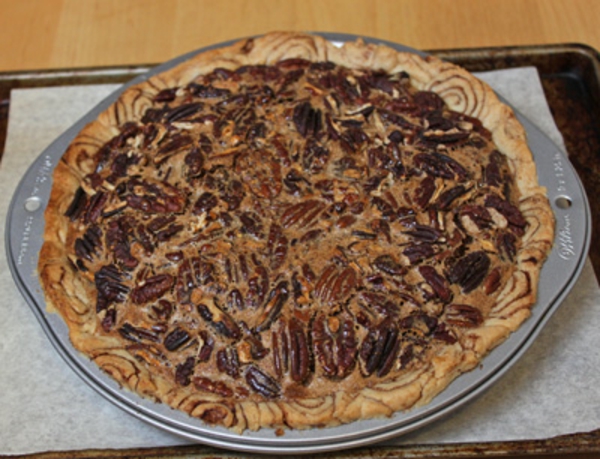 When it is finished, the center of the pie should be puffed and have slight cracks in the surface. When you lightly tap the pie tin, the center should remain steady instead of jiggling. Let the pie cool completely on a wire rack at room temperature.
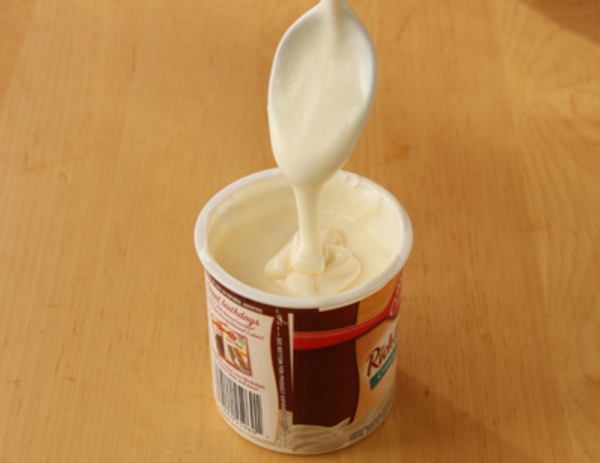 Once cool, it's time to frost this bad boy! Remove the lid from the frosting, and microwave it for 20-30 seconds, then stir well. You want to make the frosting runny enough to pour easily from a spoon. If you're using homemade frosting, thin it out with milk to a consistency that will hold its shape but will drizzle easily.
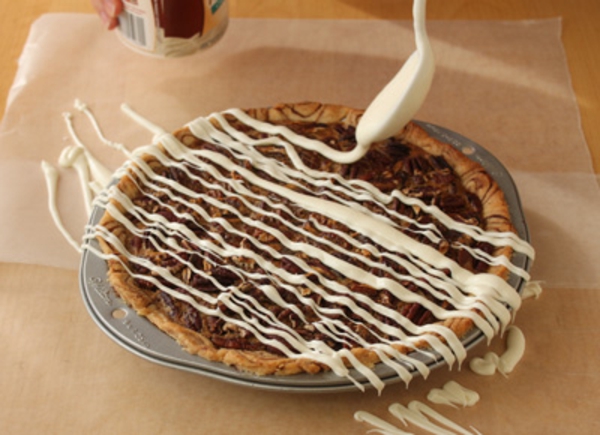 The way you decorate your pie is up to you. I like a casual look, so I drizzled diagonal lines across the top using a spoon--I wanted it to look random instead of overly polished. You could also place the frosting in a piping bag to drizzle it more precisely. Another idea is to omit this step, and instead drizzle frosting on the pieces once they have been cut and plated. All that matters is that your Cinnamon Bun Pecan Pie ends up with a bit of frosting on top!
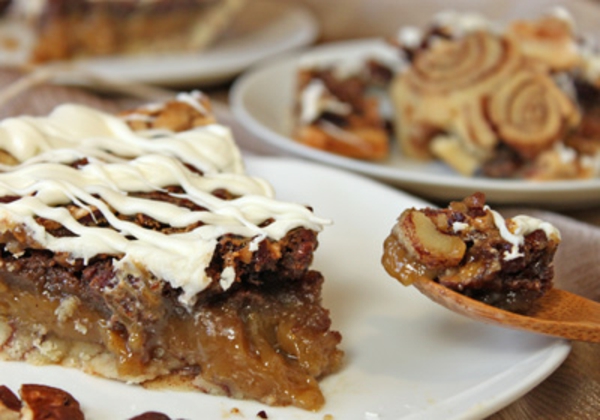
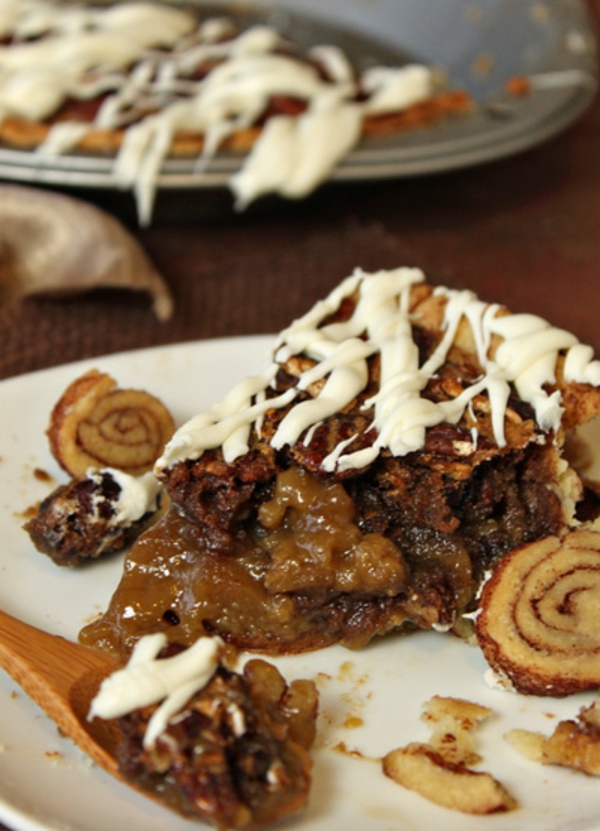
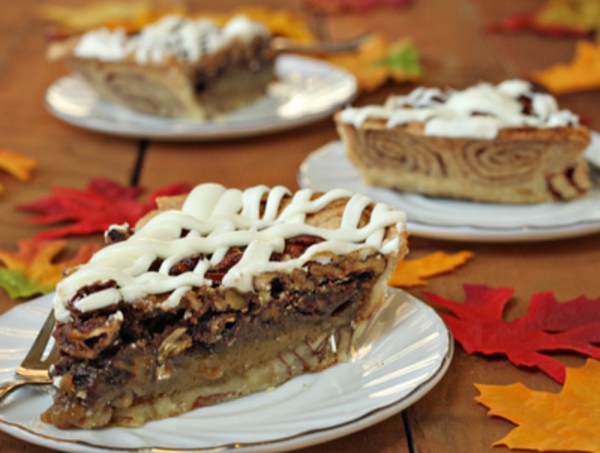 This pie is sure to be a hit at your Thanksgiving table. It's close enough to the classic recipe to please purists, but the fun crust, gooey cinnamon filling, and cream cheese topping will entice those who like to experiment a bit more with their food. The crust is most obvious when the filling is scraped out, or when looking at the back of a slice, like so:
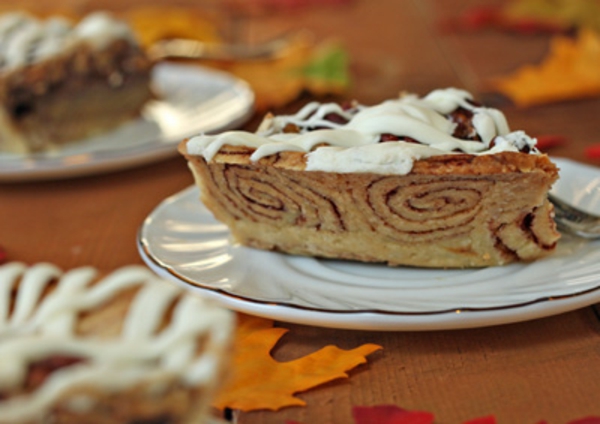 This crust technique is a fun way to dress up your dough, and can be used with just about any pie.
You can store Cinnamon Bun Pecan Pie well-wrapped in the refrigerator, but chances are you won't have an left after the big day. Who could say no to two great tastes in one dessert?
This crust technique is a fun way to dress up your dough, and can be used with just about any pie.
You can store Cinnamon Bun Pecan Pie well-wrapped in the refrigerator, but chances are you won't have an left after the big day. Who could say no to two great tastes in one dessert?
 While enjoying the Cinnamon Bun Pecan Pie, take a moment to check out our Hanukkah Gifts and Christmas nut gifts.
Enjoy!
All text and images (c) Elizabeth LaBau]]>
While enjoying the Cinnamon Bun Pecan Pie, take a moment to check out our Hanukkah Gifts and Christmas nut gifts.
Enjoy!
All text and images (c) Elizabeth LaBau]]>
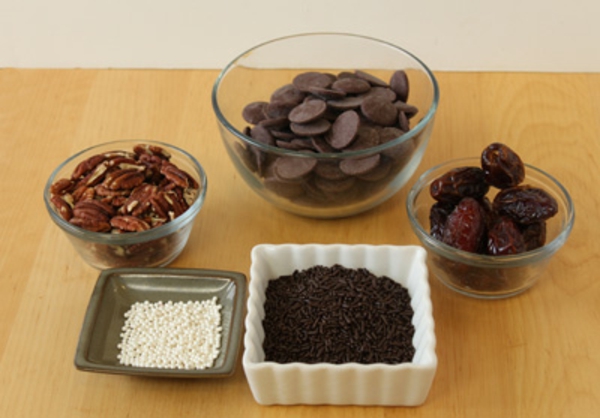
 Chocolate Cockroaches are really fast to make, and can be customized with your favorite nuts or dried fruit. I made mine with pecans and dates, but you could also use walnuts, almonds, Brazil nuts, or dried figs. Here's what you'll need to make these spooky sweets.
 DIY Chocolate Cockroaches for Halloween
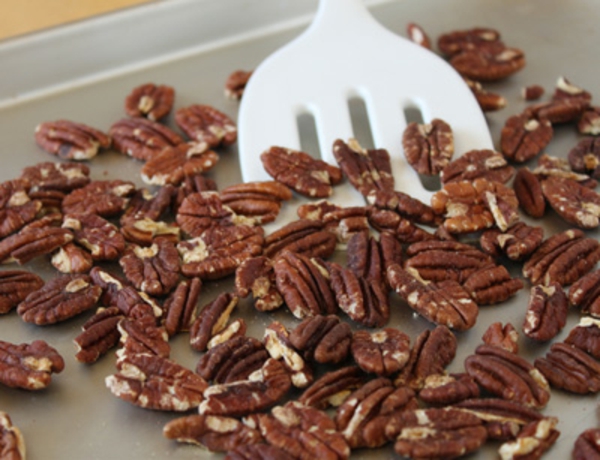 First, prep the ingredients. If your pecan halves are raw, you'll want to start by toasting them to give them a better flavor and texture. Preheat your oven to 350 F and place the pecans on a baking sheet, Toast them for about 10 minutes, stirring halfway through, until they're fragrant and a bit darker. Let them cool completely. If your nuts are already toasted, skip this step.
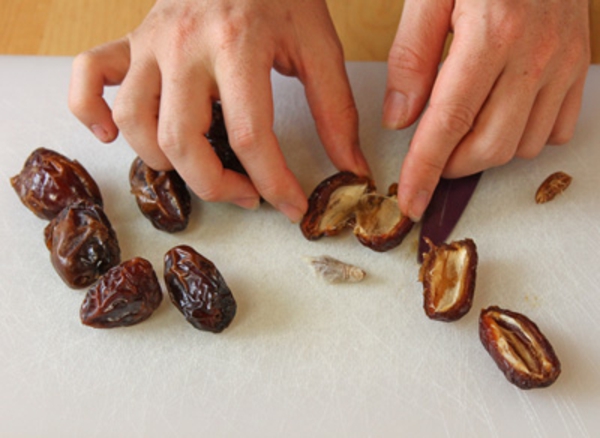 For the medjool dates, you'll need to remove the pits. Use a sharp paring knife to cut the dates in half lengthwise, and remove the pit and the papery skin from inside the date. If your dates are already pitted, simply slice them in half lengthwise.
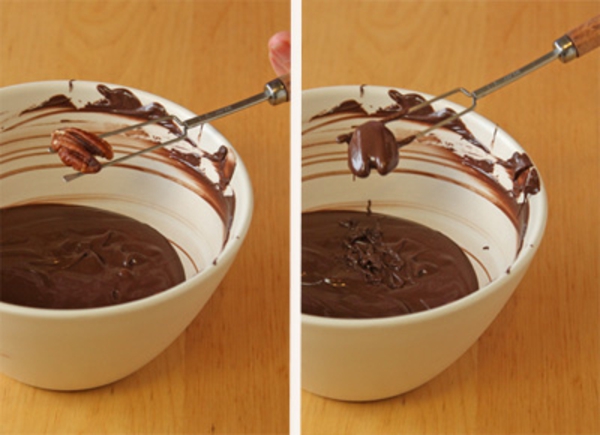 Melt the chocolate candy coating in a microwave-safe bowl in the microwave, stirring after every 30 seconds to prevent overheating. Once it's melted and smooth, use a dipping tool or a fork to dip a pecan half in the coating. Take it out of the bowl and let the extra coating drip back down into the bowl.
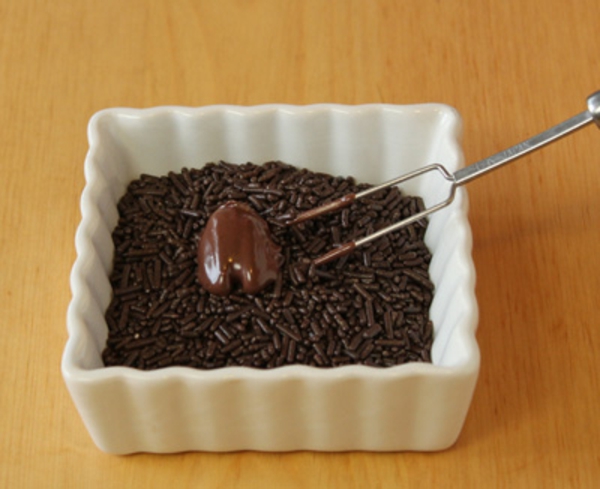 Set the pecan down in a shallow bowl of chocolate sprinkles, and move the fork out from under it so that the sprinkles can adhere to the wet coating. You want to make sure you get a nice layer of cockroach legs, don't you?
 Scoop the pecan back up out of the sprinkles, and gently set it on a layer of wax paper or parchment paper.
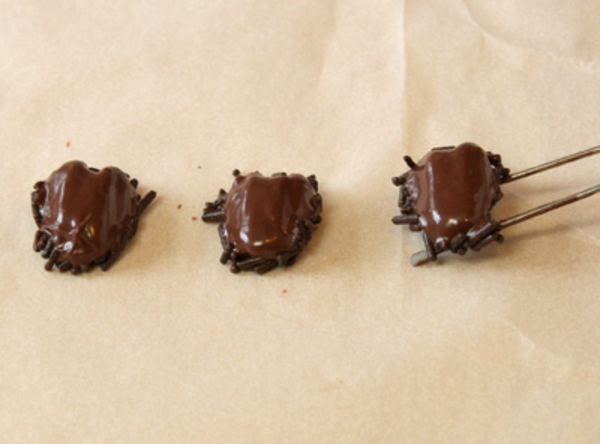
 Repeat the process with a few more pecans or dates. As you can see, the dates are much larger than the pecans, so if you use both fruit and nuts you'll have a nice variety of chocolate cockroaches.
 While the coating is still wet, press two sprinkles on each cockroach for the eyes. Repeat with the remaining pecans and dates, doing them in small batches, until all of your cockroaches are decorated. Let them set at room temperature (or in the refrigerator, if you used chocolate chips instead of coating.)
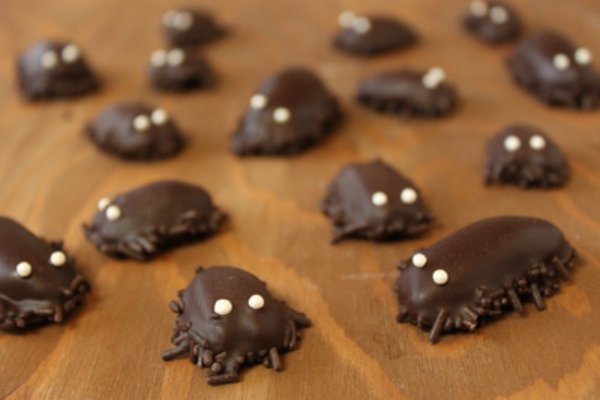
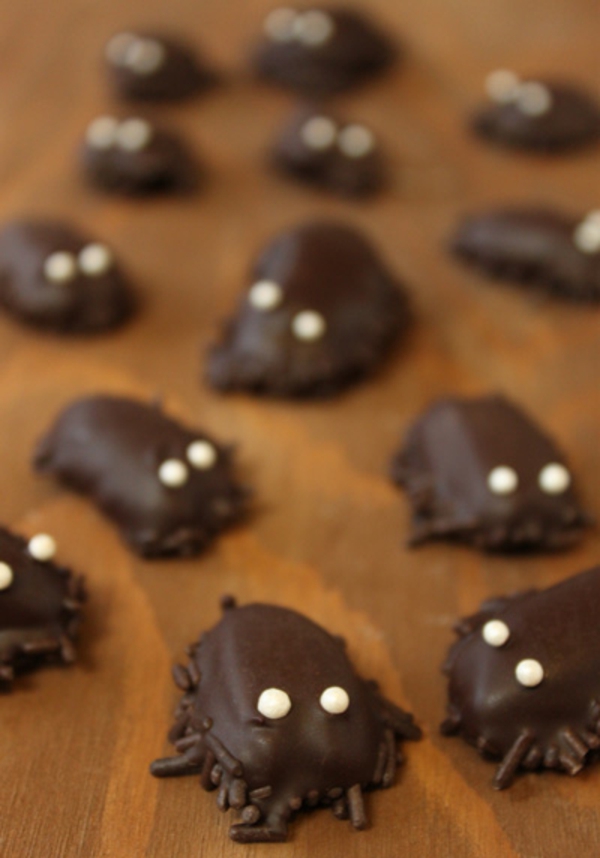 Once the coating is dry, your cockroaches are ready to scurry--I mean scatter--around! Store them in an airtight container at room temperature for up to two weeks.
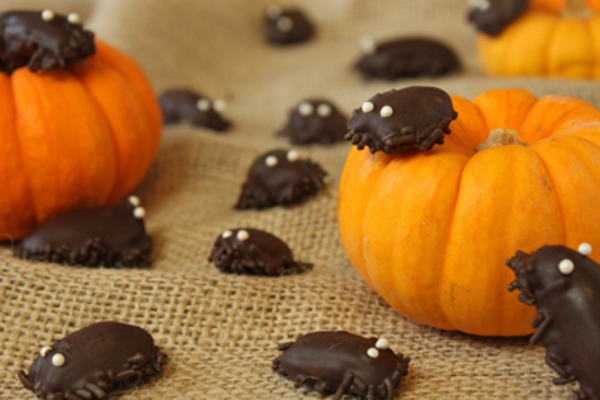 Happy Halloween!
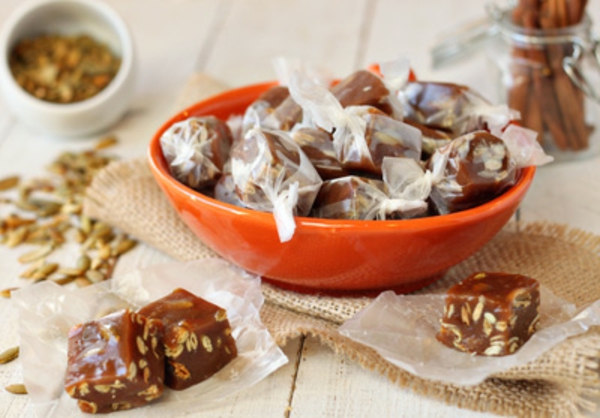
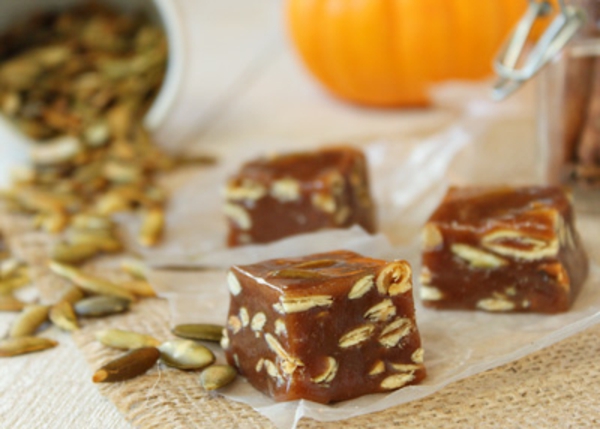
 Pumpkin seeds aren't just for scraping out of your pumpkin before you carve it. When they're hulled and roasted, they're known as pepitas, and they make a wonderful addition to fall baked goods and candies.
 Pepita Caramels (Pumpkin Seed Caramels)
yield: one 8x8-inch pan (about 64 small caramels)
Pepita Caramels (Pumpkin Seed Caramels)
yield: one 8x8-inch pan (about 64 small caramels)
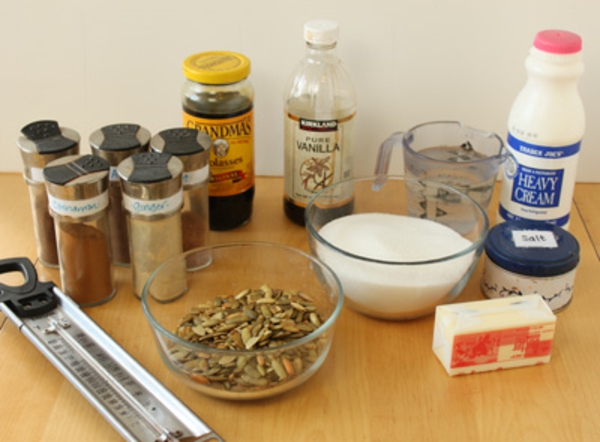
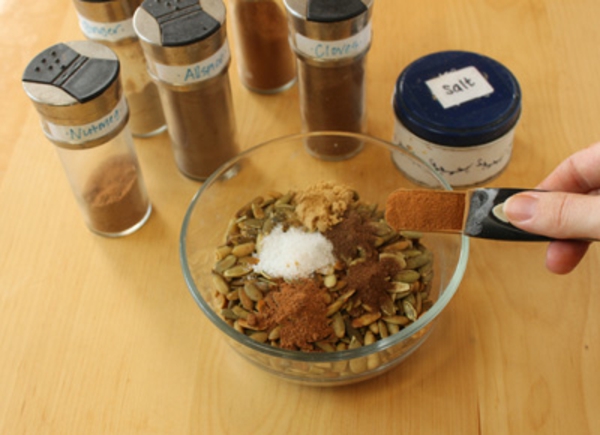 Cover an 8x8-inch baking pan with foil and spray the foil with nonstick cooking spray. Set it aside for now. In a small bowl, combine the pepitas, salt, cinnamon, ginger, nutmeg, cloves, and allspice. Set this aside as well.
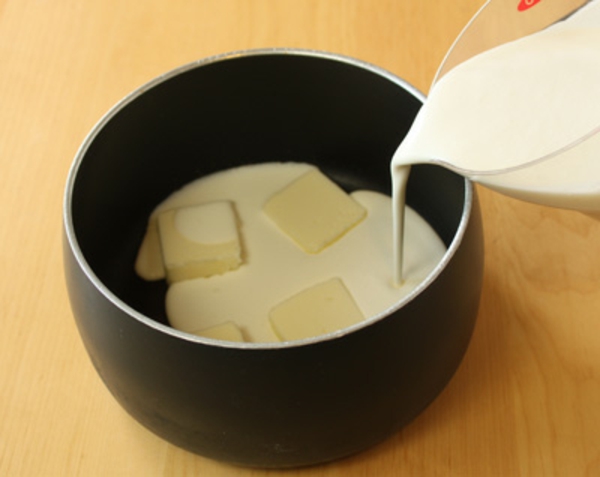 In a small saucepan, combine the heavy cream and 2 ounces of the butter--save the other half of the butter for later.
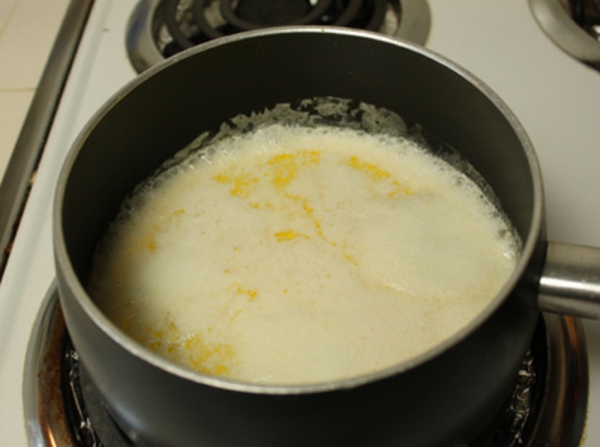 Place the pan over medium heat and bring it just under a boil--the butter will melt, and you should see bubbles forming and popping along the edges of the pan. Remove the pan from the heat, cover it, and set it aside while you prepare the rest of the caramel. The purpose of warming the cream is so that it won't cause the hot sugar to seize when you add it later, the way cold cream might.
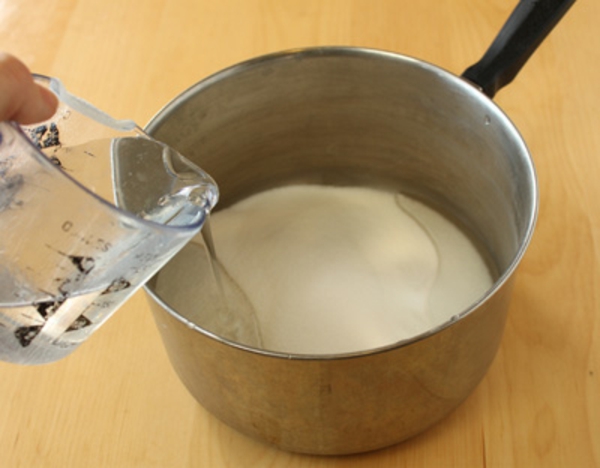 Combine the corn syrup, granulated sugar, and molasses in a medium (4-quart or larger) saucepan.
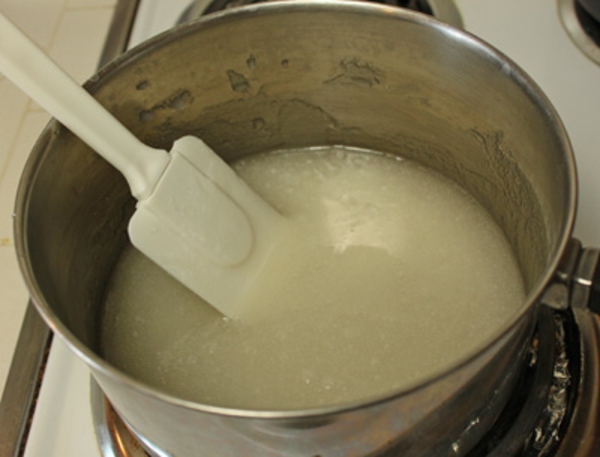 Put the pan over medium-high heat, and stir with a rubber spatula until the sugar has melted.
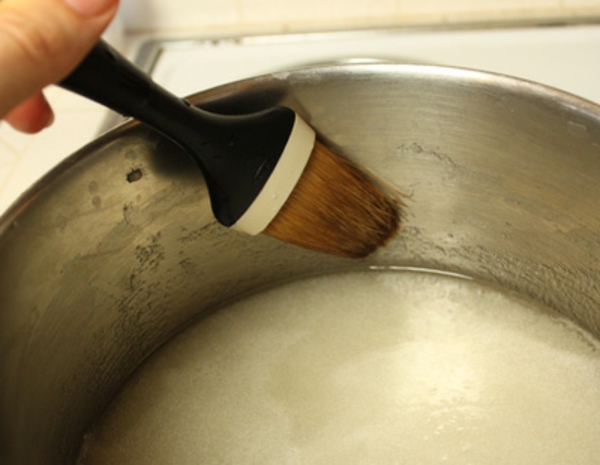 Brush down the sides of the pan with a wet pastry brush. This removes the sugar crystals that are on the pan, and helps prevent sugar crystals from forming in your caramel. Nobody likes grainy caramel!
 Once the sugar syrup comes to a boil, insert the candy thermometer. Continue to cook the candy, without stirring, until it reaches 320 degrees Fahrenheit (160 C). This will take 10-15 minutes, and by the end your sugar will have started to caramelize and take on a golden color and be fragrant. Watch it toward the end, as it tends to cook faster and you don't want it to burn.
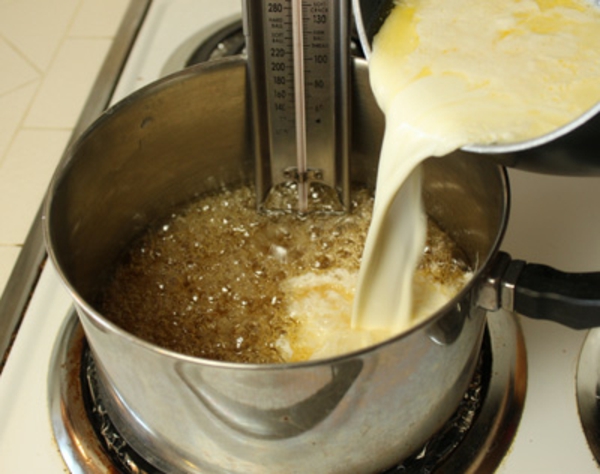 When it reaches 320 F, carefully pour the warm cream into the hot caramel. It will bubble up and steam a lot, so watch your hands and don't put your face right above the pan.
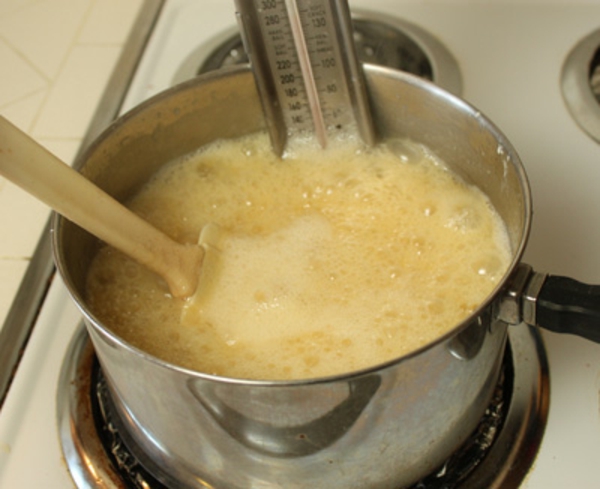 The caramel will double or triple in size in the beginning, which is why a larger pan was required. Stir the mixture constantly until the sugar syrup and the cream are well-mixed.
 After you added the cream, the temperature of the caramel dropped, so now you need to cook it, stirring frequently, until it climbs back up to 250 degrees F (121 C). This will give you a soft and chewy caramel. If you prefer firmer caramels, cook it to 255 F. As it cooks it will darken and take on a deep amber color. Make sure you keep stirring, or the caramels will scorch on the bottom of the pan.
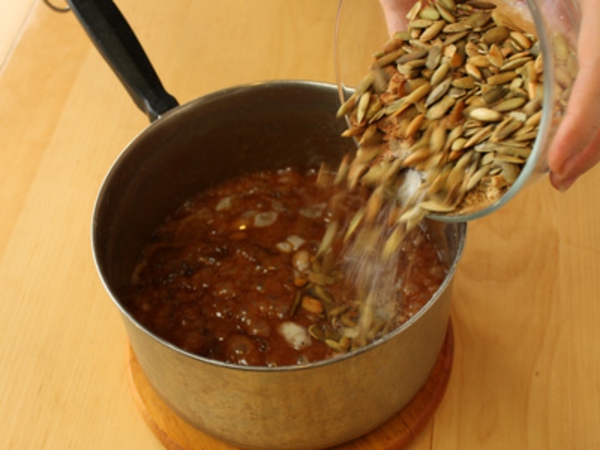 Once at 250 F, remove the pan from the heat. Add the bowl of pepitas and spices, the vanilla extract, and the remaining 2 ounces of butter.
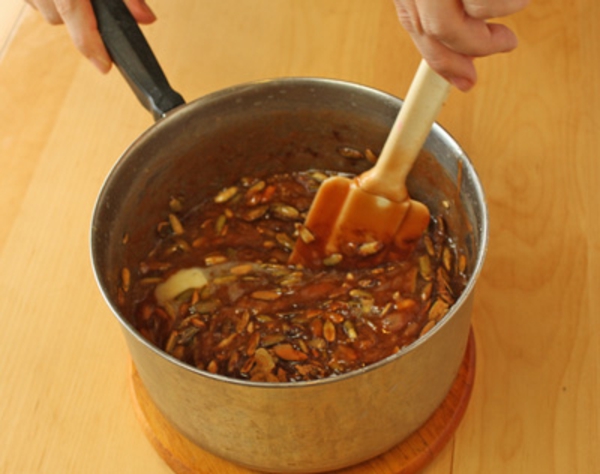 Stir until the butter melts and the nuts and spices are well-incorporated. At this point, the candy should smell fantastic.
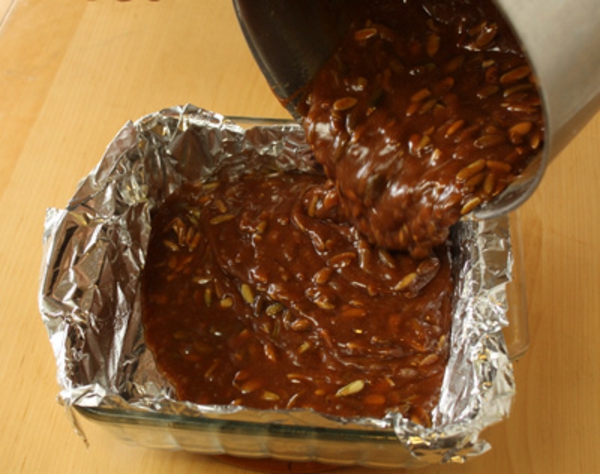 Pour the candy into the prepared pan and shake it slightly so that it evens out. Let the caramels sit at room temperature until firm, at least 4 hours or overnight. To speed up the process, you can refrigerate the caramels once they reach room temperature.
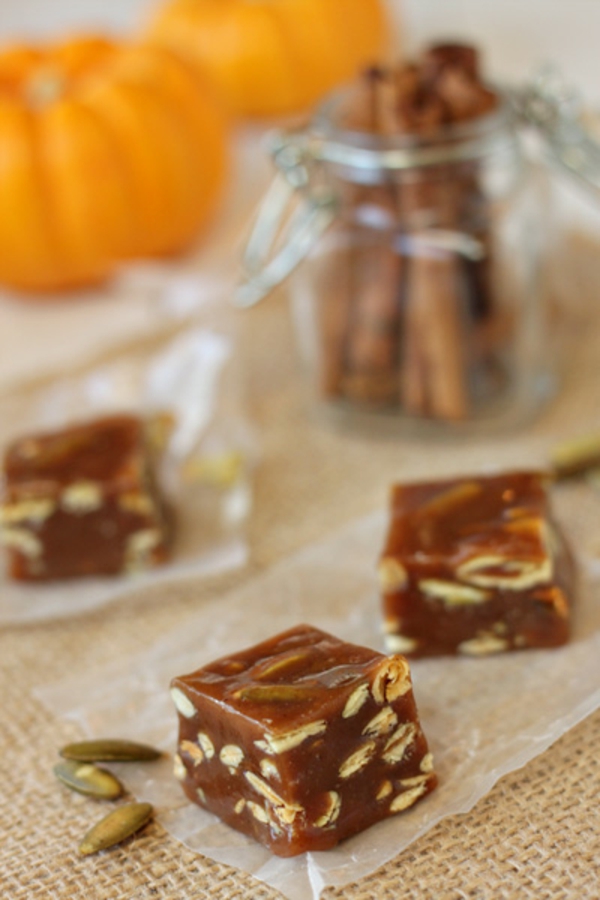
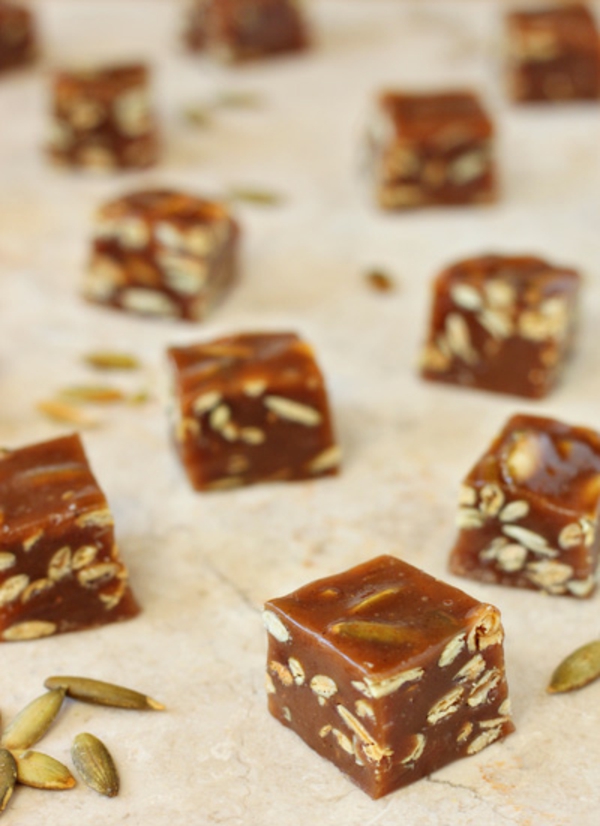
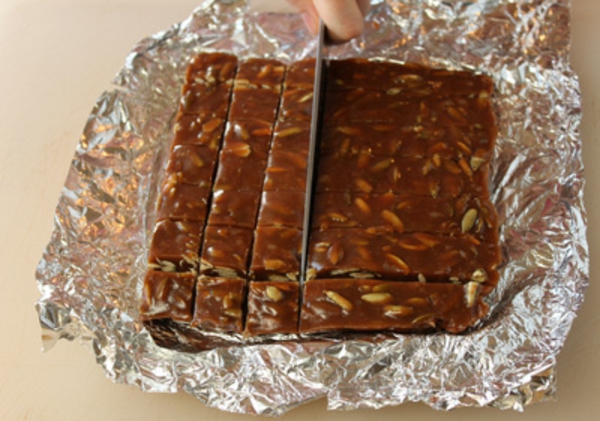 Once firm, remove the caramels from the pan using the foil as handles. Use a large sharp knife to cut the candy into thin strips, then cut the strips into small squares. The caramels are fairly tall, so you can cut small 1-inch squares and still have a very rich and satisfying candy. To serve them easily, I recommend wrapping them individually in squares of waxed paper. This helps them keep their shape and prevents them from sticking together.
 Your Pepita Caramels are finished and ready to be enjoyed! Store them in an airtight container at room temperature for up to two weeks.
 Halloween is a well-known candy holiday, but store-bought candy bars and fruit chews don't have anything on these homemade goodies. It's no trick--these autumn-inspired caramels are quite a treat!
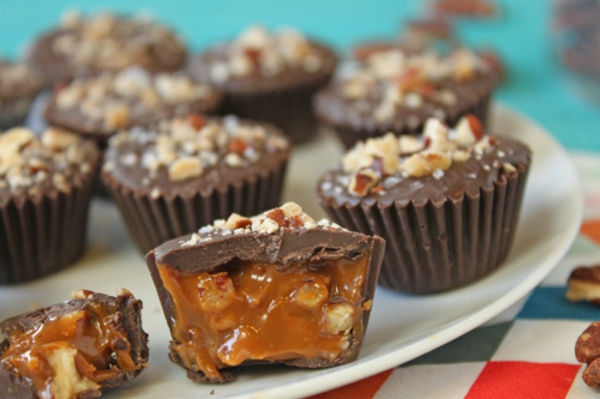
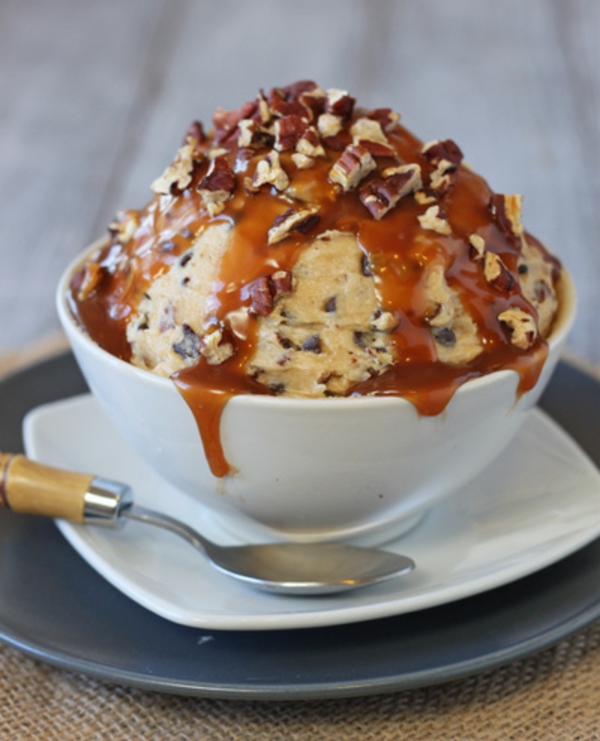
 This Pecan-Caramel Cheesecake Dip was inspired by turtle cheesecake, the classic dessert with pecans and caramel sauce. It has caramel sauce in the dip, along with cream cheese, miniature chocolate chips, and chopped toasted pecans. It's the perfect topping for cookies, pretzels, brownie chunks, or (if you're feeling virtuous) fruit slices. Here's what you'll need:
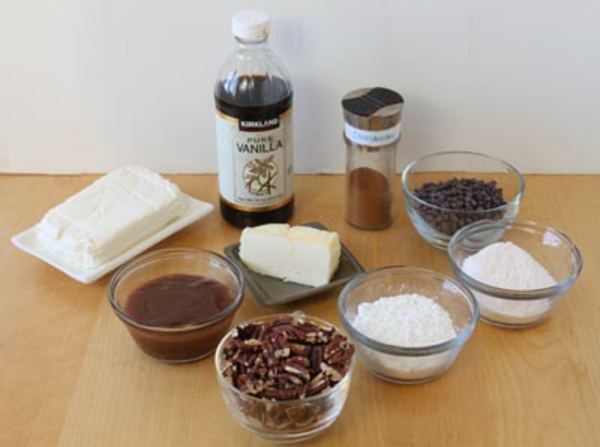
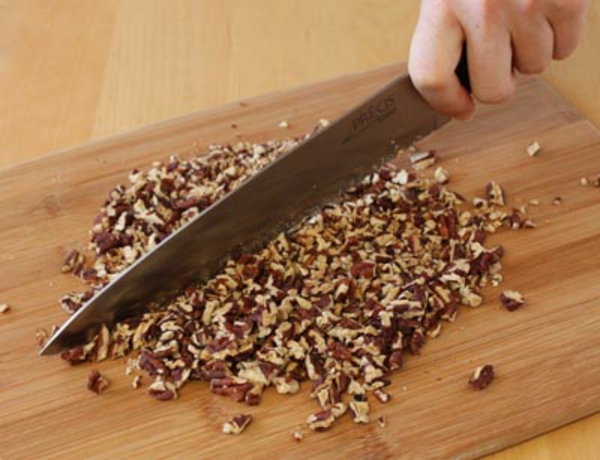 Start with pecans that have been toasted in a 350* F oven for 10-15 minutes. Toasting the nuts gives them a deeper flavor and a better crunch. Once they cool, coarsely chop them with a large sharp knife until they're in small pieces.
 Combine the room temperature cream cheese and butter in a large mixing bowl. Mix them with the paddle attachment of a stand mixer, or with a hand mixer, until they're light and fluffy.
 Add 1/2 cup of the caramel sauce, and try not to eat too much of it as you spoon it in. (The remaining 1/4 cup will be used for decoration on top.) Beat everything together until it's nice and smooth.
 Next add the powdered sugar and pudding mix. These both give the dip body, and the pudding mix, especially, gives it a little stability while maintaining a smooth, creamy texture.
 Don't forget the flavoring! Add your ground cinnamon and vanilla extract to the bowl as well.
 Mix everything together on medium speed. Once it's all incorporated, your dip will be beautifully fluffy and creamy, and a lovely pale caramel color.
 Add the miniature chocolate chips, and all but a handful of the chopped pecans. Stir everything together by hand until it's well-mixed.
 Scoop the Pecan-Caramel Cheesecake Dip into a bowl, and smooth the top and sides.
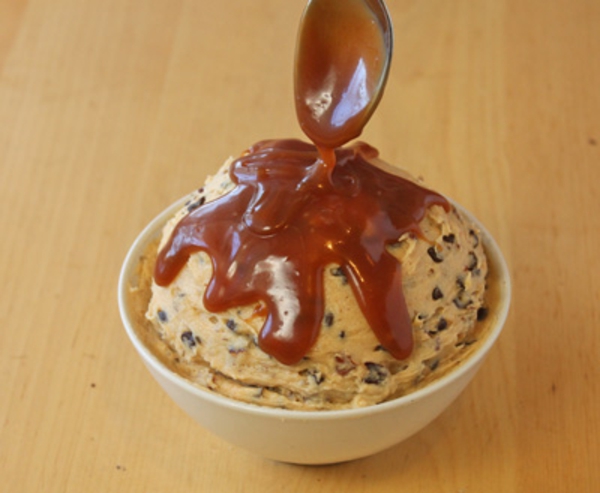 Take the remaining 1/4 cup of caramel sauce, and drizzle it on top and down the sides of the dip. (It's not a bad idea to create a "moat" around the edges of the dip, to catch most of the caramel sauce before it drips down the bowl.)
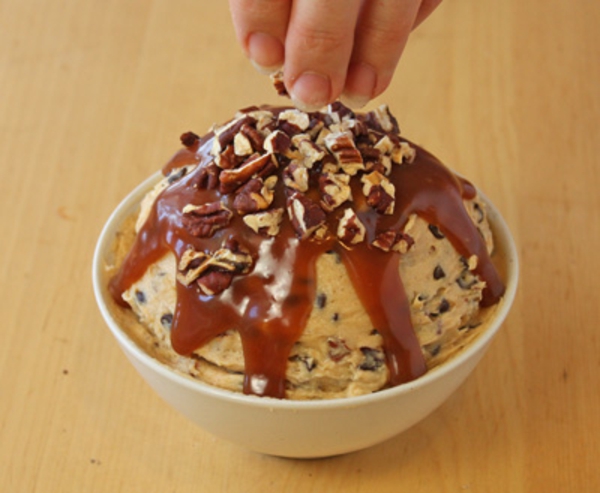 Finish the dip with a sprinkling of toasted pecans on top--beautiful!
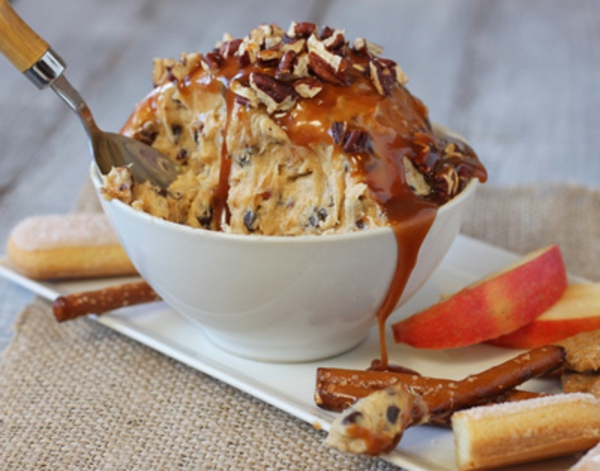
 Your Pecan-Caramel Cheesecake Dip is now finished! You can enjoy it immediately, or refrigerate it for a firmer texture. If you wrap it well, this dip will keep for up to a week in the refrigerator.
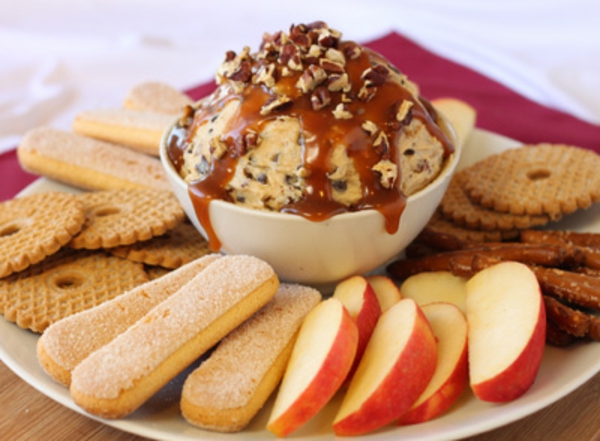 Wondering what to serve with your Pecan-Caramel Cheesecake Dip? I recommend using an assortment of sturdy, crunchy goodies, like shortbread cookies, graham crackers, pretzels, or firm lady fingers. This dip is also wonderful with fruit like apples or firm pears. Don't be afraid to get creative!
 Psst, here's one more tip: If you find yourself with leftover Cheesecake Dip, it also makes a wonderful frosting for cupcakes, cookies, or brownies! The fluffy texture and the caramelized, slightly tangy flavor make it an irresistible topping for almost any dessert. Enjoy!
All text and images (c) Elizabeth LaBau]]>
Psst, here's one more tip: If you find yourself with leftover Cheesecake Dip, it also makes a wonderful frosting for cupcakes, cookies, or brownies! The fluffy texture and the caramelized, slightly tangy flavor make it an irresistible topping for almost any dessert. Enjoy!
All text and images (c) Elizabeth LaBau]]>
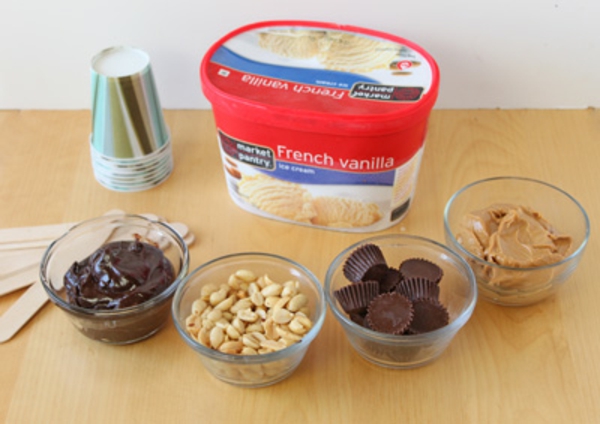
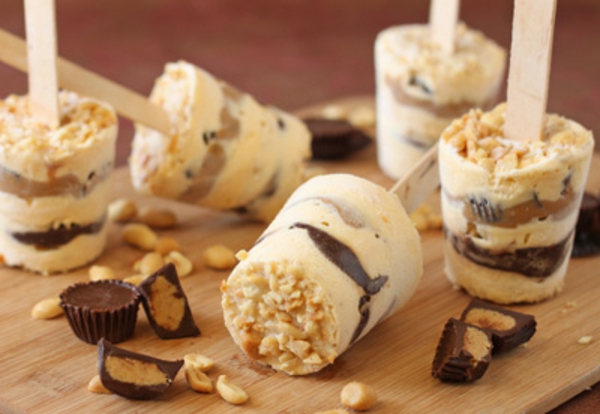 These quick desserts are an easy way to put a homemade spin on plain vanilla ice cream. Store-bought ice cream is layered with chocolate fudge sauce, salty peanuts, peanut butter, and chunks of peanut butter cups candy, in individual popsicle form. They're cold and creamy, sweet and salty, and the perfect antidote to hot summer days!
 Peanut Butter Ice Cream Pops Recipe
yield: 8 individual servings
Peanut Butter Ice Cream Pops Recipe
yield: 8 individual servings
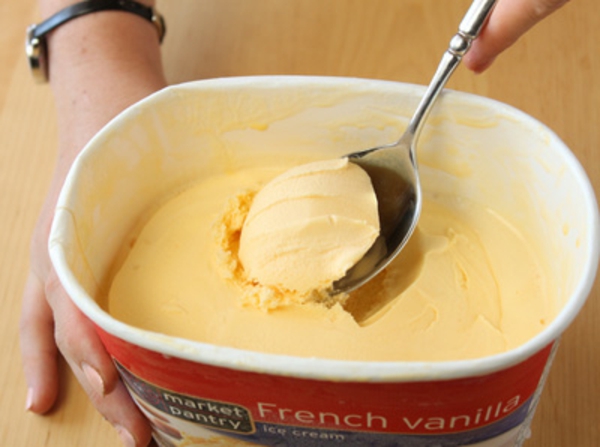 To make these ice cream pops, you want the vanilla ice cream to be slightly softened but not melting. Leave it out at room temperature for a few minutes while you prepare the rest of the ingredients.
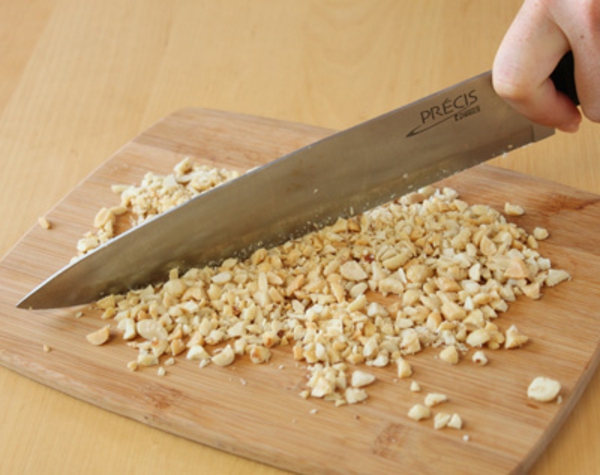 Chop the salted peanuts into coarse pieces. Don't make them too small--you want their crunchy texture in the pops!
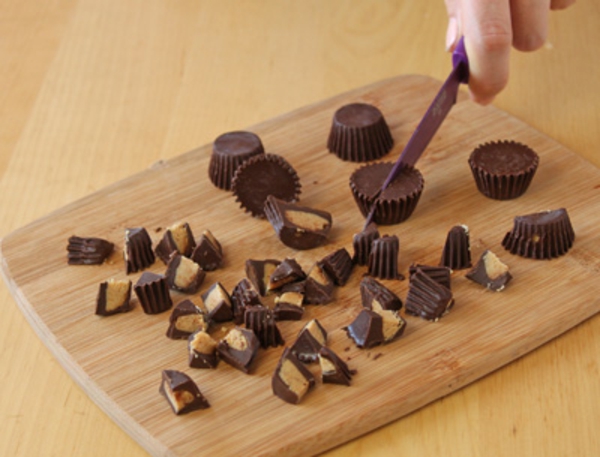 Chop the peanut butter cups roughly into eighths. They should be small enough to eat in one bite, but large enough to give an identifiable flavor and texture to the final product.
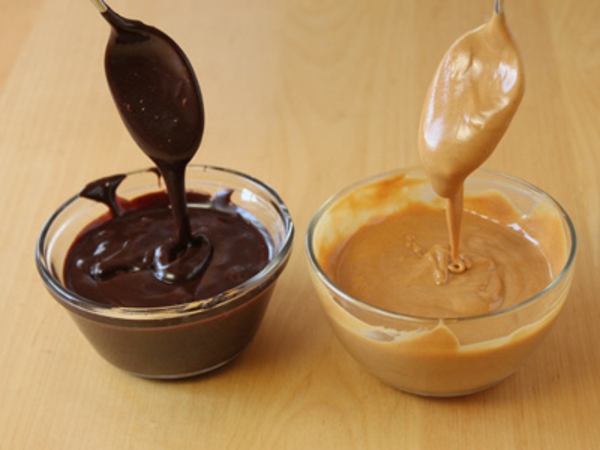 Warm up the hot fudge sauce and the peanut butter in separate bowls in the microwave. You don't actually want them to be hot, you just want to warm them enough so that they're fluid and easy to spread. About 15 or 20 seconds each should do the trick.
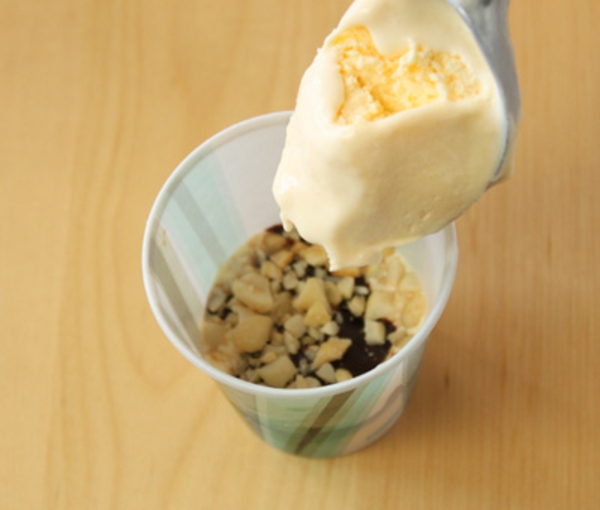
 Now it's time to start layering! Place a spoonful of chopped peanuts in the bottom of each of the eight paper cups. Take a small scoop of slightly softened vanilla ice cream, about 2 inches across, and place one in each cup.
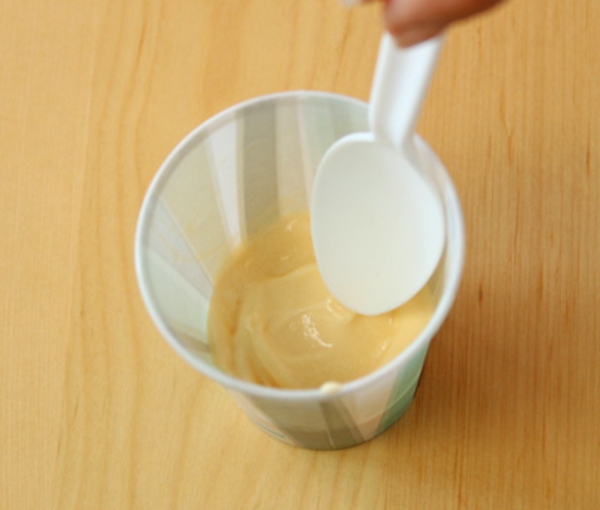 Smooth the ice cream with the back of a spoon until it's in an even layer. Nothing fancy, just flat enough to let you build the rest of the layers on top.
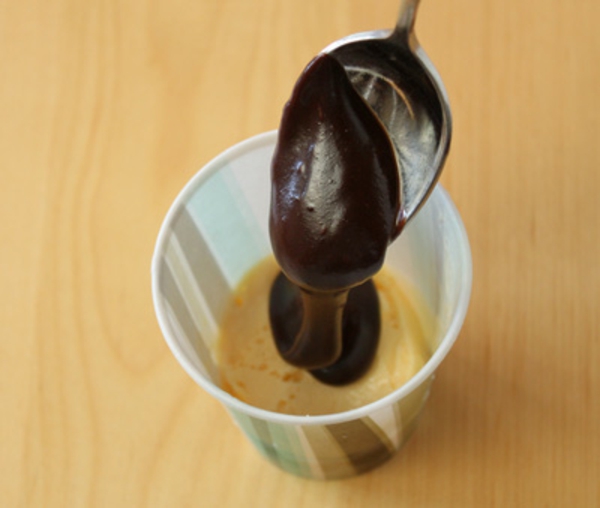 Pour a spoonful of the hot fudge sauce on top of the ice cream. If it doesn't spread out on its own, use the spoon to nudge it toward the sides so it's an even layer.
 Top the hot fudge sauce with a generous spoonful of chopped peanuts, so that the sauce is mostly covered with nuts.
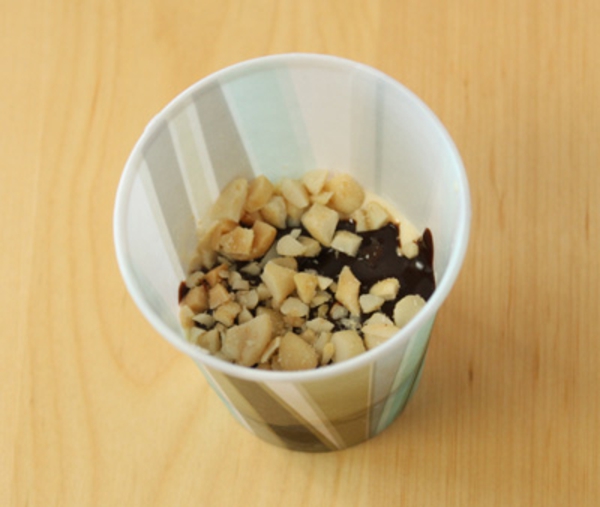
 It's time for another round of ice cream, so add a softened scoop of vanilla on top of the peanuts and spread it around.
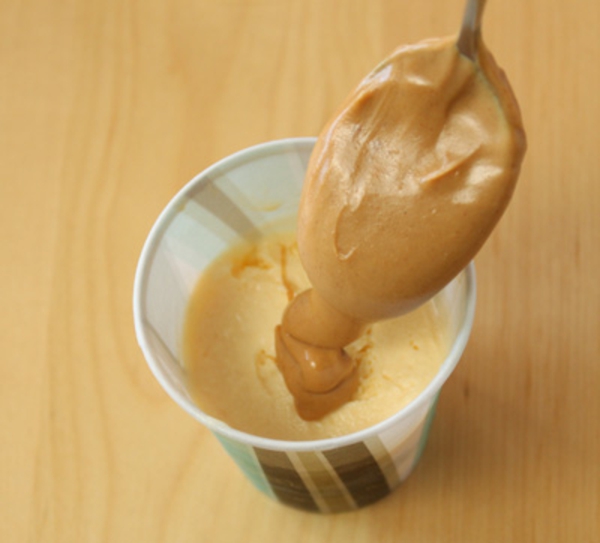 The peanut butter is next! Spoon a tablespoon of the fluid peanut butter onto the vanilla and smooth it into an even layer.
 Top the peanut butter with a generous handful of peanut butter cup chunks. These are my favorite part, so I like to make sure that every inch of peanut butter is covered with candy bits.
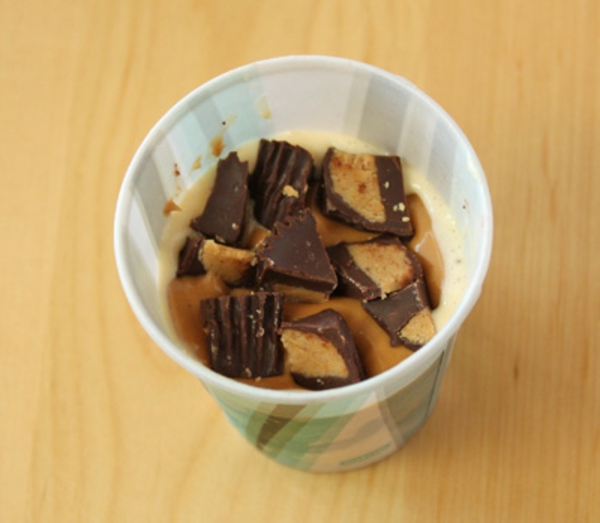
 It's time for the last layer of ice cream, so spoon it on and then smooth the ice cream out evenly.
 Add a layer of chopped peanuts on top of the ice cream and press down on them slightly to embed them in the top. Insert a popsicle stick in the middle and press down until it's almost all the way through.
Now for the tough part--waiting! Because the ice cream was soft, you'll need to re-freeze the pops for a few hours, until the ice cream is firm again.
Add a layer of chopped peanuts on top of the ice cream and press down on them slightly to embed them in the top. Insert a popsicle stick in the middle and press down until it's almost all the way through.
Now for the tough part--waiting! Because the ice cream was soft, you'll need to re-freeze the pops for a few hours, until the ice cream is firm again.
 Once the pops are re-frozen, they're ready to enjoy! Snip the paper cup with scissors, then carefully peel it away from the ice cream pop.
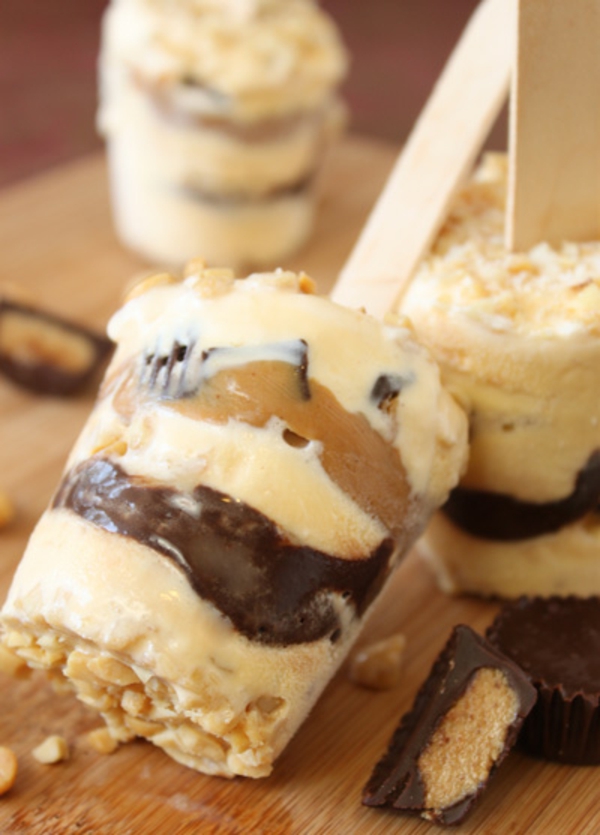 You can get creative with the different layers. Try substituting pecans and caramel sauce and making Turtle Ice Cream Pops, or adding crushed Oreos for a Cookies and Cream variation. You can make a big batch and then enjoy them over the course of a week or two. Maybe by the time you've finished them off, it will be a little cooler. Enjoy!
 This recipe doesn't require any cooking and comes together in about 15 minutes, so it's the perfect activity to do with young helpers on a warm summer's day. Grab your worms and let's go...
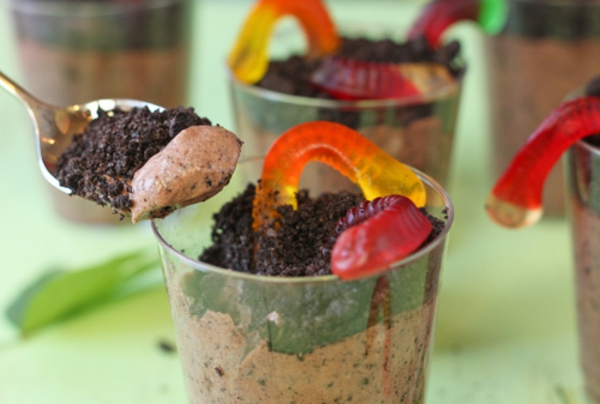
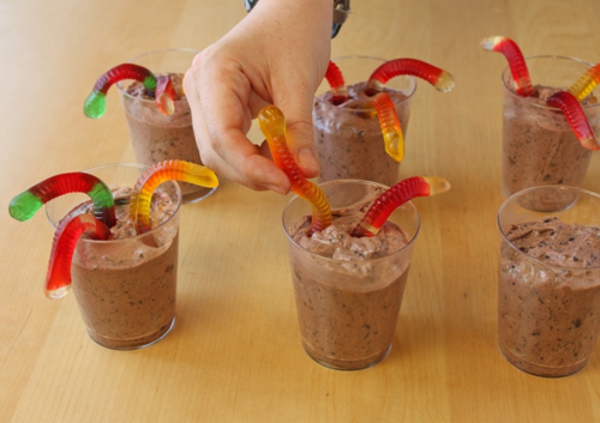
 Worms in Dirt Pudding Cups Recipe
yield: 8 cups
Worms in Dirt Pudding Cups Recipe
yield: 8 cups
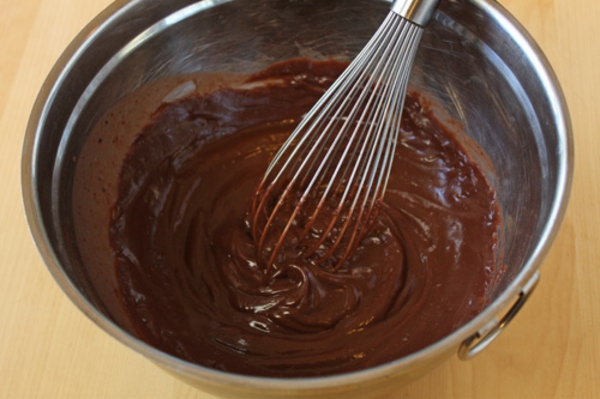
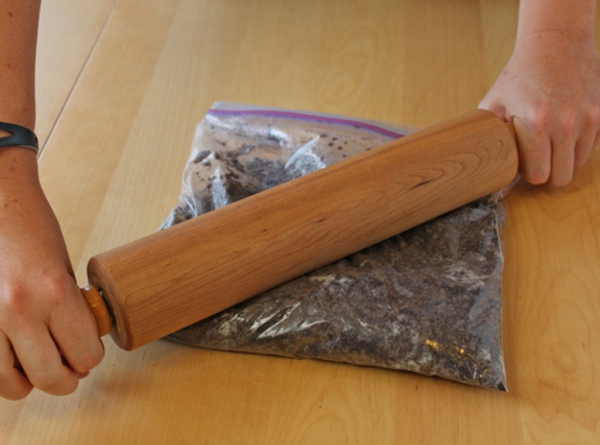 The first order of business when making "worms in dirt" is, of course, to make the dirt. Place the chocolate sandwich cookies in a large zip-top plastic bag, and use a rolling pin to crush them into small pieces. Don't worry about removing the cream filling before putting the cookies in the bag--at first they will clump together, but as you continue to crush them, the cream will blend with the cookies and you won't even notice it.
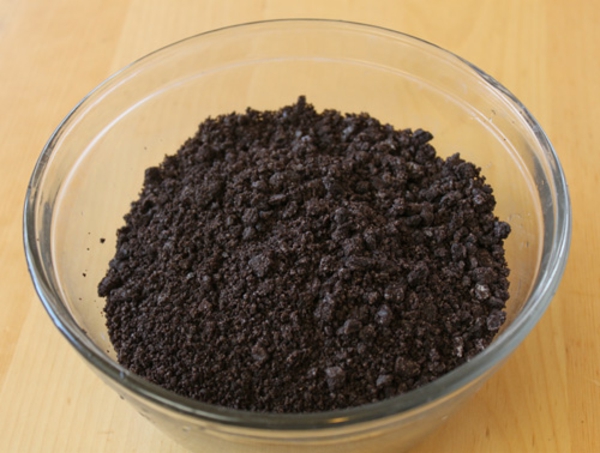 Continue to crush the cookies in the bag until they are in fine crumbs. A few larger pieces are okay, too--after all, dirt comes in different sizes!
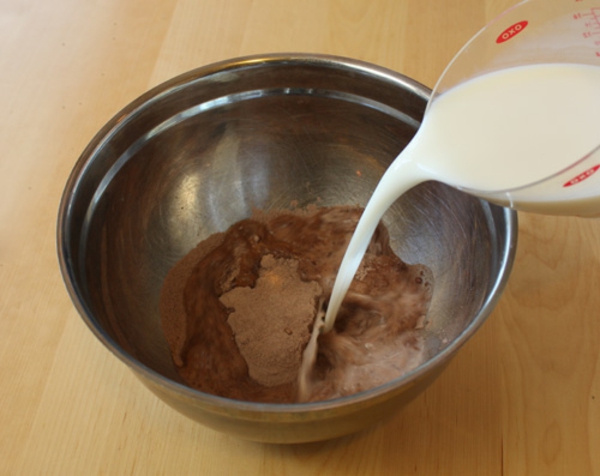 Next, make the pudding. Pour the dry pudding mix into a large bowl, then add the cold milk. Whisk everything together until all of the dry pudding dissolves and it's smooth and free of lumps.
 Let the pudding sit for about 5 minutes, until it thickens and is no longer liquid. If it has the delightfully gloppy texture of pudding, you're ready to go on.
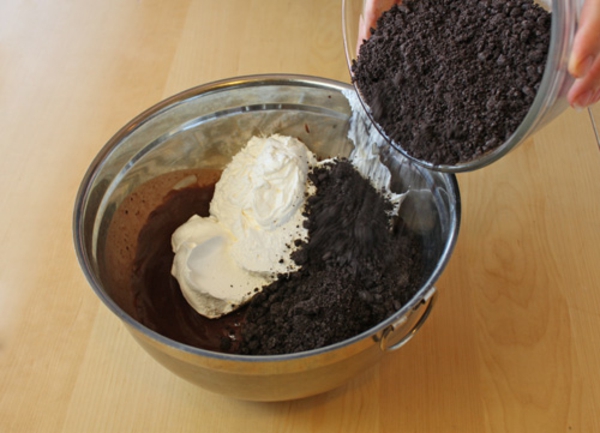 Add the whipped topping and approximately half of the cookie crumbs. You don't have to measure, just eyeball half the bag and pour it in.
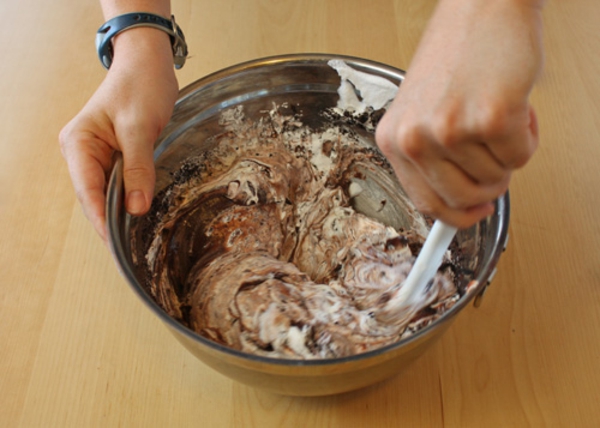 Gently stir everything together until the streaks of whipped topping disappear, and the cookies are well-mixed into the pudding.
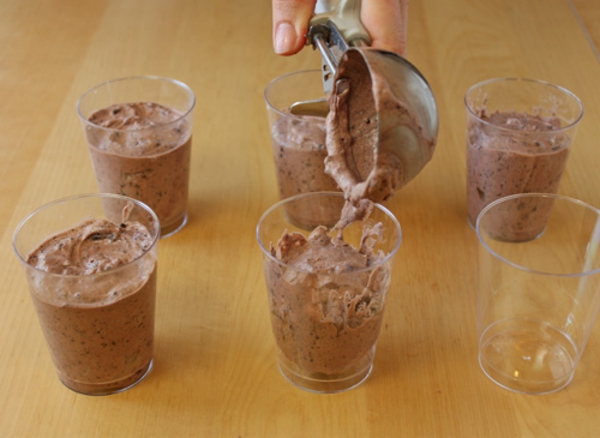 Divide the pudding mixture evenly between eight cups--each should hold a little over 1/2-cup of pudding. You can fill them however you'd like--I prefer to use a large ice cream scoop because I think it's a little neater and faster that way.
 Tap the cups on the countertop a few times to level the pudding, then insert 3
 Pour the cookie crumbs over the pudding and
 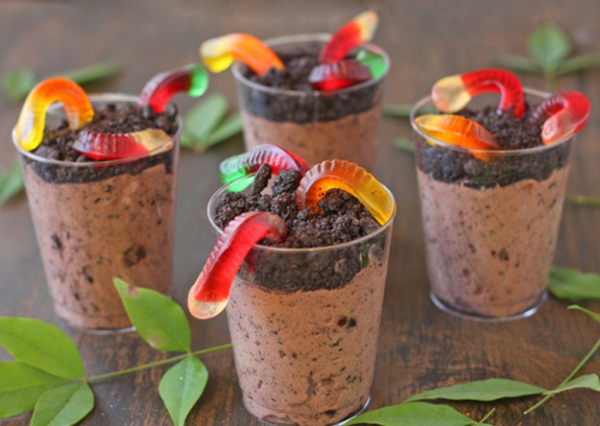 Your Worms in Dirt are done! This is such an easy and fun recipe to make with kids during the summer! If you want to make them even more special, you can hide the cups in small terra cotta flower pots, or make one large batch in a big flower pot. Enjoy!
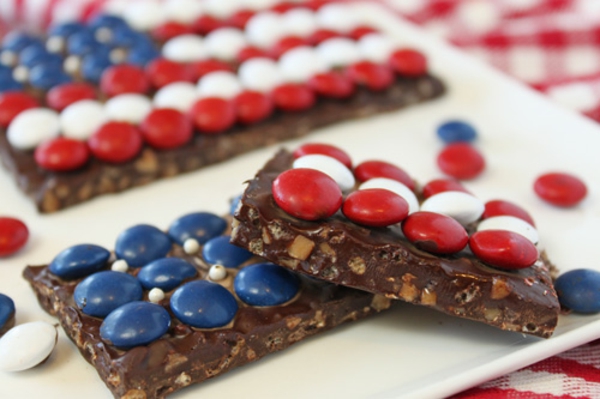 The chocolate in these candy bar flags is more than just a boring slab of semi-sweet--it's packed with crunchy mix-ins like crispy rice cereal, toffee bits, or chopped nuts. The flag design is made from red, white, and blue candies that add extra flavor and crunch. If you live in a country that doesn't celebrate the Fourth of July, this idea can always be adapted with different colors and patterns to make a wide variety of flags!
 Candy Bar Flags (Fourth of July Candy Recipe)
yield: four 4x5-inch candy bar flags
Candy Bar Flags (Fourth of July Candy Recipe)
yield: four 4x5-inch candy bar flags
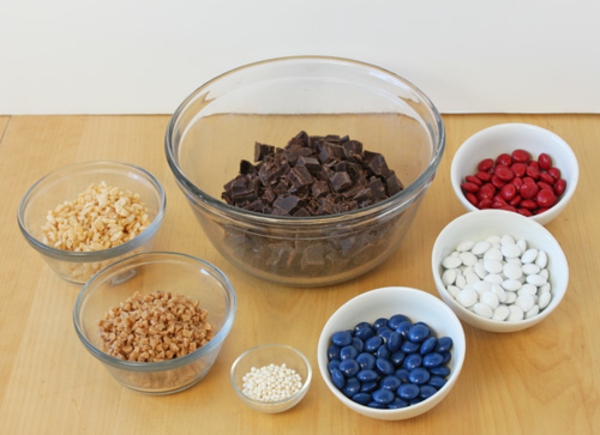
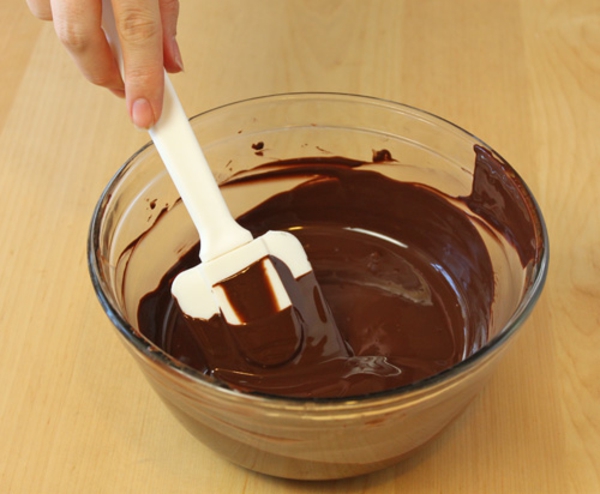 The first step is to prepare the chocolate. If you'll be enjoying these Candy Bar Flags right away, or keeping them in the refrigerator, simply melting the chocolate is fine. Place it in a microwave-safe bowl and melt it in 30-second intervals, stirring frequently, until it's smooth and lump-free.
If you want to store these bars for longer periods of time at room temperature, I suggest tempering the chocolate instead. There are photos and instructions showing how to temper chocolate on last week's Neapolitan Rocky Road Bark recipe.
The first step is to prepare the chocolate. If you'll be enjoying these Candy Bar Flags right away, or keeping them in the refrigerator, simply melting the chocolate is fine. Place it in a microwave-safe bowl and melt it in 30-second intervals, stirring frequently, until it's smooth and lump-free.
If you want to store these bars for longer periods of time at room temperature, I suggest tempering the chocolate instead. There are photos and instructions showing how to temper chocolate on last week's Neapolitan Rocky Road Bark recipe.
 Once the chocolate is melted, add the crunchy mix-ins and stir them in. I used crispy rice cereal and toffee bits, but you can add chopped nuts, toasted coconut, or any other candy bar-friendly ingredients.
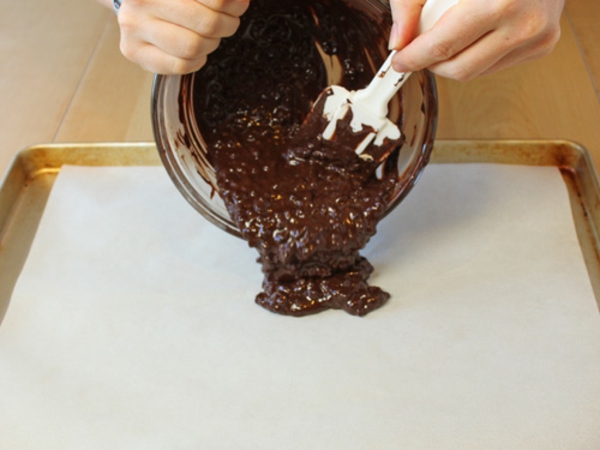 Scrape the chocolate mixture out onto a baking sheet covered with parchment paper, waxed paper, or aluminum foil.
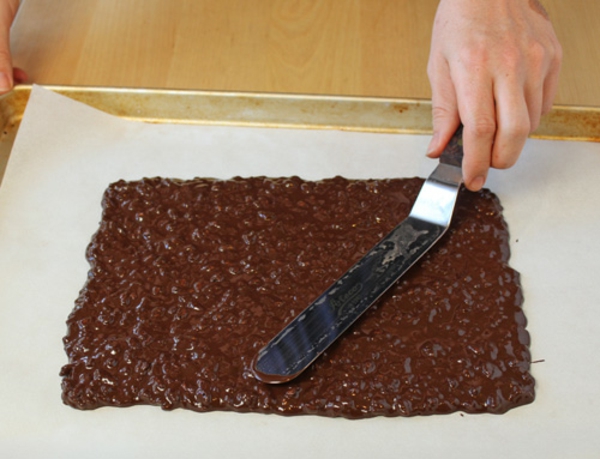 Use a spatula or a knife to spread it into a rectangle, about 10 inches long and 8 inches wide. It will be about 1/4-inch thick.
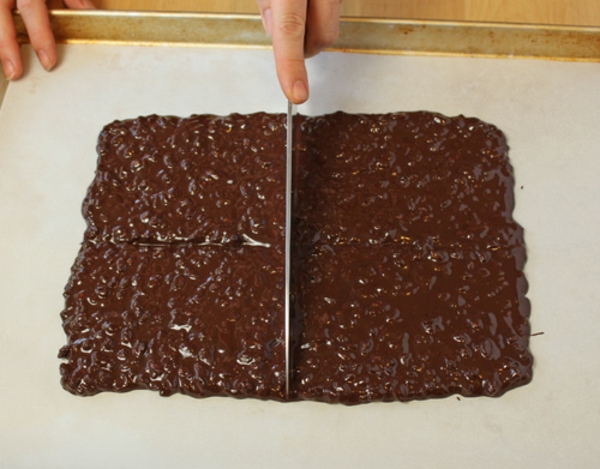 Use a knife to mark the chocolate in half vertically and horizontally, forming four equal rectangles. Since the chocolate is still wet you're not actually cutting it, you're just giving yourself a visual guide.
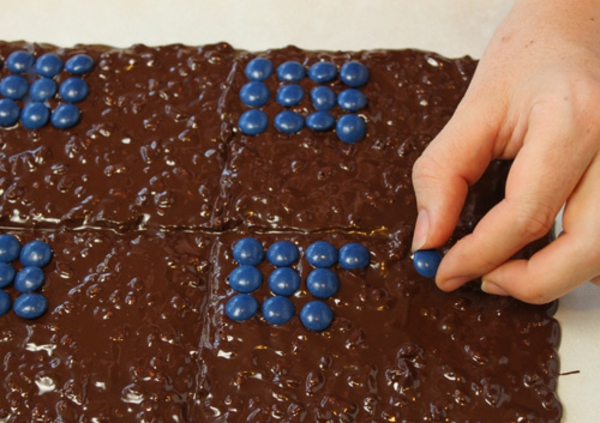 Once the flags are marked off, you'll need to work quickly to add the candies on top before the chocolate hardens. Leave a small 1/4-inch margin on the edge of each flag so that you can cut them into neat rectangles without cutting into the candies. First, arrange the blue candies into a rectangle four across and three long in the upper left corner of each chocolate flag.
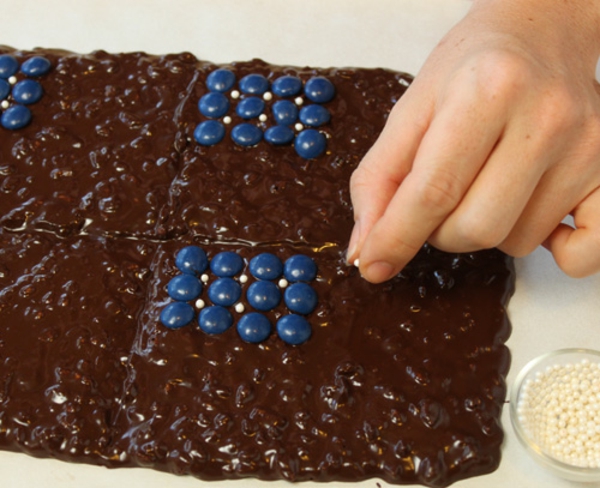 Drop a small white sprinkle into the space between each blue candy, to represent the stars. If you don't have white sprinkles this step is optional, but I think it adds a nice touch.
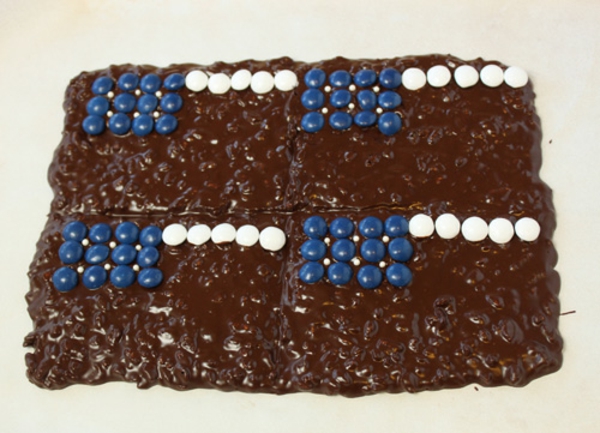 Add a row of white candies on top, going all the way to the end. Depending on the size of your flags,you should be able to fit four or five candies in the row.
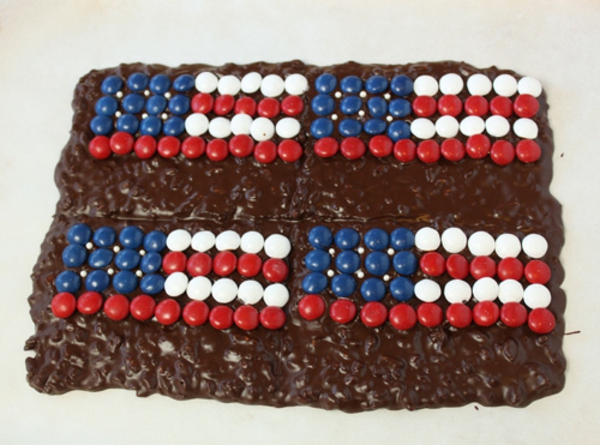 Add a layer of red candies underneath, keeping the same spacing for the candies. Continue to add rows of candies, alternating red and white colors.
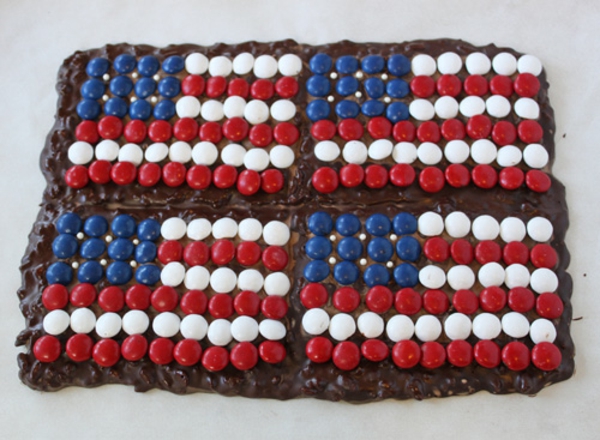 Continue until you've run out of room on the bottom of the flags. Don't forget to keep a margin so you can easily cut them! If the chocolate hardens before you're able to finish, melt a little more chocolate and place it in a plastic bag with a hole cut in the corner. Squeeze a thin line of melted chocolate across the flag, and press the candies into the chocolate to adhere them.
Once all of the candies are affixed to the chocolate, refrigerate the tray until the chocolate sets completely.
Continue until you've run out of room on the bottom of the flags. Don't forget to keep a margin so you can easily cut them! If the chocolate hardens before you're able to finish, melt a little more chocolate and place it in a plastic bag with a hole cut in the corner. Squeeze a thin line of melted chocolate across the flag, and press the candies into the chocolate to adhere them.
Once all of the candies are affixed to the chocolate, refrigerate the tray until the chocolate sets completely.
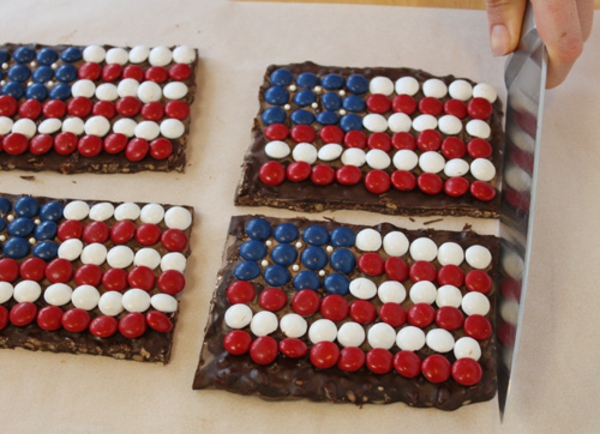 Once set, use a sharp knife to carefully cut the uneven edges from the sides of the flags, then cut the flags apart from each other.
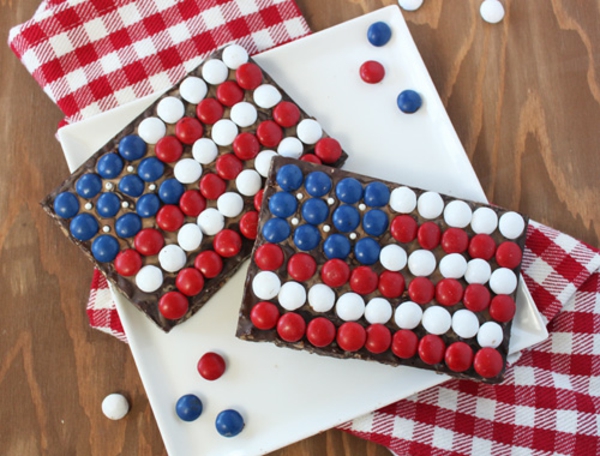 These flags make fun party favors, centerpieces,or edible decorations for your Fourth of July bash. Not having a party? They're also a great kid's craft, since they're quick, easy, and full of delicious edible craft materials.
Have a safe and happy holiday!
All text and images (c) Elizabeth LaBau]]>
These flags make fun party favors, centerpieces,or edible decorations for your Fourth of July bash. Not having a party? They're also a great kid's craft, since they're quick, easy, and full of delicious edible craft materials.
Have a safe and happy holiday!
All text and images (c) Elizabeth LaBau]]>
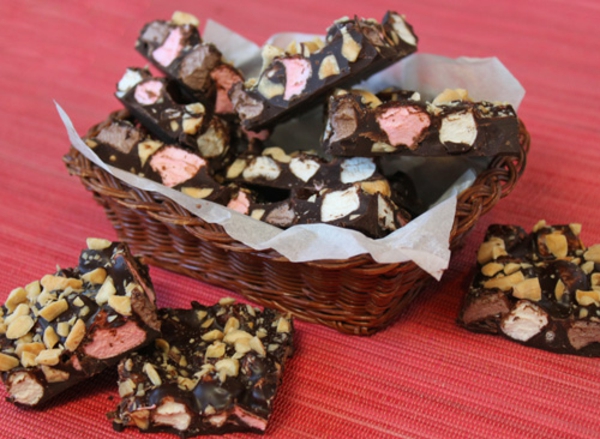 Have you noticed that marshmallow flavors have gotten crazy? Whereas there used to be just two choices--large or small?--I can now find a huge selection of different marshmallow flavors and shapes in most grocery stores. I was inspired by this bounty to make Neapolitan rocky road, using vanilla, chocolate, and strawberry marshmallows. They're mixed with roasted almonds and semi-sweet chocolate to form a rich, chewy, crunchy candy. If you can't find these exact marshmallow flavors, you can substitute whatever is easily available.
One quick note: when making chocolate candies, it's best to temper the chocolate, meaning to heat it and cool it to a specific temperature. This keeps its hard and shiny, and keeps it from melting in warm weather. If you have an instant-read thermometer, or a chocolate thermometer, the process is easy. If you don't want to go to the trouble of tempering, you can skip this step--I've included both variations down below.
Have you noticed that marshmallow flavors have gotten crazy? Whereas there used to be just two choices--large or small?--I can now find a huge selection of different marshmallow flavors and shapes in most grocery stores. I was inspired by this bounty to make Neapolitan rocky road, using vanilla, chocolate, and strawberry marshmallows. They're mixed with roasted almonds and semi-sweet chocolate to form a rich, chewy, crunchy candy. If you can't find these exact marshmallow flavors, you can substitute whatever is easily available.
One quick note: when making chocolate candies, it's best to temper the chocolate, meaning to heat it and cool it to a specific temperature. This keeps its hard and shiny, and keeps it from melting in warm weather. If you have an instant-read thermometer, or a chocolate thermometer, the process is easy. If you don't want to go to the trouble of tempering, you can skip this step--I've included both variations down below.
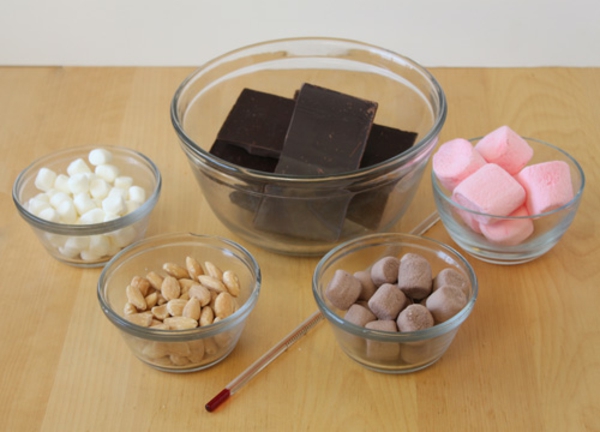 Neapolitan Rocky Road Recipe
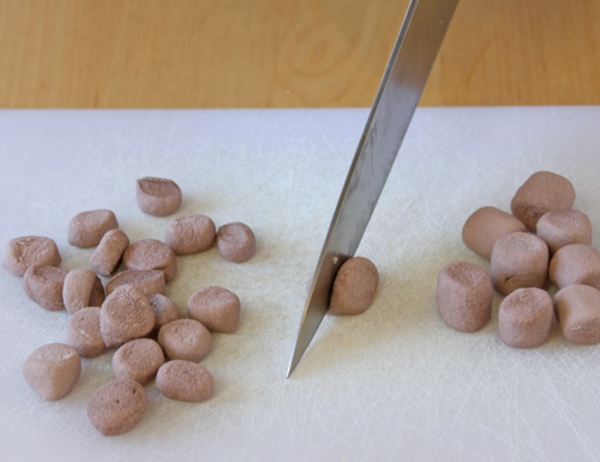 Here's how not hard this recipe is: the next four pictures are all going to be about chopping ingredients. That's the bulk of the work! Start by making sure your marshmallows are all the same small size. These steps might vary depending on what is available to you, but the basic idea is that you want them all to approximate the size of the miniature marshmallows. The chocolate marshmallows I found were about twice the size of miniature marshmallows, so I cut the chocolate ones in half.
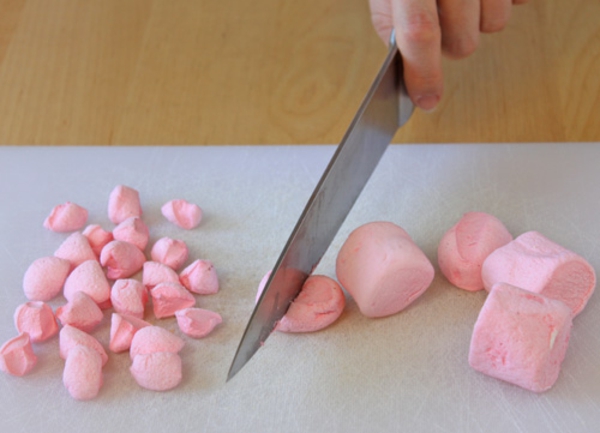 The strawberry marshmallows I found were pretty gigantic, so they were cut in 6-8 pieces each, until they were about the size of a dime.
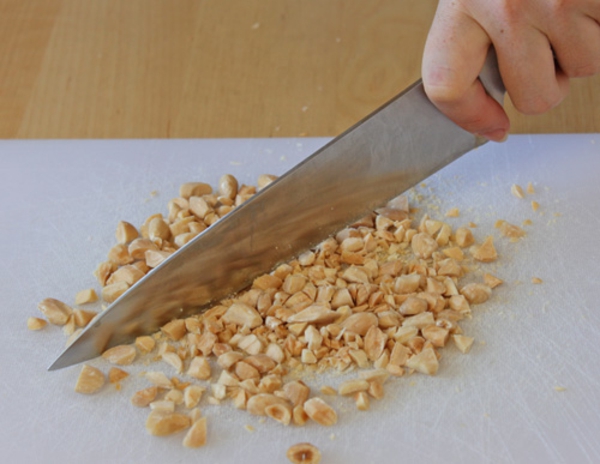 Next, coarsely chop the roasted almonds. Make sure you leave them in good-sized chunks to add some much-needed texture. They do put the rock in rocky road, after all.
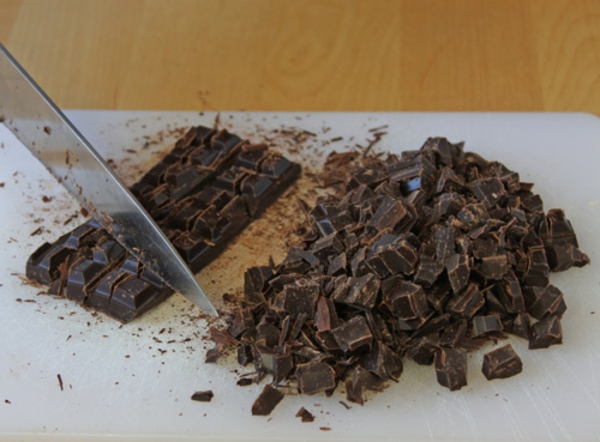 Finally, chop the chocolate. If you will NOT be tempering it, chop all of the chocolate into small pieces, and place it in a large microwave-safe bowl.
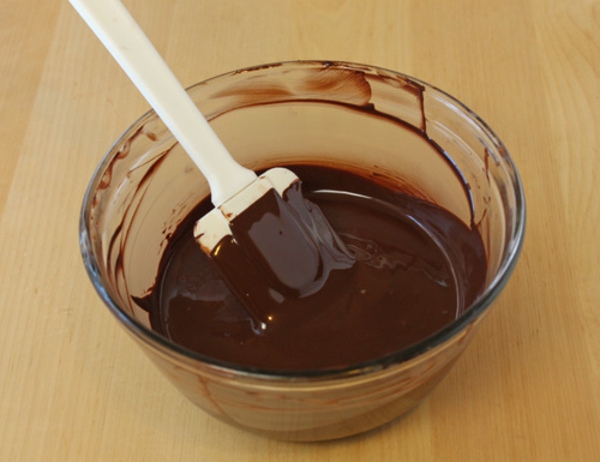 Melt the chocolate in the microwave in 30-second increments so it won't get overheated. Stir until the chocolate is melted and smooth, then skip down a few steps to where we add the mix-ins.
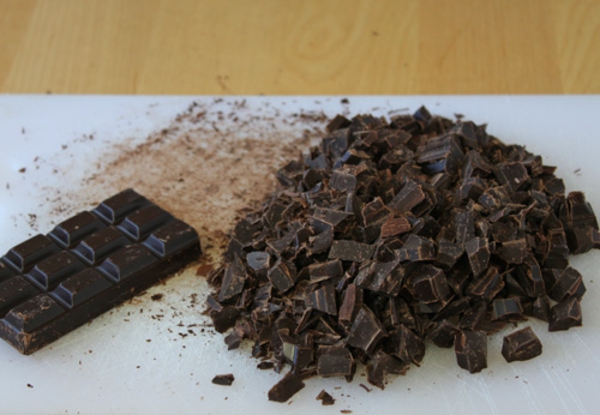 If you WILL be tempering the chocolate, chop about three-quarters of it into small pieces. Leave one big chunk whole. It should be about a quarter of the total chocolate, but don't worry about being too precise.
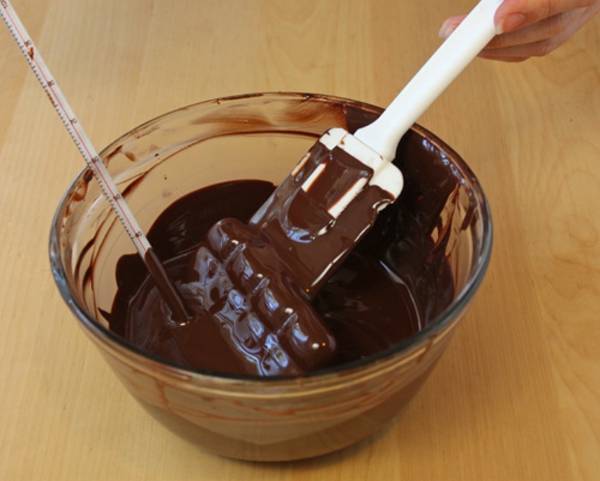 Melt the chopped chocolate in the microwave. When it's completely melted, add the big chunk of chocolate and insert the chocolate thermometer or instant-read thermometer. Stir the chocolate frequently, and try to scrape the big bar of chocolate with your spatula, to encourage it to melt into the melted chocolate. Keep stirring the chocolate around until it dips below 90 degrees Fahrenheit on the thermometer.
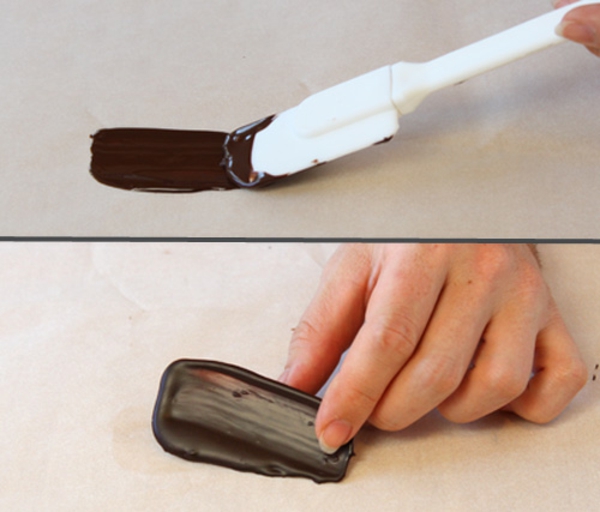 Once it's under 90 F, do a quick test by spreading some of the chocolate on a sheet of parchment. If it's properly tempered, it should quickly begin to set, and within 3-5 minutes it should be hard and shiny and room temperature. If it doesn't set, keep stirring and let the temperature dip lower, then try again.
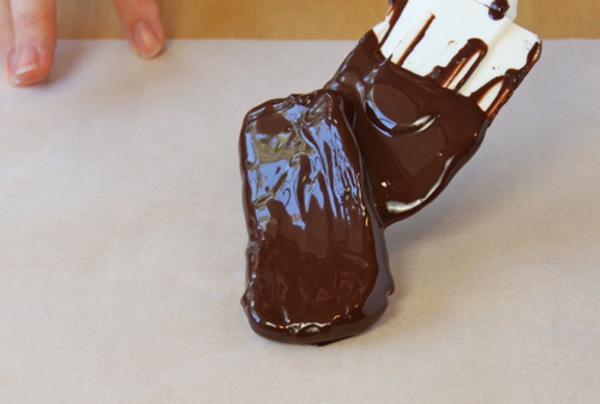 The last step is to remove the rest of the unmelted block of chocolate. Take it out of the bowl, and set it aside to use for your next cooking project!
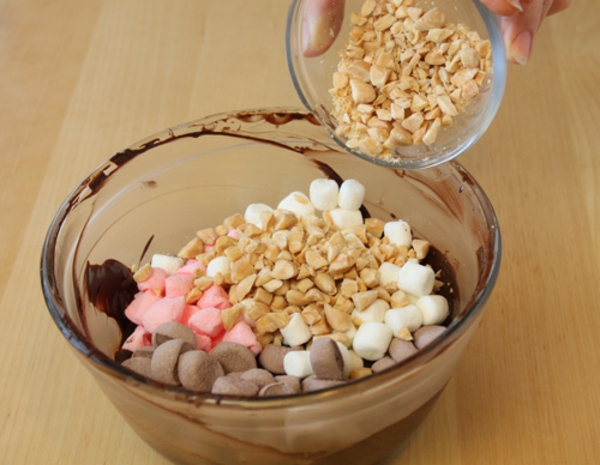 Now it's time to add the mix-ins. Dump all of the chocolate marshmallows, strawberry marshmallows, and miniature marshmallows into the chocolate. Add most of the chopped nuts, but reserve a few spoonfuls of nuts to scatter on top of the rocky road.
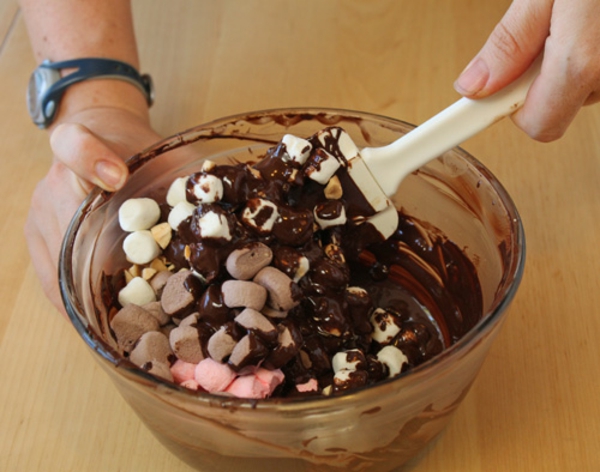 Stir everything together until all of the nuts and marshmallows are completely coated with chocolate.
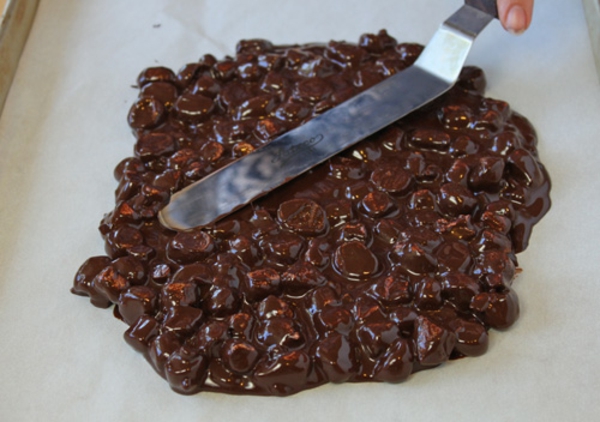 Scrape the candy out onto a baking sheet covered with parchment or waxed paper, and spread it into a thin, even layer.
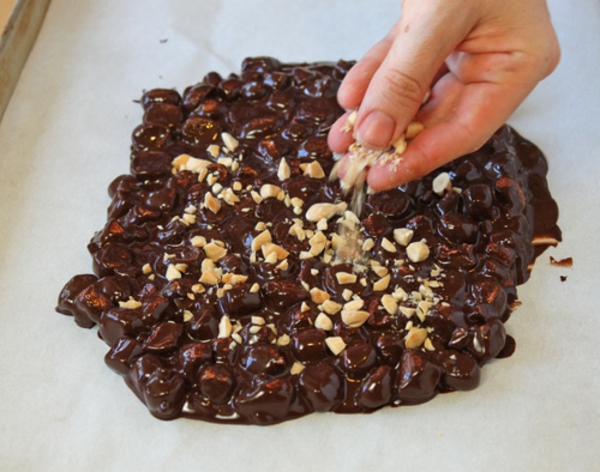 Sprinkle the remaining chopped nuts all over the top of the chocolate, and press down gently to get them to stick. If you've tempered the chocolate, you can let it set at room temperature, but if you've just melted it, you'll want to put it in the refrigerator to firm up, for about 20 minutes.
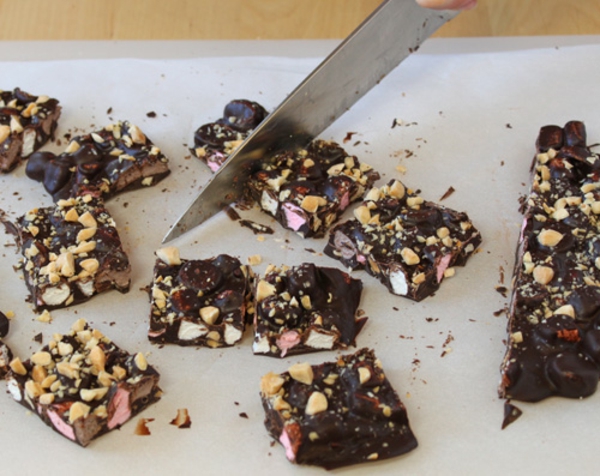 When it's completely set, cut the Neapolitan rocky road candy into small squares. You could also break it into pieces, but because the marshmallows are so chewy, it's easier and neater just to cut it.
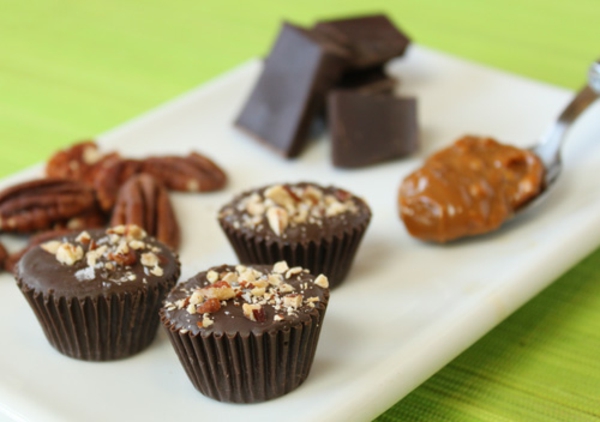 Ready-made dulce de leche is available in many large grocery stores, but I prefer to make my own by cooking sweetened condensed milk until it caramelizes into a thick, golden mixture with the flavor of cooked milk and sugar. Making it myself gives it a fresher taste, and I can also control the stiffness and texture of the finished product, However, if you are rushed for time or want to skip a step, you can use 1 cup of ready-made dulce de leche in place of the condensed milk in this recipe. Now let's make candy cups!
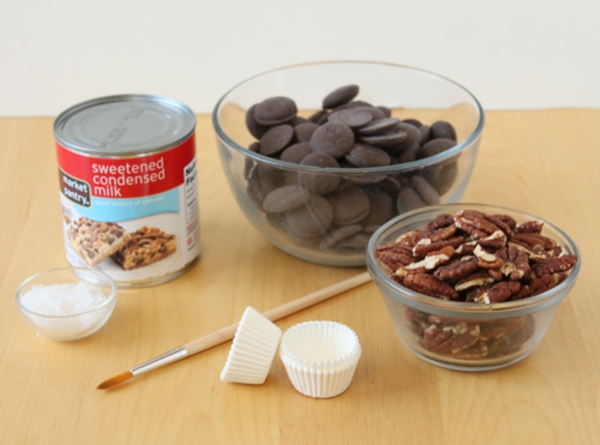 Dulce de Leche Cups Recipe
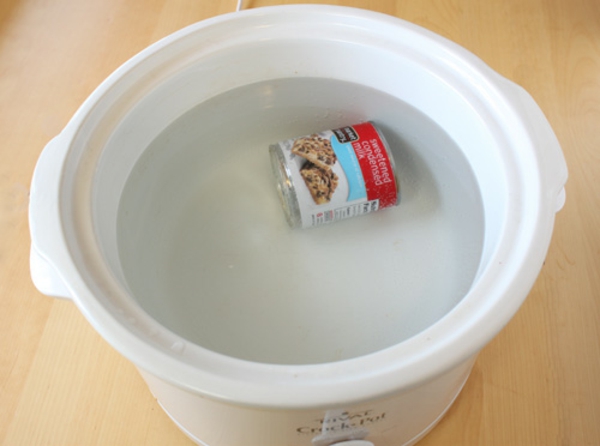 There are numerous way of making dulce de leche from condensed milk. The classic version--and the one you've probably been warned against--involves boiling the can of milk in a saucepan of water for 4-5 hours. (This method is slightly dangerous, because there's the chance the can might explode if the water level gets too low.) You can also make dulce de leche in an oven, using a pressure cooker, or--my favorite method--using a slow cooker.
As the name might suggest, the process is slow, but it's also ridiculously easy and requires no work or brain cells, so I think the trade-off is worth it. All you need to do is place the can of condensed milk in the slow cooker, then add enough water to cover the can by an inch. Place a lid on the cooker, and heat it on low for 8-9 hours. (Like I said: slow! You'll want to shoot for 8 hours for runnier dulce de leche, or 9 hours for stiffer dulce de leche.) Assuming you use a lid, you don't have to monitor it and refill the water, you just have to have the patience to wait all day for your dulce de leche to cook. As you might imagine, this is a good step to do a day in advance.
There are numerous way of making dulce de leche from condensed milk. The classic version--and the one you've probably been warned against--involves boiling the can of milk in a saucepan of water for 4-5 hours. (This method is slightly dangerous, because there's the chance the can might explode if the water level gets too low.) You can also make dulce de leche in an oven, using a pressure cooker, or--my favorite method--using a slow cooker.
As the name might suggest, the process is slow, but it's also ridiculously easy and requires no work or brain cells, so I think the trade-off is worth it. All you need to do is place the can of condensed milk in the slow cooker, then add enough water to cover the can by an inch. Place a lid on the cooker, and heat it on low for 8-9 hours. (Like I said: slow! You'll want to shoot for 8 hours for runnier dulce de leche, or 9 hours for stiffer dulce de leche.) Assuming you use a lid, you don't have to monitor it and refill the water, you just have to have the patience to wait all day for your dulce de leche to cook. As you might imagine, this is a good step to do a day in advance.
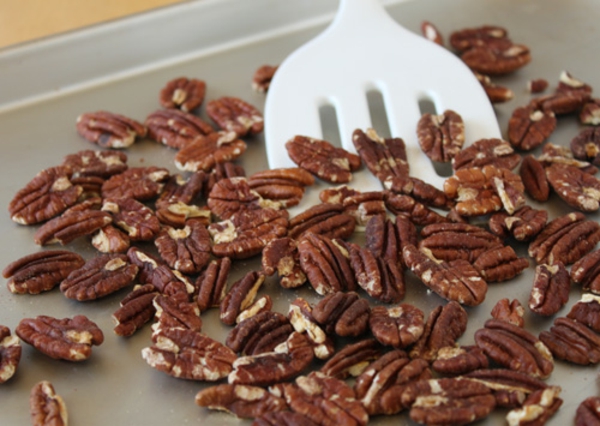 While you're waiting for the dulce de leche to be ready, prepare the rest of the recipe components. Place the
 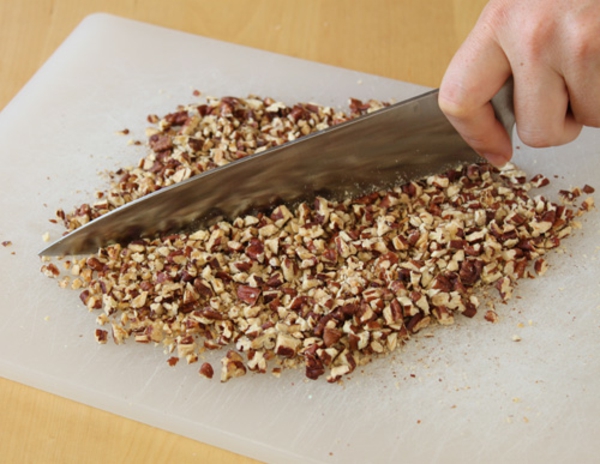 Let the
 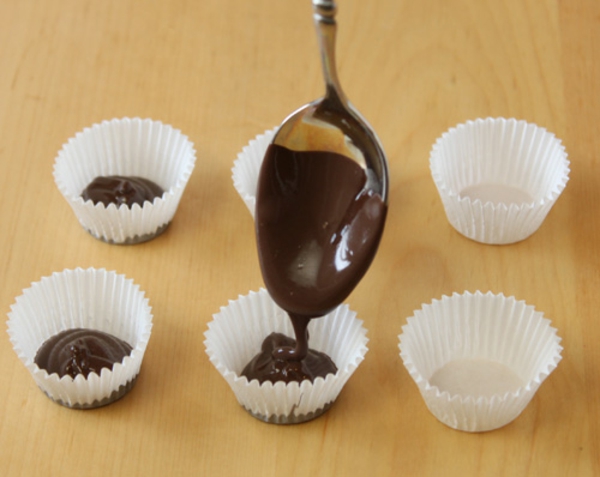 The next step is to prepare the chocolate cups. I recommend using chocolate candy coating for this step, as opposed to real
 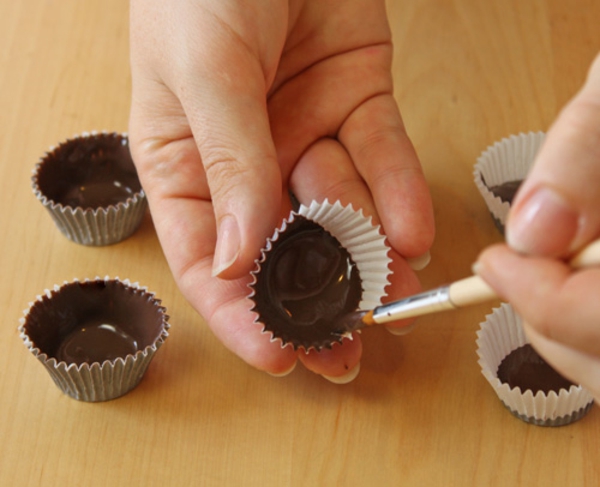 Hold the cup in one hand and tilt it at an angle. Use the paintbrush to nudge the coating from the bottom of the cup up the sides, until the cup is entirely painted with chocolate on the inside. Hold it up to the light to look for weak spots, and make sure that any translucent spots or gaps are covered with chocolate.
Repeat this process until all of the candy cups are lined with chocolate coating. Set the cups aside to firm up until you're ready to fill them, and keep the extra coating handy, as you'll need them to top the cups later.
Hold the cup in one hand and tilt it at an angle. Use the paintbrush to nudge the coating from the bottom of the cup up the sides, until the cup is entirely painted with chocolate on the inside. Hold it up to the light to look for weak spots, and make sure that any translucent spots or gaps are covered with chocolate.
Repeat this process until all of the candy cups are lined with chocolate coating. Set the cups aside to firm up until you're ready to fill them, and keep the extra coating handy, as you'll need them to top the cups later.
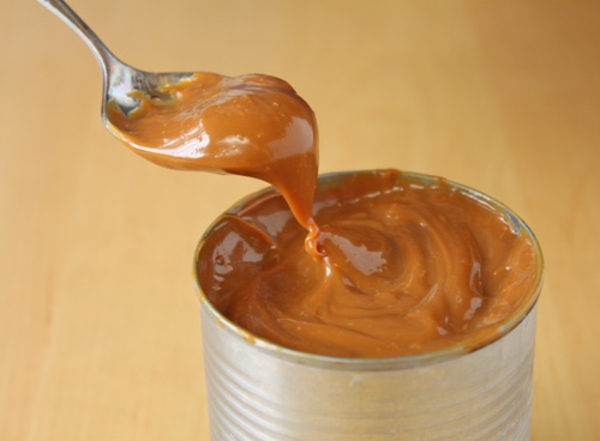 Once the dulce de leche is finished cooking, let it cool completely before opening the can, to prevent burns. (This is why it's a good idea to make the dulce de leche a day in advance!) Once you open the can you'll be greeted by smooth, rich, milky caramel.
 Transfer the dulce de leche from the can into a bowl, and add three-quarters of the chopped
 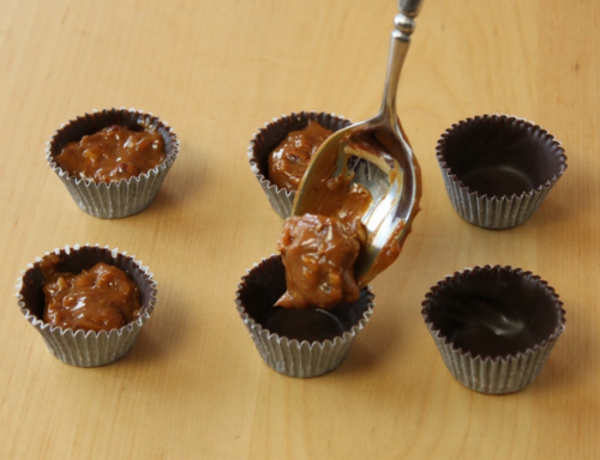 Use a spoon to drop small spoonfuls of the mixture into the chocolate cups. Make sure that you leave a little room at the top so they can be covered with chocolate. If the dulce de leche is on the stiffer side, wet your finger with water and press the top down so it's a smooth, even surface.
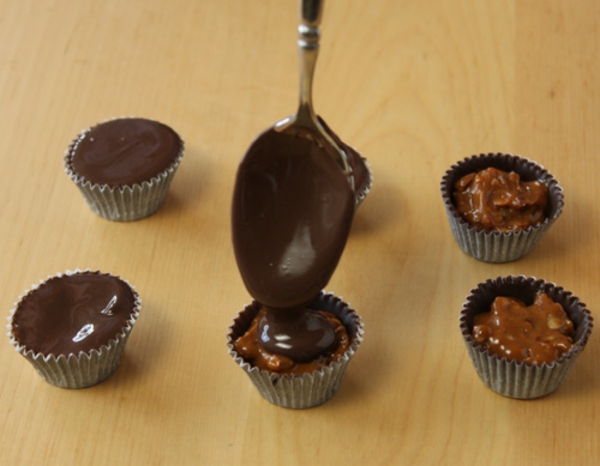 Re-melt the remaining chocolate coating, and again working with 5-6 cups at a time, spoon a bit of coating on top of the dulce de leche. Use the spoon to nudge the coating to the edges of the cup, making sure that it forms a tight seal with the chocolate around the edges.
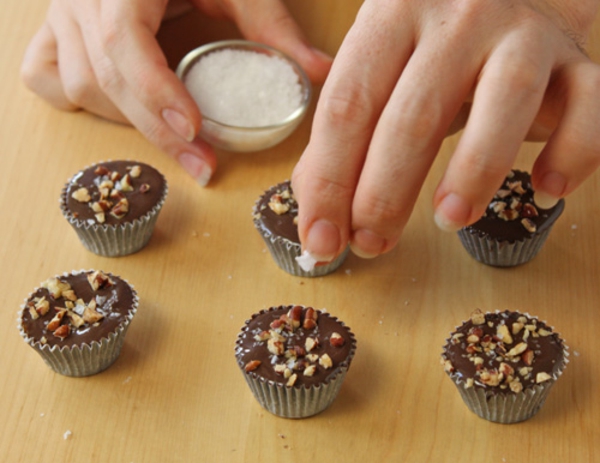 While the chocolate coating is still wet, sprinkle the tops of the cups with some of the remaining chopped
 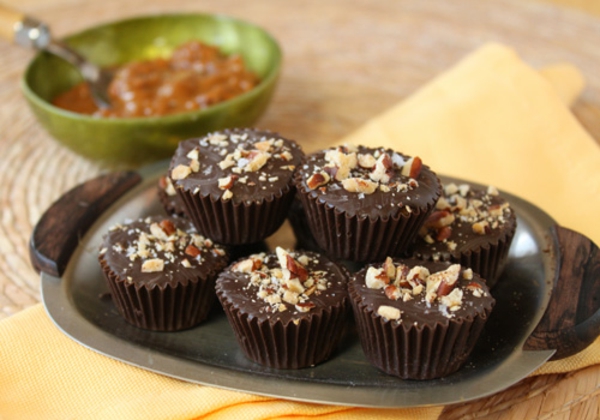 These Dulce de Leche Cups can be stored in an airtight container at room temperature for up to two weeks, or in the refrigerator for up to a month.
You can also use this method of making chocolate shells to create other candies. Try filling them with truffle ganache, caramel, mousse, ice cream, or whipped cream...but to be honest, once you taste the dulce de leche and pecan filling, you might not be interested in trying anything else!
All text and images (c)
These Dulce de Leche Cups can be stored in an airtight container at room temperature for up to two weeks, or in the refrigerator for up to a month.
You can also use this method of making chocolate shells to create other candies. Try filling them with truffle ganache, caramel, mousse, ice cream, or whipped cream...but to be honest, once you taste the dulce de leche and pecan filling, you might not be interested in trying anything else!
All text and images (c) 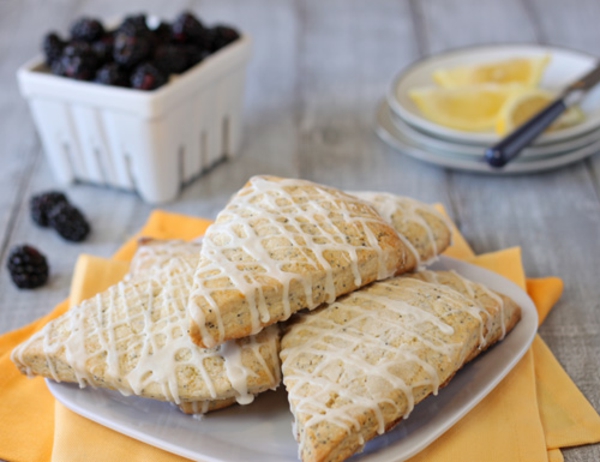 These scones are my ideal breakfast! food. They're indulgent but not too heavy. They're sweet but not cloying, so I can eat several of them and not regret it. They take a little time but aren't too complicated or fussy. And the lemon and
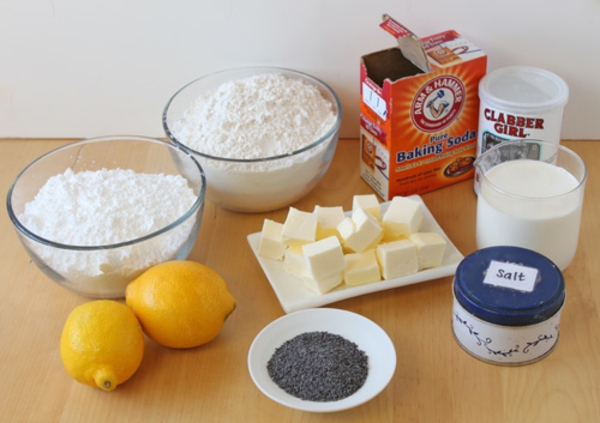 Lemon Poppy Seed Scones Recipe
yield: 8 large or 12 medium scones
Lemon Poppy Seed Scones Recipe
yield: 8 large or 12 medium scones
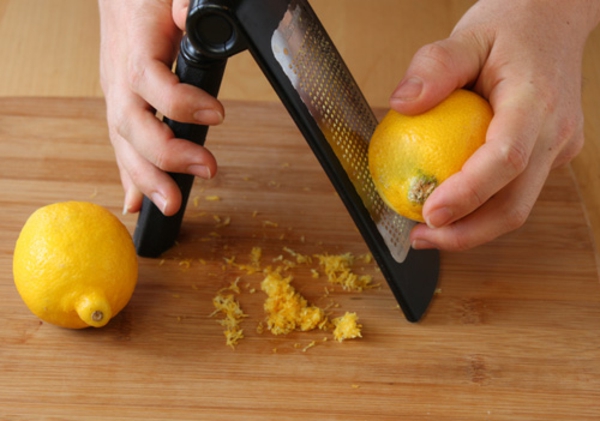 Preheat your oven to 375 degrees Fahrenheit. Start by zesting the large lemons. Use a microplane if you have it, otherwise, use a grater with the smallest holes you can find, and chop the zest up finely with a sharp knife.
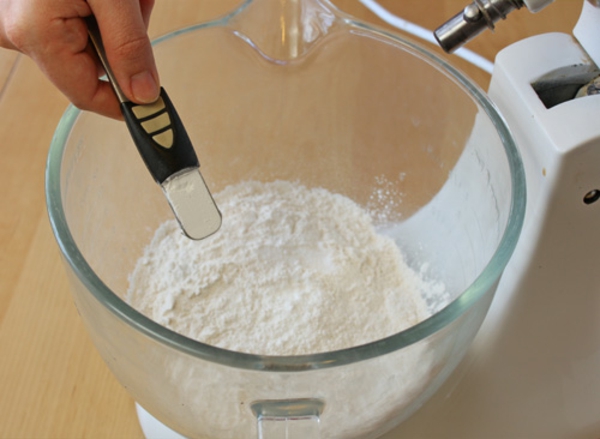 In the bowl of a large stand mixer, combine the flour, powdered sugar, baking powder, baking soda, and salt. Turn the mixer on low speed and run it for 20-30 seconds, until the dry ingredients are well-mixed.
 Add the lemon zest and
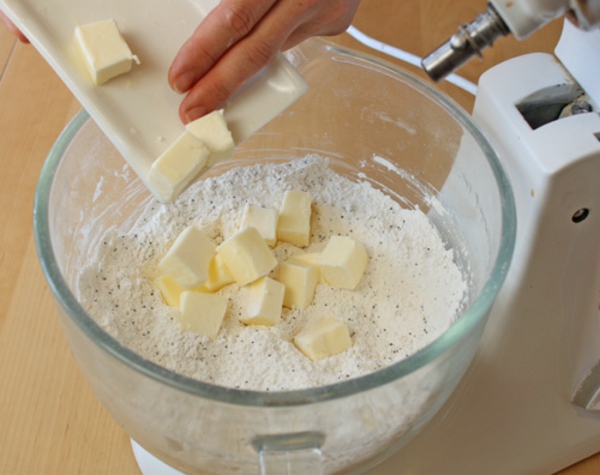 Add the cold butter cubes to the dry ingredients, and mix on low speed. Stay by the mixer and watch it carefully, as you don't want to over-mix at this stage.
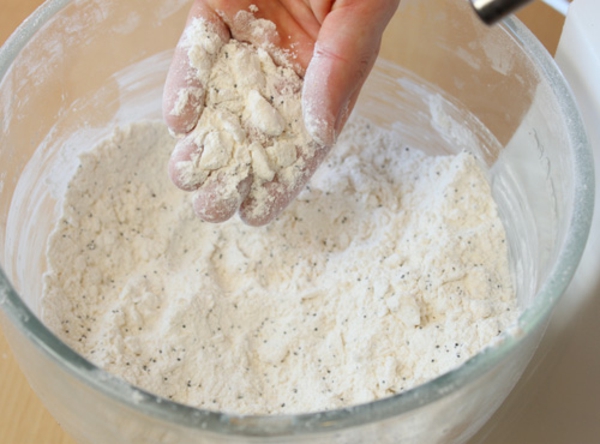 Mix everything together until the mixture is crumbly, and you have butter pieces ranging from the size of oatmeal flakes to the size of peas. Stop mixing when you still have chunks of butter--this will make your scones flaky and tender.
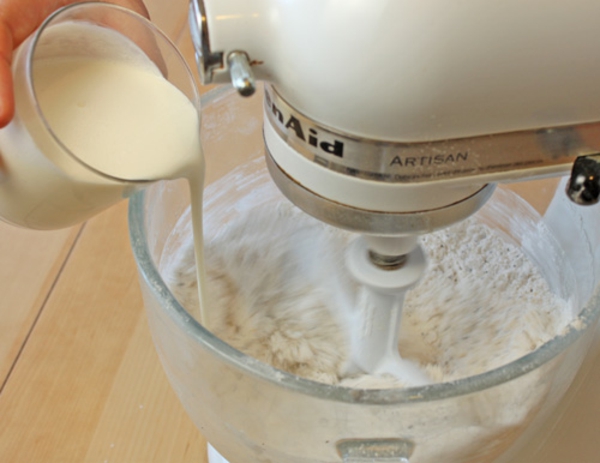 Now, with the mixer running on low, stream in the cold heavy cream and mix just until it's almost incorporated. Stop the mixer when you still have some streaks of flour, and stir the last of the flour in by hand with a spatula, making sure to scrape down the bottom and sides of the bowl.
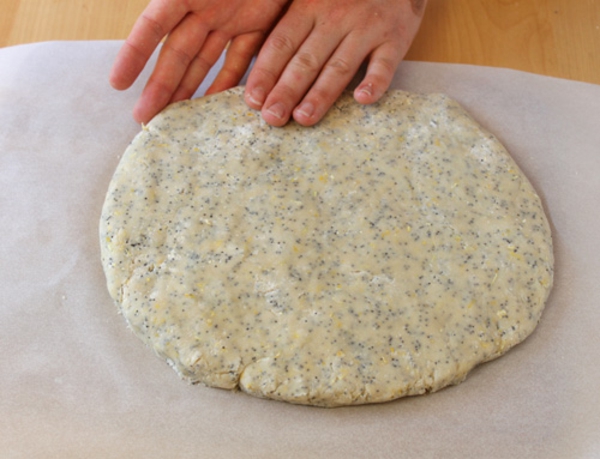 Turn the scone dough out onto a floured work surface, and knead it together gently. Don't work it too much, or the scones will be tough. Press the dough into a circle about 3/4-inch thick.
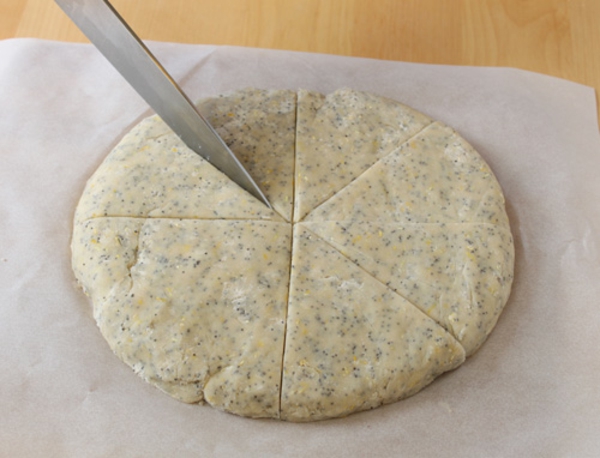 If you have the time, chill the dough for 30 minutes. This step can be omitted, but it improves the taste and texture of the scones if you can manage to plan far enough in advance! Use a large sharp knife to cut the scones into wedges. This recipe will yield eight (very!) large scones, or twelve medium-sized scones.
 Brush the tops of the scones with a little cream or milk, then sprinkle them with a generous dusting of granulated sugar. Bake the scones in the preheated 375 F oven for 22-25 minutes, until they are puffed, with a crackly top and golden brown edges.
 Let the scones cool completely, then make the glaze. Sift the powdered sugar into a medium bowl, and squeeze the juice from one lemon over the sugar. Stir the sugar and juice together. The mixture will be very difficult to stir at first, but as you continue to stir it should turn into a thick liquid. Add 2 teaspoons of milk, and check the texture: it should drip in a thick ribbon from a spoon and hold its shape for a few seconds before running together. If it's too thick, add another spoonful of milk, but resist the temptation to add lots of extra liquid: if it's too thin, the glaze will run everywhere once you drizzle it on the scones.
 Dip a spoon in the glaze, and drizzle the glaze over the scones in a criss-cross pattern. Let them sit at room temperature for about 20 minutes to set the glaze before serving the scones.
 Enjoy these lemon poppy seed scones with a pat of butter, a little whipped cream, or your favorite jam or jelly. They're best the day they're made, but if you wrap them well, they can be stored for several days at room temperature.
All text and images (c)
Enjoy these lemon poppy seed scones with a pat of butter, a little whipped cream, or your favorite jam or jelly. They're best the day they're made, but if you wrap them well, they can be stored for several days at room temperature.
All text and images (c) 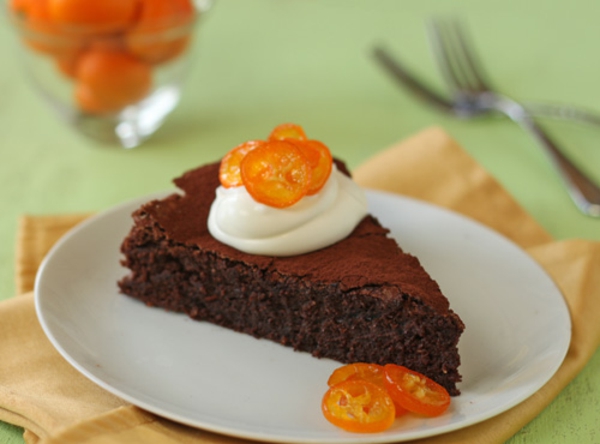 This is a flourless chocolate cake made with almond flour instead of flour. It's moist, rich, fudgy, and the perfect end to a Passover celebration. Even if you don't celebrate Passover, chances are you celebrate chocolate desserts in general, so this recipe has something for everyone.
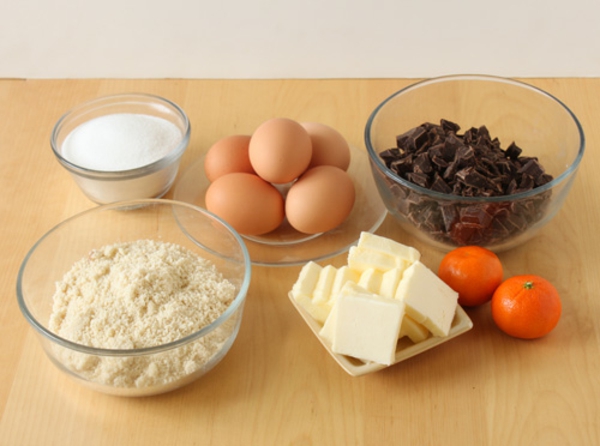 Flourless Chocolate Cake for Passover
yield: one 9-inch cake
Flourless Chocolate Cake for Passover
yield: one 9-inch cake
 You can make your own almond flour by grinding toasted almonds in a food processor, but they won't be quite as finely chopped as if you buy the flour pre-made.
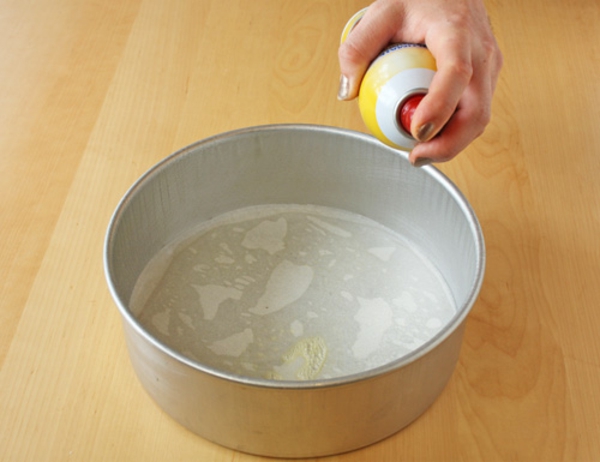 Preheat the oven to 350 degrees Fahrenheit. You'll need a 9-inch springform (cheesecake) pan or a cake pan with a removable bottom for this recipe, because the cake is too delicate to remove otherwise. Spray the pan with nonstick cooking spray and cover the bottom with parchment paper.
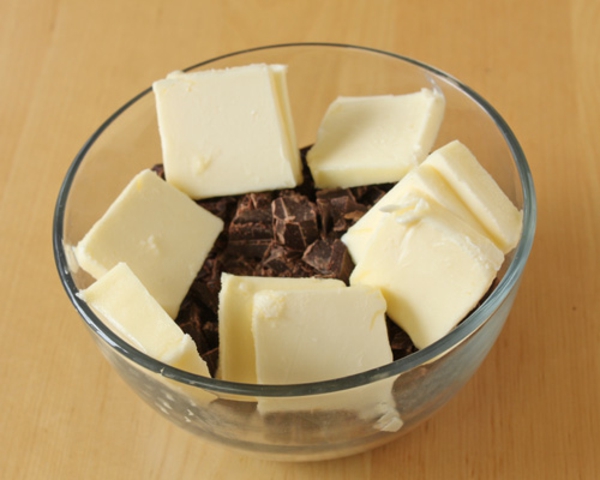 Start by combining the chopped chocolate and the cubed butter in a microwave-safe bowl. Microwave it in 30-second increments, stirring after every 30 seconds so the chocolate doesn't overheat.
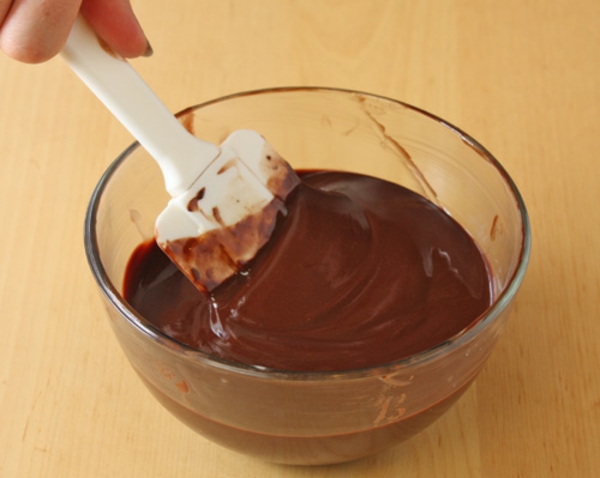 Once the chocolate and butter are completely melted together, set it aside to cool to room temperature while you prepare the rest of the cake.
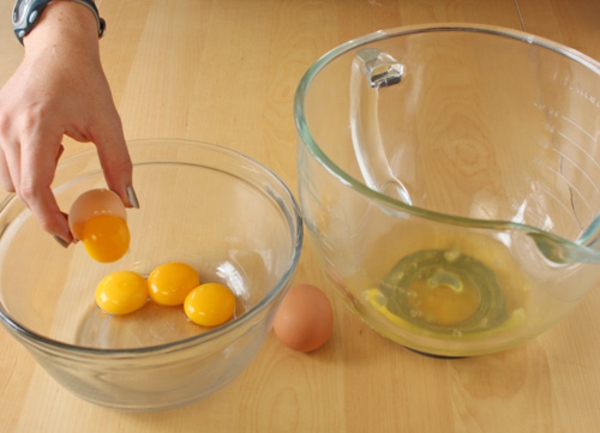 Separate the room temperature eggs, putting the yolks in one large bowl and the whites in a large mixing bowl.
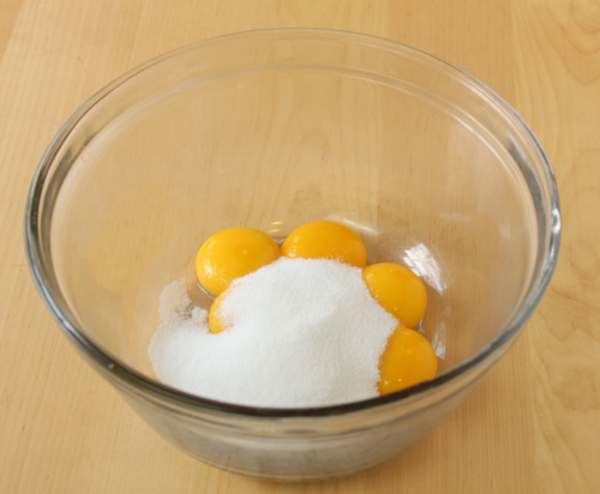
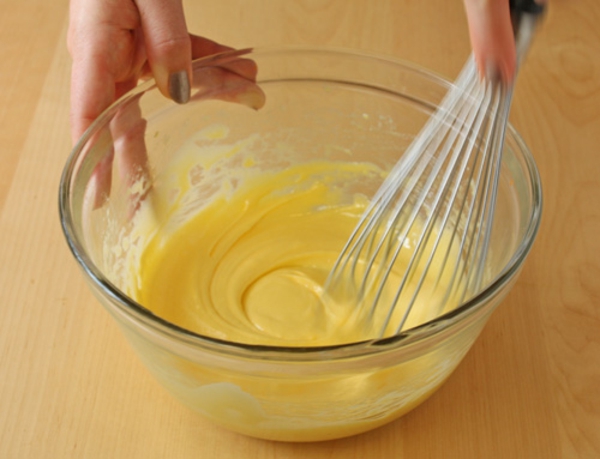 Add 1/3 cup of the granulated sugar to the bowl of yolks, and vigorously whisk them together until the yolks are thickened and pale yellow. If you have a hand mixer, you can mix them on medium speed instead, but there's nothing wrong with burning a few extra calories and doing this step by hand.
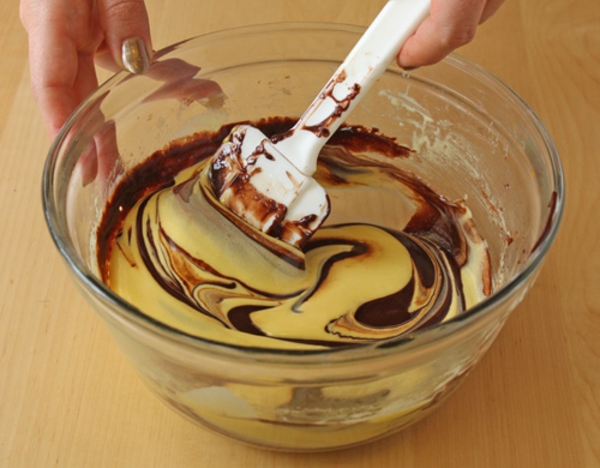 Carefully fold the cooled, melted chocolate into the yolks.The idea is to keep the light texture of the yolks, so stir gently!
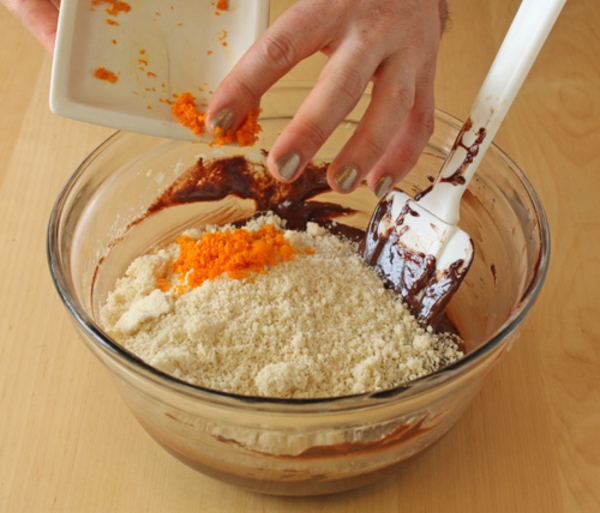 Add the almond flour and the citrus zest, if you're using it, t to the chocolate bowl, and stir those in as well.
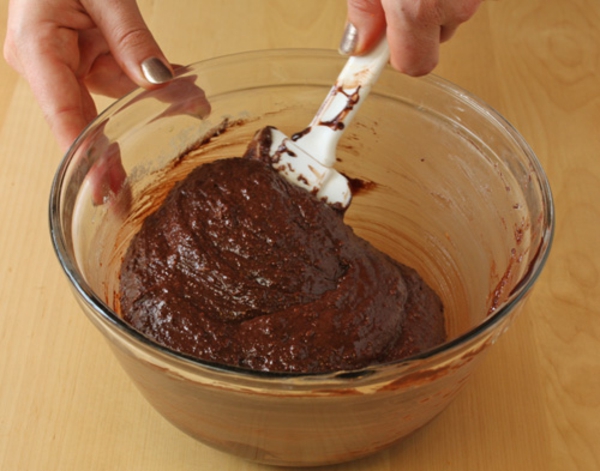 When you're finished, you'll have a tasty chocolate mixture with a slightly grainy texture from the almonds.
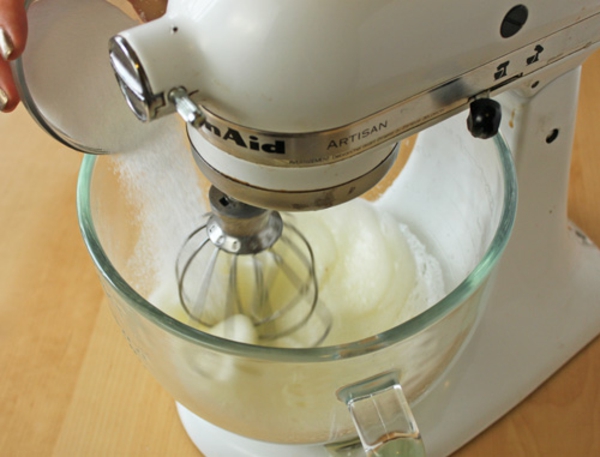 Remember our egg whites? Those are now ready to be mixed. Start beating them in a mixer fitted with a whisk attachment on medium-high speeds. Once they have started to hold soft peaks, gradually stream in the remaining 1/3 cup of granulated sugar and continue beating them until they hold firm peaks.
 What you DON'T want to do is overbeat them until they're stiff and crumbly. My favorite way to describe perfectly beaten egg whites is to look for the texture of shaving cream. The whites will have a lot of volume and hold their peaks well, but still have a soft, supple texture.
 Gently fold 1/3 of the beaten egg whites into the bowl of chocolate. This is called "the sacrifice" and it helps lighten the chocolate mixture so that the rest of the whites blend in easily and keep their airy texture in the finished cake. Once the whites are folded in, add the rest of the whites in two batches, again stirring gently.
 Scrape the cake into the prepared pan and smooth it into an even layer.
 Bake the cake at 350 degrees F for 35-40 minutes, just until it's dry on top and has juuuust started to show a crack or two. (I prefer 35 minutes for a fudgier cake.) Let the cake cool completely at room temperature before unmolding it.
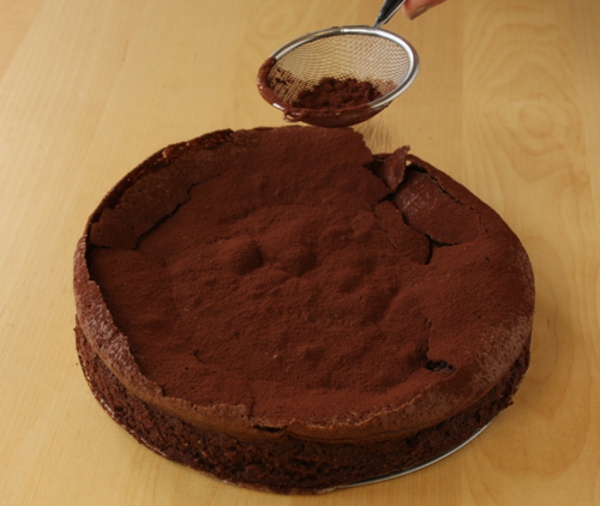 As it cools it will probably develop more cracks on top. This is fine. This is normal. If they bother you, you can add a cosmetic sprinkling of cocoa powder on top of the cake. I promise absolutely no one will be noticing the cracked top when you serve them this deliciously moist, tender, bursting-with-chocolate cake!
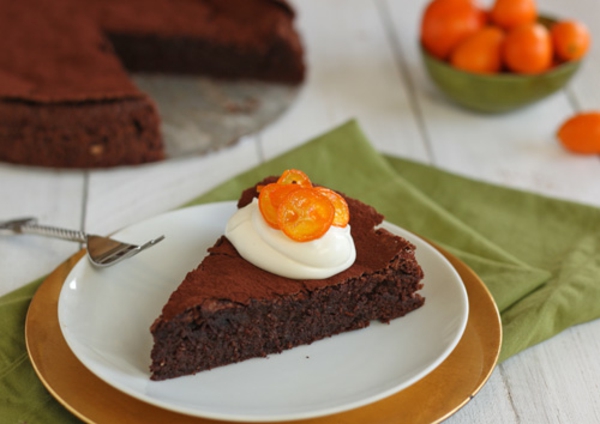 This flourless chocolate cake does provide a pretty intense chocolate dose, so I like to serve it with whipped cream and a fruit topping, to cut the richness and provide some different textures and flavors. You could also add chopped nuts on top, or coconut, or caramel sauce.
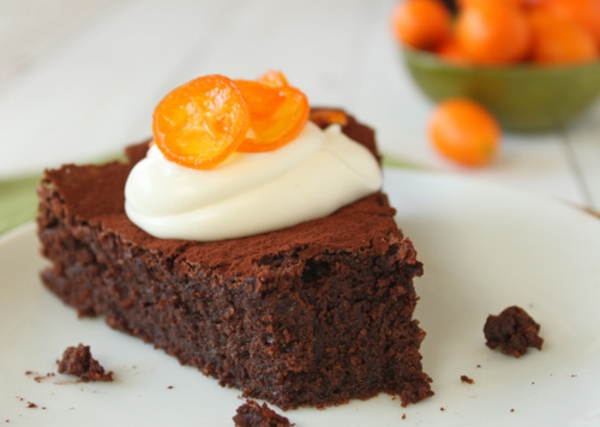 Because it is so moist and fudgy, this Passover cake keeps really well. Wrap it and store it at room temperature in an airtight container, and you can enjoy chocolate cake for up to a week...if it lasts that long.
Don't miss these other Passover dessert recipes:
Because it is so moist and fudgy, this Passover cake keeps really well. Wrap it and store it at room temperature in an airtight container, and you can enjoy chocolate cake for up to a week...if it lasts that long.
Don't miss these other Passover dessert recipes: