How To Make Edible Fruit Bouquets and Arrangements
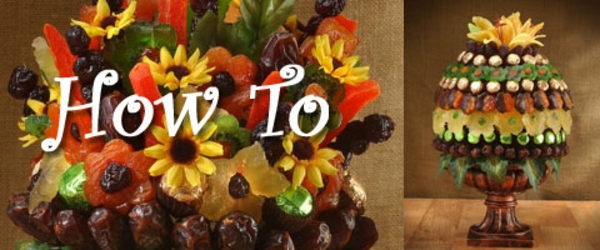
Enjoy this video on How To Make Edible Fruit Bouquets and Arrangements. Using Dried Fruit and chocolate.
Full Transcript
What I’m doing is demonstrating how this particular piece is made. You can use any kind of fruit or chocolate to create your own masterpiece.
We’re going to start off with a ceramic base, such as this. We’re going to need a six inch Styrofoam ball. The key to this is that the ball is about two inches larger than the actual base itself. A glue gun to glue the leaves to the base. A flower shaped cookie cutter. A pack of toothpicks, very common. We got ourselves a wire cutters, here, so that we can cut the flowers.
Again, you can use any kind of fruit that you prefer, any kind of shape or design; it’s the individual’s artistic expression. For this particular one, as you can see here, having the straight lines are very important. So what we’ll do is, we’re going to start off at the bottom, with a line all the way around the diameter of it. With the first line will be our dates. And then, our second line will be chocolates, which again will go around the circumference of the bowl, and we’ll follow that line continuously, building up. And at the point of finishing it, well, we’ll finish it with flowers, as we have our roses, here.
So, what we’ll do is, we’re going to start off here with preparing the base. I’ve already started with a few leaves here, using the glue gun. Once you have the glue gun heated up, you basically want to put a few little drops, bring it on the side, and cut some leaves, here. And just apply them on, like this. What’s best is when you cut your leaves, to try to have them all universal size. So again, we’ll take the Styrofoam ball, I’m going to glue this down to the base, here. Okay. Just takes a few moments for the hot glue to set.
Before I dip this in the chocolate, I’ll give you…I’ll show you how it’s actually cut. Take our dried pineapple piece, like so. Use our cutter. What we’re going to do is, we’re going to just gently, but furiously, push down and cut through the pineapple. Now this particular fruit, because of the sweetness and the sugar levels in it, sometimes you’ll get stuck to the cutter. So you might actually have to use your hands, and gently just remove the excess pieces. This could be set aside, for later use. And then we’ll just gently push the pineapple out of the cutter.
By using the dried kiwi that we have here, we have another cutter to make a nice little round cut; to fill in the center of the pineapple. Now we’ll take this piece, here. Then gently but firmly, just push through, take the extra, the excess, put that aside for later use.
The dried apricots here, what I’ll do is, give you the exact same example. And then we’re going to use the flower cookie cutter. And, mind you, you can use any shape or any size of cookie cutters for the same process; it’s just depends on what flowers, or what objects you prefer to have on your Fruitopia. What’s great about working with your food like this, if you have any mistakes, you can eat them.
Okay, so what we’re going to do is, start with these medjool dates. You just gently, but firmly, push them in. Okay. And you can see how it’s a lot of fun. Then we add the crusts. Again this is a great way…I don’t know, most children don’t appreciate fruit. I know most children appreciate chocolate, though. So this is a great way to incorporate healthier eating for desserts for a lot of young children.
As you see, on this finished product here, artificial leaves on the bottom for the base, and artificial flowers on top give it a little color and some beauty. And any flower from any craft store can be sufficient, we’ll just place it here, on top.
Fruitopia, from Oh! Nuts. Here we go!