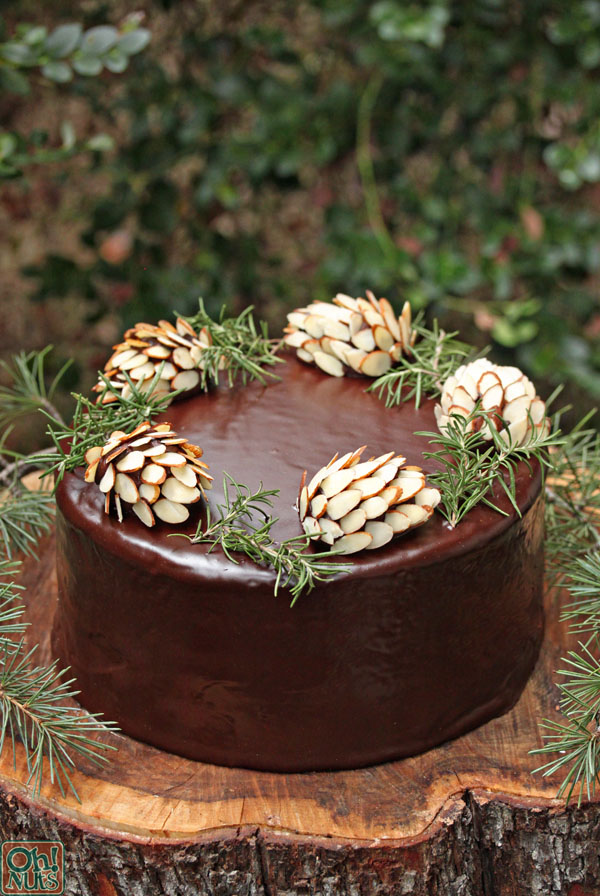
Chocolate Pine Cones
Prep time
Total time
This recipe can be easily halved, if you don't need a large number of pine cones. It can also be doubled, if you want to make an entire forest of chocolate pine cones!
Author: Elizabeth
Serves: 36
Ingredients
- 18 oz (3 cups) chocolate chips
- 14 oz (1 standard can) sweetened condensed milk
- 2 oz unsalted butter
- ¼ tsp salt
- 1 tsp almond extract (can substitute vanilla or another flavor of your choice)
- ½ cup milk chocolate wafers
- 3 cups sliced natural raw almonds
Instructions
- Combine the chocolate chips, condensed milk, butter, salt, and almond extract in a large microwave-safe bowl. Microwave for one minute, then stir well. If some of the chocolate chips haven't melted, microwave in 20-second increments, stirring every time, until the mixture is entirely melted and smooth.
- Press a piece of plastic wrap directly on top of the chocolate, and let it sit and firm up enough to roll—about 2 hours at room temperature, or 45 minutes in the refrigerator. If it gets too cool it will be difficult to work with, so if possible I like to let it sit at room temperature just to be safe.
- Use a cookie scoop to form balls of dough about 1½-inches—you should get about 36 pinecones of this size. If you want to use a ¼-cup scoop, you'll get pinecones about 3-4 inches long, and you should get about 15 of this size. Whichever size you choose, place your scoops on a baking sheet covered with waxed paper or parchment.
- Roll the fudge between your palms into an oval shape. Gently pinch one end so that it comes to a subtle point and has a pine cone shape.
- Melt the milk chocolate wafers in the microwave, and stir until smooth. Dip one side of the bottom of a sliced almond in the melted coating, and press it against the back of one of the fudge pine cones. Dip a second sliced almond, then place it next to the first one, overlapping it slightly. Continue to add sliced almonds in an overlapping pattern, working back to front, until your fudge pine cone is covered with almonds. For the most realistic look, use only whole pieces of almond, and try to tilt them forward (instead of having them stick straight up and down).
- Once all of the pine cones are decorated, refrigerate the tray to set them briefly, for about 15 minutes. Place them on cakes, cupcakes, tarts, or use them as an edible place setting! They're a little delicate, since the almonds are prone to breaking if handled roughly, so I recommend using a spatula or knife to transfer them instead of grabbing them by hand.
Recipe by Oh Nuts Blog at https://www.ohnuts.com/blog/chocolate-pinecones/