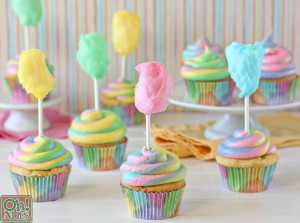
Cotton Candy Cupcakes
Okay, party people, hold on to your pointy hats, because I’m about to share the cutest party idea ever! These Cotton Candy Cupcakes are super fun, super easy, and super adorable!

It’s simple to turn regular cupcakes and boring white frosting into these beautiful multicolored desserts! A few drops of food coloring are all you need to make these gorgeous frosting swirls, and they’re the perfect base for the mini cotton candy toppers. Oh Nuts sells a wide variety of delicious flavored cotton candy in bright colors, like Pink Cotton Candy (cherry), Blue Cotton Candy (raspberry), Yellow Cotton Candy (lemon), and Green Cotton Candy(lime). If you carefully wrap a little cotton candy around a lollipop stick, it looks just like a miniature version of the real thing!

Can you imagine a whole tray of cotton candy cupcakes lined up at a kid’s birthday party, a baby shower, or a carnival-themed event? They’re so eye-catching and fun! You can also use this same idea and top a birthday cake with a border of cotton candy sticks. It’s an easy idea, but there are a few tips and tricks to make it go smoothly, so check out the step-by-step pictures and recipe down below. Let’s get our cotton candy on!

Cotton Candy Cupcakes
yield: 24 cupcakes
Ingredients
- 24 cupcakes, baked and cooled
- 8 cups white buttercream frosting
- Assorted food coloring
- Two disposable piping bags
- 24 lollipop sticks (6-8 inches)
- Cotton candy (I used yellow, green, pink, and blue)

Start by making that boring white frosting a bit more interesting! First off, you can add any flavoring extract you’d like–vanilla, coconut, almond, lemon, or orange are all great choices. Once the frosting is the flavor of your choice, decide how many different colors you want. I recommend using 3-5–any fewer than that, and you might not get the rainbow effect, and any more than that and the frosting can start to look too muddy or busy.
Divide the frosting into the number of bowls that you need, and add a few drops of coloring to each bowl. Stir until each color is bright and vivid, with no white streaks remaining.

Use a spatula to spread a thick stripe of each color up the inside of a disposable piping bag. If it helps, you can stick the bag inside a tall glass before filling it, to give it more strength and structure. You will have too much frosting for one piping bag, so use about half of each color to fill this one bag, and then fill a second bag the same way.

When you finish, you should have two piping bags full of stripes of different colors of frosting. Don’t worry if they’re not perfectly even–the swirls will still turn out beautifully. Twist the bag closed at the top, and snip off the tip so that there is a 1/2-inch opening at the bottom.

Squeeze the bag for a minute, until the frosting starts to come out multi-colored. Pipe generous swirls on top of the cupcakes. When the first bag runs out, snip the tip off the second bag and continue piping until all of the cupcakes are frosted. Set the cupcakes aside for a moment.

To make the miniature cotton candy sticks, take a generous pinch of cotton candy and press it around the top of a lollipop stick. Don’t be afraid to really squish it together, so that it adheres to the stick. It won’t look pretty, but it’s necessary to make a secure, sturdy cotton candy stick. Besides, it will be covered up in the end!

Now, take more cotton candy and gently press it around the top, being carefully not to compact it so that it remains light and fluffy. Try to gently tear the cotton candy apart so that it retains its airy, cottony texture. Continue building layers of cotton candy until it is the size you want. Repeat with more sticks and candy until you have as many as you need. Note that the cotton candy will start to absorb moisture from the air almost as soon as they’re assembled, so this is not a good make-ahead activity. Make these toppers right before you’re ready to serve the cupcakes! You probably have 20-30 minutes between assembly and when they start to look bedraggled–less in very stormy weather, and more in a dry climate.

To finish, stick the cotton candy sticks down through the frosting and into the cupcakes. Serve and enjoy them immediately!

As always, there’s an easily printable recipe and pin-able image below. I hope you enjoy, and I can’t wait to see how you use this idea for your own parties!
- Decide how many different colors of frosting you want, and divide the buttercream into that many bowls. Add a few drops of food coloring to each bowl and mix until you have vibrant pastel colors.
- Use a spatula to spread a thick stripe of each color up the inside of a disposable piping bag. If it helps, you can stick the bag inside a tall glass before filling it, to give it more strength and structure. Repeat with the remaining colors until your bag is full of vertical stripes of frosting.You will have too much frosting for one piping bag, so use about half of each color to fill this one bag, and then fill a second bag the same way. Twist the bag closed at the top, and snip off the tip so that there is a ½-inch opening at the bottom.
- Pipe generous swirls of multi-colored frosting on top of each cupcake. When your first frosting bag runs out, snip the tip off the second bag and continue until all of the cupcakes are frosted. Once they're frosted, set aside for a moment.
- To make the miniature cotton candy sticks, take a generous pinch of cotton candy and press it around the top of a lollipop stick. Don't be afraid to really squish it together, so that it adheres to the stick. Now, take more cotton candy and gently press it around the top, being carefully not to compact it so that it remains light and fluffy. Continue building layers of cotton candy until it is the size you want. Repeat with more sticks and candy until you have as many as you need.
- Stick the cotton candy sticks down through the frosting and into the cupcakes. Serve and enjoy immediately!

All text and images (c) Elizabeth LaBau