Pretzel Ladybugs
It’s almost summer, the weather is fabulous, and it’s time to get outdoors! Picnics, park days, garden parties, Pretzel Ladybugs…you know, the usual.
Okay, Pretzel Ladybugs might not be a usual part of your summer routine, but I think they should be! They’re easy, and delicious, and the perfect treat for a picnic, birthday party, or any outdoor-themed event.

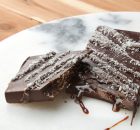
If you like chocolate-covered pretzels (and you should, unless you’re a monster with no tastebuds) then you’ll love these Pretzel Ladybugs! Pretzels are dipped in candy coating, then decorated with other types of candy like candy beads, chocolate-covered peanuts, and candy eyeballs. They’re sweet and salty, and they’d make adorable party favors for a kid’s birthday party.

They’re also great cake or cupcake toppers, and I’ll share with you a few tips for making these grass and flower-topped cupcakes down below. Ready to rock your summer and get started? Here’s what you’ll need:

Pretzel Ladybugs
yields: 24 ladybugs
Ingredients
- 9 oz (1 1/2 cups) red melting chocolate wafers
- 24 mini twist pretzels
- 24 chocolate-covered peanuts or Junior Mints
- Black candy beads
- 48 small candy eyeballs
- Baked and cooled cupcakes
- Vanilla frosting tinted green, yellow, and blue
- Assorted piping bags and tips

Put the red melting chocolate wafers into a microwave-safe bowl and microwave them in short increments. Stir after every 30 seconds to prevent them from overheating. Sometimes I get questions about candy wafers becoming lumpy and not melting properly in the microwave, and a big cause is improperly heating them. If wafers are overheated, they will become lumpy and there’s not that can be done to salvage them. The best thing is to prevent it entirely by microwaving in short bursts and stirring often. If the coating still seems a little thick when it’s melted, you can add a spoonful of shortening to thin it out and make dipping easier.

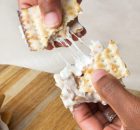
After the red coating is melted and smooth, use dipping tools or a fork to dip a pretzel into the coating. Place it on a parchment-covered baking sheet, and repeat twice more so you have 3 pretzels dipped. Working with just a few pretzels at a time means that you’ll be able to decorate them fully before the coating starts to set.

Use a spoon to pour a little melted coating into the center of each pretzel, and swirl it around until it’s a smooth, even layer.

Press a chocolate-covered peanut or Junior Mint into the bottom of each pretzel. I like to let them hang off the bottom a little, so the ladybug’s head looks a bit more separated from the wings.

Drop the black candy beads onto the wings. If you don’t have black beads, miniature chocolate chips would work well here, too.

Take a toothpick and dab two dots of red coating onto each chocolate head, and press a candy eyeball onto the dots, affixing them firmly. If you don’t have candy eyeballs, you can use melted white and dark chocolate to make your own eyes.
After you’ve finished your 3 ladybugs, do another batch of them, and repeat until all of your ladybugs are assembled! Refrigerate the tray to set the coating completely, for at least 20 minutes. After this, you can serve your ladybugs, package them up for a party, or use them as cake or cupcake decorations. If you want to make cute grass cupcakes like I did, here’s how to do it.

You’ll need what’s called a “grass tip”–it’s a piping tip with lots of small holes on top, used for making grass or fur. Fit a grass tip onto a piping bag and fill it with green buttercream. Pipe grass all over the tops of your cupcakes.

To make these easy flowers, fit a star tip onto a piping bag and fill it with blue or yellow frosting. Pipe stars onto the grass, and fill in the center with a dot of a contrasting color. Finish each cupcake off with one or two pretzel ladybugs!

As always, there’s an easily printable recipe down below, and a pin-able image showing how easy it is to make these ladybugs. Enjoy!
- 9 oz (1½ cups) red melting chocolate wafers
- 24 mini twist pretzels
- 24 chocolate-covered peanuts or Junior Mints
- Black candy beads
- 48 small candy eyeballs
- Baked and cooled cupcakes
- Vanilla frosting tinted green, yellow, and blue
- Assorted piping bags and tips
- Place the red melting wafers in a medium microwave-safe bowl and microwave in 30-second increments, stirring after every 30 seconds so the wafers don't overheat. Stir and heat until the wafers are melted and smooth.
- Cover a baking sheet with parchment paper or waxed paper. Use dipping tools or a fork to dip a mini pretzel into the red coating, then place it on the baking sheet. Repeat twice more, so you have 3 dipped pretzels—you'll want to work with just a few pretzels at a time, so the coating doesn't have a chance to set before they can be fully assembled.
- Use a spoon to pour a little melted coating into the center of each pretzel. Press a chocolate-covered peanut or Junior Mint on the bottom of the pretzels. Drop black candy beads onto the top of the pretzel's "wings." Finally, dip a toothpick into the bowl of coating and dab two dots of red onto the head. Press an eyeball onto each dot to firmly affix it. Once your three ladybugs are assembled this way, repeat with the rest of the pretzels until they've all been dipped and decorated.
- If you want to create grassy cupcakes to put your ladybugs on, fit a piping bag with a grass tip and fill it with green buttercream. Pipe grass on top of the cupcakes. Switch to a star tip and fill a bag with yellow or blue frosting, and pipe small star-shaped flowers across the grass. Finish up with a dot of contrasting buttercream in the center of the flowers.
- Place the pretzel ladybugs on the cupcakes and serve!

All images and text (c) Elizabeth LaBau