How to Make Almond Milk (Step by Step) – Recipe

When almond milk was first on the market, my brother visited my house and spied a carton of almond milk in the refrigerator. Picking it up, he snorted derisively and asked, “How do you milk an almond?” Almond milk–and other milk alternatives–have come a long way since those early days! Now multiple brands and flavors can be found in many grocery stores, and people are recognizing that they’re not just for the lactose intolerant–many folks simply enjoy the slightly nutty flavor and ultra-creamy texture of almond milk.
You can purchase almond milk easily enough, but along with those almonds comes lots of sugar, preservatives, stabilizers, and other not-so-natural ingredients. But I have good news! Making homemade almond milk is actually really simple, and produces a deliciously creamy beverage with minimal effort. So whether you’re already an almond milk devotee or are curious to see what all the fuss is about, let’s make almond milk–no actual milking of almonds required.
Almond Milk Recipe
Yield: about 5 cups almond milk
Ingredients
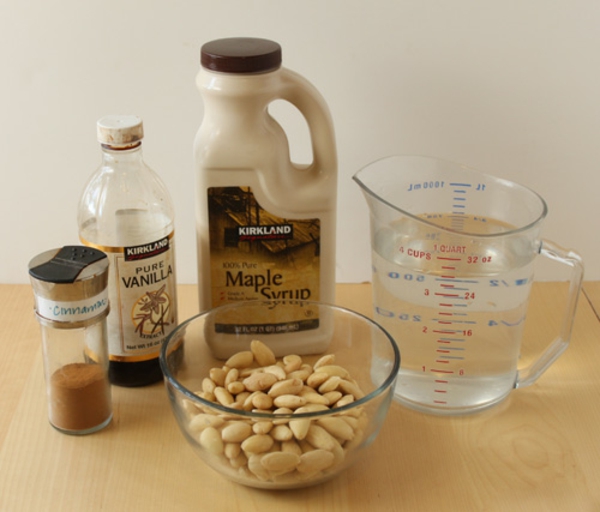
- 1.5 cups whole blanched almonds or other whole raw almonds
- 4 cups water
- 1 tsp vanilla extract
- 1.5 tbsp maple syrup or honey
- dash cinnamon
Other equipment:
Ingredients
- Blender
- metal strainer
- cheesecloth
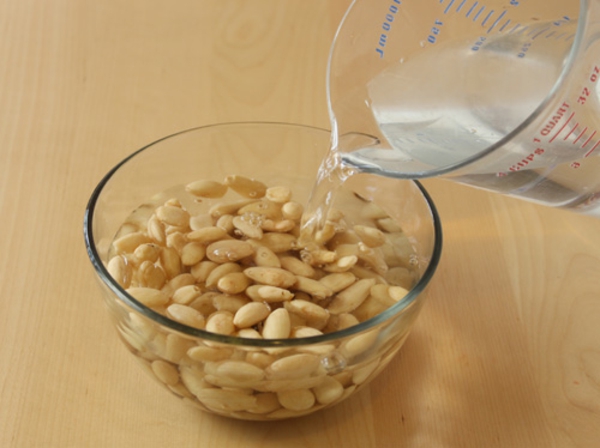
First thing, get to soaking those almonds. I like to use whole blanched almonds because they already have the papery, slightly bitter almond skins removed. If you don’t have blanched almonds you can either blanch them yourself, or use regular almonds. They work just fine, but you might have to strain your milk a little more carefully to get all the skins out. At any rate, the most important characteristic is that your almonds are raw, not toasted.
Cover the almonds with water, and soak them for at least 4 hours, or overnight.This softens them and makes them much easier to blend.
Once they’re soft, it’s time to milk those suckers. Strain the water from the almonds, and place the soaked almonds in your blender. Add 1.5 cups of water. We blend them with less water in the beginning, so they become a really smooth paste.
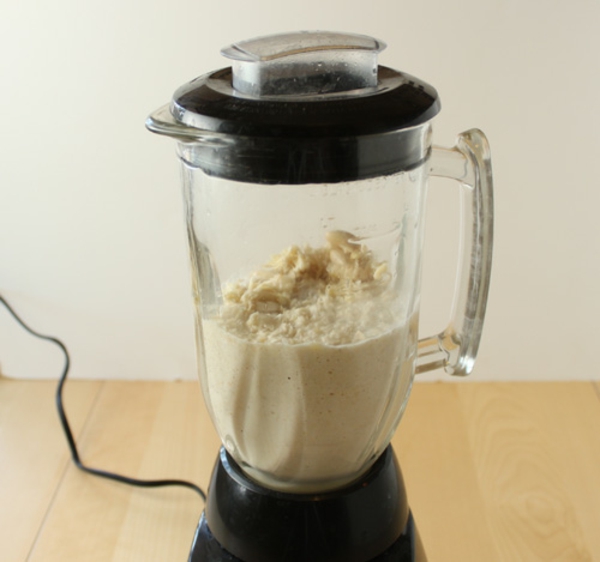
Blend the almonds and water for 1-2 minutes. If your blender is weak like mine, you’ll probably need to stop a few times and move things around with a spatula. Do not be alarmed that your almond milk starts out looking like chunky baby food. This is all part of the plan.
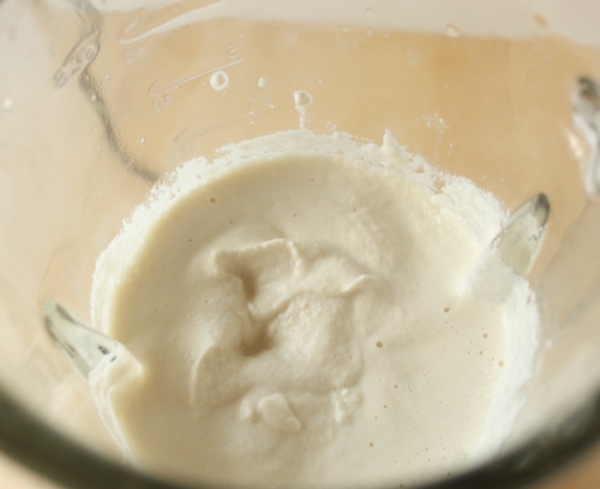
After a few minutes, you should have a beautiful smooth puree, like this. However, we’re not making almond puree, so we need to keep going. Add the cinnamon and maple syrup or honey…
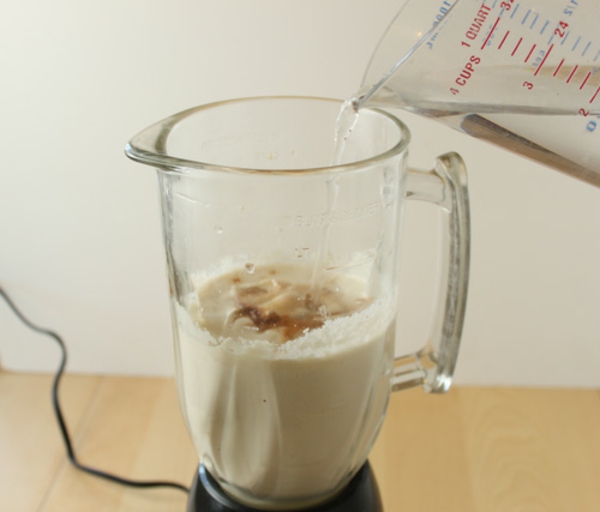
And add the remaining 2.5 cups of water. Blend everything together for another 2-3 minutes, until it is completely smooth and frothy. Taste the milk, and adjust the vanilla, cinnamon, and sweetener to taste. You might also find that a pinch of salt brings out the other flavors in the milk.
At this point the milk could technically be finished–after all, you have a substance with the color and consistency of milk, right? But all the almond solids in the milk tend to give it a chalky texture, so for a smoother, more creamy product we’ll strain the almond milk.
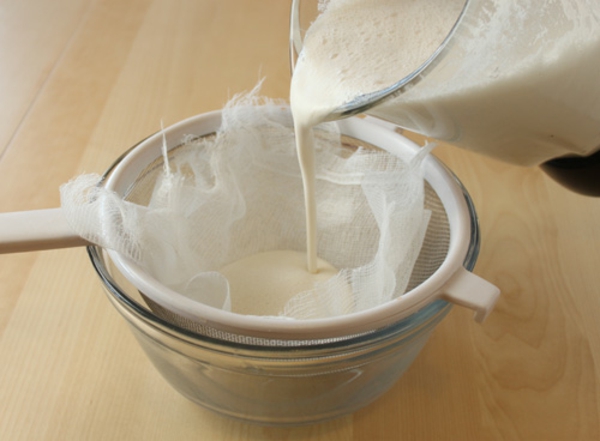
Place 3 or 4 layers of cheesecloth over a metal strainer set over a bowl. The strainer or a single layer of cheesecloth wouldn’t strain the almond milk well enough, since it’s so well-blended. Pour the almond milk through the strainer into the bowl. You might have to do this part in batches, depending on the size of your strainer and bowl. Use a spoon or spatula to press down on the strainer and move the solids around, to help the almond milk through the cheesecloth.

Once most of the milk has passed through the strainer, gather up the cheesecloth and gently squeeze it to remove excess liquid. You’ll be left with really fine almond meal inside the cheesecloth. You can discard it, or you can dry it out in a very low oven and use it in place of almond flour in baking recipes!
")
Hey, you’ve made almond milk! Well done. You can use it in place of milk for drinking, on cereal, or in many baking recipes, and I can personally recommend it as an accompaniment for warm chocolate chip cookies. It keeps in the refrigerator for 3-4 days. Now that you’ve seen how easy it is to make almond milk, you can experiment with using other nuts—raw cashews also make a delicious milk alternative.
- 1.5 cups whole blanched almonds or other whole raw almonds
- 4 cups water
- 1 tsp vanilla extract
- 1.5 tbsp maple syrup or honey
- dash cinnamon
- First thing, get to soaking those almonds. I like to use whole blanched almonds because they already have the papery, slightly bitter almond skins removed. If you don’t have blanched almonds you can either blanch them yourself, or use regular almonds. They work just fine, but you might have to strain your milk a little more carefully to get all the skins out. At any rate, the most important characteristic is that your almonds are raw, not toasted.
- Cover the almonds with water, and soak them for at least 4 hours, or overnight.This softens them and makes them much easier to blend.
- Once they’re soft, it’s time to milk those suckers. Strain the water from the almonds, and place the soaked almonds in your blender. Add 1.5 cups of water. We blend them with less water in the beginning, so they become a really smooth paste.
- Blend the almonds and water for 1-2 minutes. If your blender is weak like mine, you’ll probably need to stop a few times and move things around with a spatula. Do not be alarmed that your almond milk starts out looking like chunky baby food. This is all part of the plan.
- After a few minutes, you should have a beautiful smooth puree, like this. However, we’re not making almond puree, so we need to keep going. Add the cinnamon and maple syrup or honey…
- And add the remaining 2.5 cups of water. Blend everything together for another 2-3 minutes, until it is completely smooth and frothy. Taste the milk, and adjust the vanilla, cinnamon, and sweetener to taste. You might also find that a pinch of salt brings out the other flavors in the milk.
- At this point the milk could technically be finished–after all, you have a substance with the color and consistency of milk, right? But all the almond solids in the milk tend to give it a chalky texture, so for a smoother, more creamy product we’ll strain the almond milk.
- Place 3 or 4 layers of cheesecloth over a metal strainer set over a bowl. The strainer or a single layer of cheesecloth wouldn’t strain the almond milk well enough, since it’s so well-blended. Pour the almond milk through the strainer into the bowl. You might have to do this part in batches, depending on the size of your strainer and bowl. Use a spoon or spatula to press down on the strainer and move the solids around, to help the almond milk through the cheesecloth.
- Once most of the milk has passed through the strainer, gather up the cheesecloth and gently squeeze it to remove excess liquid. You’ll be left with really fine almond meal inside the cheesecloth. You can discard it, or you can dry it out in a very low oven and use it in place of almond flour in baking recipes!