Brownie-Filled Chocolate Easter Eggs
Eggs are everywhere this time of year. Hard-boiled eggs, plastic eggs, jelly eggs…it’s hard to walk five feet in the grocery store without tripping over an egg display! So it’s not surprise that when it came time to brainstorm ideas for a fun Easter dessert, I had eggs on the brain. Although I have nothing against traditional candy eggs, I wanted my Easter dessert to be a little more special than just throwing some jelly beans on top of a cupcake. I wanted this dessert to be a little more egg-ceptional, if you will.

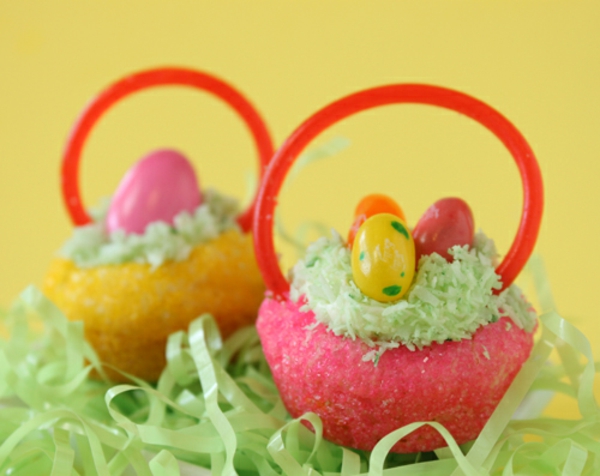
These Brownie-Filled Chocolate Easter Eggs are certainly egg-stra special! (I should warn you that this is not the last terrible egg pun.) They’re gorgeous hollow chocolate eggs, decorated with beautiful colored patterns seamlessly blended right into the chocolate shell. And as the name might suggest, they’re filled with rich, fudgy brownies, decorated with frosting “grass” and topped with an assortment of Easter candy.

Each brownie-filled egg is the perfect individually portioned dessert. Display them together for a beautiful Easter dinner centerpiece, then serve them on individual plates with a fork for guests to enjoy! You can also try topping them with whipped cream, ice cream, or chocolate sauce. Ready to make your Easter dessert extra egg-citing? (Okay, okay, I’ll stop.) Here’s what you need to get started!

Brownie-Filled Chocolate Easter Eggs
yield: Five 4-inch chocolate eggs
Ingredients
- Box brownie mix, and ingredients to prepare mix
- 20 0z brown melting milk chocolate wafers
- 8 oz assorted colors melting chocolate wafers
- 1 1/2 cups prepared frosting
- Green food coloring
- Candy eggs for decoration, like Pastel Jordan Almonds, Fruit Cordial Eggs, and Sweet N’ Sour Jelly Eggs
- 4-inch chocolate egg mold

Mix and bake the box of brownie mix in a 9×9-inch pan according to the package directions. Alternately, you can use your favorite homemade brownie recipe that fits in a 9×9-pan. But since we’re doing so much work to make the chocolate eggs, I suggest taking a few shortcuts when you can! Once the brownies are baked, let them cool while you prepare the chocolate eggs.

Divide the colored wafers into small cups by color, and microwave them individually until melted. Stir frequently to prevent the wafers from overheating and scorching. Pour the colored wafers into paper cones or small plastic bags with a small hole snipped in the corner. If you want to try your hand at making parchment paper cones, here’s a photo tutorial showing how it’s done.

To make the chocolate egg, you’ll need an egg mold. Look for one that’s about 4 inches long, with a smooth interior, and that has both a top and a bottom cavity–the bottom will be flattened so that the eggs can easily balance on their side. Egg molds can be easily found online, and they are often at many specialty candy supply stores and craft stores around Easter time.
Pipe a design onto the inside of the egg mold. Polka dots and stripes are both easy and look great, but you can get fancier and make any design you like! Remember that if you want to write words, you need to write them backwards so they will be legible once they’re flipped out of the mold. When you are done making your design, keep the bags of colors in an oven that is just slightly warm(not hot), so that they stay liquid in between uses.

Refrigerate the mold to set the colored wafer design. While you’re waiting for the colors to set, place the melting milk chocolate wafers into a bowl and microwave them until melted, stirring after every 30 seconds to prevent overheating. Let the melted chocolate cool until it is no longer warm, but is still fluid. It should thicken a bit as it gets closer to room temperature. The warmer it is, the more likely it is to melt the colored design, so ideally it should be as close to room temperature as possible while still having a liquid consistency. When it is the right temperature, pour several generous spoonfuls of chocolate into the egg mold.

Use a clean paintbrush to paint the chocolate up the sides of the mold. Add more chocolate if necessary, working until you have a thick layer of chocolate on the bottom and sides of each egg-shaped cavity. Try to keep a thick layer of chocolate on the brush so it doesn’t drag through the colored design underneath.

Run an offset spatula or knife around the edge of the egg to remove any excess chocolate and make a clean line. Refrigerate the mold to set the chocolate completely, for about 20 minutes.

Once set, turn the mold upside-down a few inches over your counter and gently flex it to remove the chocolate egg. Repeat this process until you have made five chocolate egg shells. Wipe the inside of the mold off between uses so it remains clean and shiny, and reheat the chocolate and bags of colored coating as necessary.
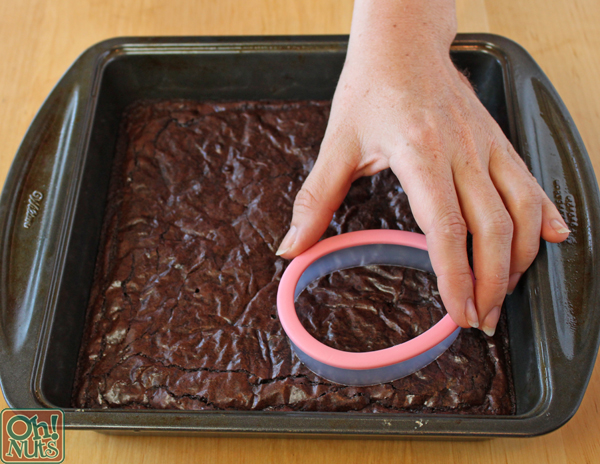
If you have an egg-shaped cutter that’s the approximate size of your egg mold, use that to cut out five egg-shaped brownies. If not, use a knife to cut out egg-shaped brownies.

Gently place a brownie in the bottom of each chocolate egg.

Mix the frosting with a bit of green food coloring to make a grass color. Transfer it to a piping bag fitted with a star tip, or to a plastic bag with a hole cut in the corner. Pipe the frosting on top of the brownies to resemble grass.

Top each brownie with the candy eggs. Finish by carefully placing the top of the egg on each base, and serve! You can also try filling these eggs with cake, mousse, or even ice cream! If you want to keep things traditional, you can simply fill them with candy, pipe a thin layer of chocolate coating on the edge, and press the two halves together to make a hollow chocolate egg with a surprise inside. There are so many ways to enjoy these beautiful eggs! As always a printable recipe and pin-able image are down below. Enjoy!

Brownie-Filled Chocolate Easter Eggs
yield: Five 4-inch chocolate eggs
Ingredients
- Box brownie mix, and ingredients to prepare mix
- 20 0z brown melting milk chocolate wafers
- 8 oz assorted colors melting chocolate wafers
- 1 1/2 cups prepared frosting
- Green food coloring
- Candy eggs for decoration, like Pastel Jordan Almonds, Fruit Cordial Eggs, and Sweet N’ Sour Jelly Eggs
- 4-inch chocolate egg mold
Directions
- Mix and bake the box of brownie mix in a 9×9-inch pan according to the package directions. Let the brownies cool while you prepare the chocolate eggs.
- Divide the colored wafers into small cups by color, and microwave them individually until melted. Stir frequently to prevent the wafers from overheating and scorching. Pour the colored wafers into paper cones or small plastic bags with a hole snipped in the corner.
- Pipe a design onto the inside of the egg mold. Polka dots and stripes are both easy and look great, but you can get fancier and make any design you like! Remember that if you want to write words, you need to write them backwards so they will be legible once they’re flipped out of the mold. When you are done making your design, keep the bags of colors in an oven that is warm but not hot, so that they stay liquid in between uses.
- Refrigerate the mold to set the colored wafer design. While you’re waiting for the colors to set, pour the chocolate wafers into a bowl and microwave them until melted, stirring after every 30 seconds to prevent overheating. Let the melted chocolate cool until it is no longer warm, but is still fluid. It should thicken a bit as it gets closer to room temperature. The warmer it is, the more likely it is to melt the colored design, so ideally it should be as close to room temperature as possible while still having a liquid consistency.
- Pour several generous spoonfuls of chocolate into the egg mold, then use a clean paintbrush to paint it up the sides of the mold. Add more chocolate if necessary, working until you have a thick layer of chocolate on the bottom and sides of each egg-shaped cavity. Try to keep a thick layer of chocolate on the brush so it doesn’t drag through the colored design underneath.
- Run an offset spatula or knife around the edge of the egg to remove any excess chocolate and make a clean line. Refrigerate the mold to set the chocolate completely, for about 20 minutes.
- Once set, turn the mold upside-down a few inches over your counter and gently flex it to remove the chocolate egg. Repeat this process until you have made five chocolate egg shells.Wipe the inside of the mold off between uses so it remains clean and shiny, and reheat the chocolate and bags of colored coating as necessary.
- If you have an egg-shaped cutter that’s the approximate size of your egg mold, use that to cut out five egg-shaped brownies. If not, use a knife to cut out egg-shaped brownies. Gently place one in the bottom of each egg.
- Mix the frosting with a bit of green food coloring to make a grass color. Transfer it to a piping bag fitted with a star tip, or to a plastic bag with a hole cut in the corner. Pipe the frosting on top of the brownies to resemble grass.
- Top each brownie with the candy eggs. Finish by carefully placing the top of the egg on each base, and serve!
- Box brownie mix, and ingredients to prepare mix
- 20 0z brown melting milk chocolate wafers
- 8 oz assorted colors melting chocolate wafers
- 1½ cups prepared frosting
- Green food coloring
- Candy eggs for decoration, like Pastel Jordan Almonds, Fruit Cordial Eggs, and Sweet N' Sour Jelly Eggs
- 4-inch chocolate egg mold
- Mix and bake the box of brownie mix in a 9x9-inch pan according to the package directions. Let the brownies cool while you prepare the chocolate eggs.
- Divide the colored wafers into small cups by color, and microwave them individually until melted. Stir frequently to prevent the wafers from overheating and scorching. Pour the colored wafers into paper cones or small plastic bags with a hole snipped in the corner.
- Pipe a design onto the inside of the egg mold. Polka dots and stripes are both easy and look great, but you can get fancier and make any design you like! Remember that if you want to write words, you need to write them backwards so they will be legible once they're flipped out of the mold. When you are done making your design, keep the bags of colors in an oven that is warm but not hot, so that they stay liquid in between uses.
- Refrigerate the mold to set the colored wafer design. While you're waiting for the colors to set, pour the chocolate wafers into a bowl and microwave them until melted, stirring after every 30 seconds to prevent overheating. Let the melted chocolate cool until it is no longer warm, but is still fluid. It should thicken a bit as it gets closer to room temperature. The warmer it is, the more likely it is to melt the colored design, so ideally it should be as close to room temperature as possible while still having a liquid consistency.
- Pour several generous spoonfuls of chocolate into the egg mold, then use a clean paintbrush to paint it up the sides of the mold. Add more chocolate if necessary, working until you have a thick layer of chocolate on the bottom and sides of each egg-shaped cavity. Try to keep a thick layer of chocolate on the brush so it doesn't drag through the colored design underneath.
- Run an offset spatula or knife around the edge of the egg to remove any excess chocolate and make a clean line. Refrigerate the mold to set the chocolate completely, for about 20 minutes.
- Once set, turn the mold upside-down a few inches over your counter and gently flex it to remove the chocolate egg. Repeat this process until you have made five chocolate egg shells. Wipe the inside of the mold off between uses so it remains clean and shiny, and reheat the chocolate and bags of colored coating as necessary.
- If you have an egg-shaped cutter that's the approximate size of your egg mold, use that to cut out five egg-shaped brownies. If not, use a knife to cut out egg-shaped brownies. Gently place one in the bottom of each egg.
- Mix the frosting with a bit of green food coloring to make a grass color. Transfer it to a piping bag fitted with a star tip, or to a plastic bag with a hole cut in the corner. Pipe the frosting on top of the brownies to resemble grass.
- Top each brownie with the candy eggs. Finish by carefully placing the top of the egg on each base, and serve!

All text and images (c) Elizabeth LaBau