How to make Apple Cake Pops
Fall is in the air, and you know what that means: back to school time, pumpkin spice lattes, cute scarves and boots, and apple desserts galore! If you’re tired of the same old apple pies and apple crisps, I suggest getting your apple fix in a different form: these apple cake pops!

They may not contain real apples, but what they lack in authenticity they make up in cuteness. These sweet pops are made from moist bites of cake and frosting mixed together, dipped in red melting chocolate and topped with a pretzel stem and green chocolate leaf. I actually used caramel apple-flavored cake and frosting, to make them super seasonal and appropriate, but you can mix and match your favorite cake and frosting flavors! These make adorable teacher gifts, party favors, or even after-school treats.

Additionally, Rosh Hashanah is right around the corner, and what better way to celebrate the new year than with this creative twist on the typical apple dessert? Kids and adults alike will love these bite-sized, completely addictive cake pops. And if you’re looking for other Rosh Hashanah dessert ideas, be sure to check out our recipes for Honey Cake, Apple Crumb Cake, and Honey Cake Skewers with Caramel Sauce!

Apple Cake Pops
yield: approximately 52-56 cake pops
Ingredients
- 1 box cake mix, plus ingredients to make cake
- 1 cup prepared frosting
- 2 lbs red melting chocolate wafers
- 4 oz (3/4 cup) green melting chocolate wafers
- 1/2 cup small pretzel sticks, broken into small 1/2-inch pieces
- 56 lollipop sticks
- Styrofoam or cake pop stand

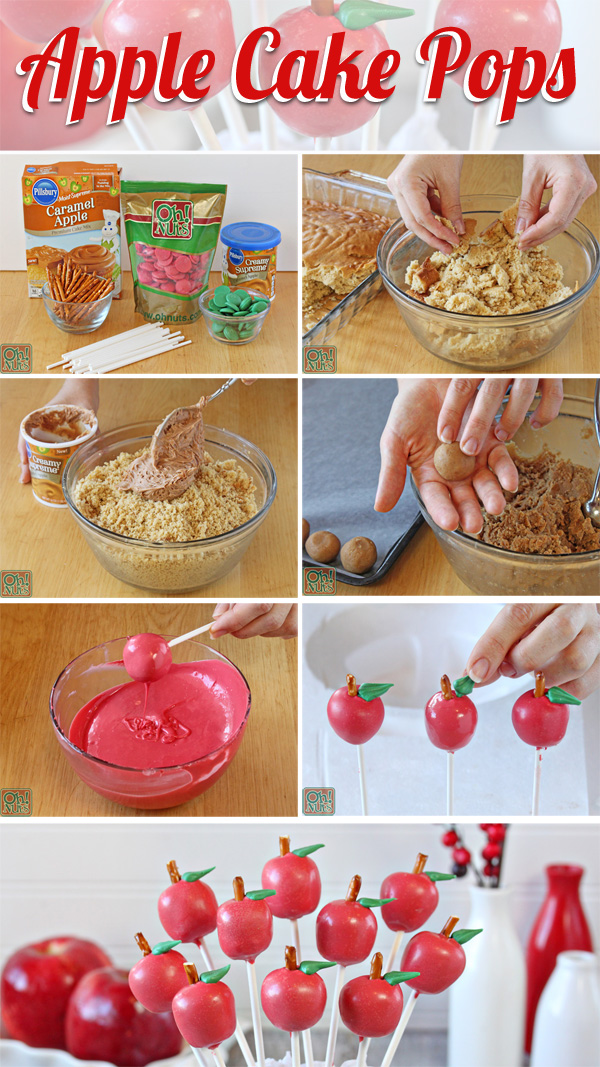
Prepare the cake in a 9×13-inch pan according to the package directions. You can use any flavor of cake you’d like–I found a seasonal caramel apple flavor, and used that to make the pops extra delicious and realistic! Bake the cake and let it cool completely before proceeding. The cake can be made several days ahead of time and kept, well-wrapped, at room temperature until you’re ready to make the pops.
Crumble the baked and cooled cake into a large bowl and work it gently between your fingers until it is in small pieces.

Add 3/4 cup of frosting to the cake crumbs, and stir them together until they’re well-combined and no streaks of frosting remain.

The mixture should be moist and hold together if you squeeze it into a ball between your fingers. If it seems too dry, add another spoonful or two of frosting, up to about 1 cup total, to get it to a workable consistency.

Use a small candy scoop or a spoon to scoop out small balls of cake. Roll them between your palms until they’re perfectly round.

If you want to make more of an apple shape, squeeze them at the bottom so that the top is wider than the bottom. Place the rolled truffles on a baking sheet covered with parchment or waxed paper. Chill the balls in the refrigerator for 2-3 hours, or until they’re very firm.

While you’re waiting for the truffles to chill, make the green leaves. Melt the green candy coating in the microwave, stirring after every 30 second to prevent overheating. Scrape the melted coating into a plastic bag, and snip a small hole in the corner.

If you want to make leaves with a realistic ridge in the center, like those in the picture, cut a triangle-shaped notch in the corner, instead of just snipping straight across. Having a diamond-shaped opening will give the piped leaves a little more texture and make them more realistic.

Cover a baking sheet with waxed paper or parchment, and pipe out about 60 small leaf shapes. You’ll only make about 52-56 cake pops, but it’s a good idea to make extra leaves in case of breakage. Refrigerate the tray to set the green leaves.

When the truffles are firm, place the red candy coating in a medium microwave-safe bowl and microwave it until melted, stirring after every 30 seconds to prevent overheating. Dip the tip of a lollipop stick into the melted coating, covering about 1/4-inch of the tip, then press it into the bottom of a cake ball—this will help anchor the stick into the cake pop and make dipping easier. Repeat until they’re all skewered on lollipop sticks.
Place the cake pops in the freezer for 10-15 minutes, until very firm but not frozen. Don’t freeze them completely, or they will crack when you dip them! You just want to get them nice and firm for dipping.
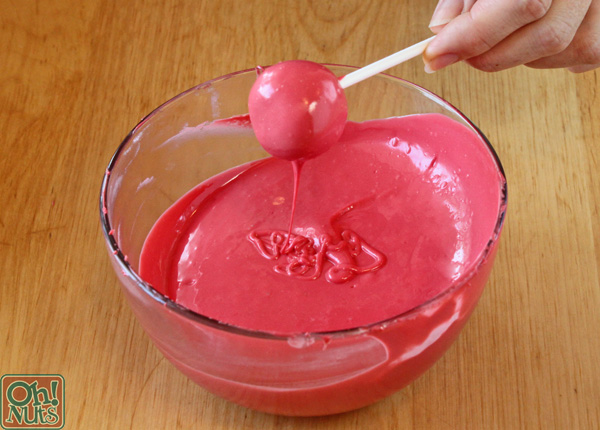
Re-warm the red coating, if necessary, then dip a cake pop fully into the candy coating until the cake is submerged. Take it out of the coating and gently tap the stick against the lip of the bowl so that excess coating drips off.

Stick the cake pop into a large piece of Styrofoam so that it stands upright. While the coating is still wet, push a piece of pretzel in the top for the stem, and set a green candy leaf alongside the pretzel. Repeat with the remaining cake pops until all of them are dipped and decorated.

Apple Cake Pops can be stored for up to a week in an airtight container in the refrigerator. For the best taste and texture, bring them to room temperature before serving. As always, there’s an easily printable recipe and pin-able image down below. Enjoy!
- 1 box cake mix, plus ingredients to make cake
- 1 cup prepared frosting
- 2 lbs red melting chocolate wafers
- 4 oz (3/4 cup) green melting chocolate wafers
- ½ cup small pretzel sticks, broken into small ½-inch pieces
- 56 lollipop sticks
- Styrofoam or cake pop stand
- Prepare the cake in a 9x13-inch pan according to the package directions. Bake the cake and let it cool completely.
- Crumble the baked and cooled cake into a large bowl and work it gently between your fingers until it is in small pieces. Add ¾ cup of frosting to the cake crumbs, and stir them together until they're well-combined and no streaks of frosting remain. The mixture should be moist and hold together if you squeeze it into a ball between your fingers. If it seems too dry, add another spoonful or two of frosting, up to about 1 cup total, to get it to a workable consistency.
- Use a small candy scoop or a spoon to scoop out small balls of cake. Roll them between your palms until they're perfectly round. If you want to make more of an apple shape, squeeze them at the bottom so that the top is wider than the bottom. Place the rolled truffles on a baking sheet covered with parchment or waxed paper. Chill the balls for 2-3 hours, or until firm.
- While you're waiting for the truffles to chill, make the green leaves. Melt the green candy coating in the microwave, stirring after every 30 second to prevent overheating. Scrape the melted coating into a plastic bag, and snip a small hole in the corner. Cover a baking sheet with waxed paper or parchment, and pipe out about 60 small leaf shapes. Refrigerate the tray to set the green leaves.
- When the truffles are firm, place the red candy coating in a medium microwave-safe bowl and microwave it until melted, stirring after every 30 seconds to prevent overheating. Dip the tip of a lollipop stick into the melted coating, covering about ¼-inch of the tip, then press it into the bottom of a cake ball—this will help anchor the stick into the cake pop and make dipping easier. Repeat until they're all skewered on lollipop sticks.
- Place the cake pops in the freezer for 10-15 minutes, until very firm but not frozen. Don't freeze them completely, or they will crack when you dip them! You just want to get them nice and firm for dipping.
- Re-warm the red coating, if necessary, then dip a cake pop fully into the candy coating until the cake is submerged. Take it out of the coating and gently tap the stick against the lip of the bowl so that excess coating drips off.
- Stick the cake pop into a large piece of Styrofoam so that it stands upright. While the coating is still wet, push a piece of pretzel in the top for the stem, and set a green candy leaf alongside the pretzel. Repeat with the remaining cake pops until all of them are dipped and decorated.
- Apple Cake Pops can be stored for up to a week in an airtight container in the refrigerator. For the best taste and texture, bring them to room temperature before serving.
All text and images (c) Elizabeth LaBau