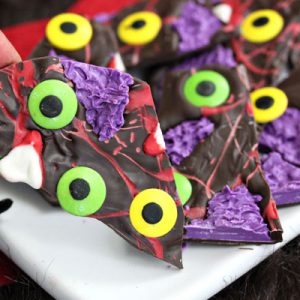
Monster Chocolate Bark – Great Halloween Candy Idea
This Monster Chocolate Bark is an easy, creepy Halloween candy recipe that’s sure to be a hit with all the ghosts and goblins in your life!

Halloween is all about the candy, but who says we have to stick with that store-bought stuff? I mean, come on. A bag of mini candy bars repackaged with little pumpkins or ghosts on them? Booooooring! I want legitimate Halloween candy–something delicious, yes, but also fun, creepy, and more than a little spooky! That’s where this MONSTER BARK comes in.

This homemade chocolate bark just screams Halloween candy! It starts with a chocolate base that’s decorated with all sorts of creepy accents like candy eyeballs, blood splatters, bloody fangs, and even purple monster fur bursting out of the chocolate. This NEEDS to be part of your Halloween celebrating this year!
Not only is it super bright and eye-catching, but it’s quick and easy to make, too! All of the work is done in the microwave, and it’s a good one for kids to help with–they can drizzle the red “blood,” help make the textured monster fur, and then go crazy putting all of the toppings on the chocolate. In short, it’s the perfect Halloween candy. Here’s how you make it!

Monster Chocolate Bark
Ingredients
- 4 oz purple candy coating
- 2 oz white candy coating
- 2 oz red candy coating
- 1 tsp shortening
- 12 oz chocolate candy coating
- Large candy eyeballs

Start by making the monster “fur” that’s going to poke out of the bark. Melt the purple candy wafers in the microwave, stirring after every 30 seconds so they don’t overheat or burn.
Cover a baking sheet with parchment or waxed paper, and spread the coating out into a thin layer. Let it sit for a minute so it starts to thicken, but not set up, then take a fork and begin tapping the top of the coating with the fork’s tines. The fork should make little peaks in the coating. If they immediately droop back down into the puddle of coating, wait another minute for it to thicken up a bit more.

Keep tapping the top of the coating all around, and soon it should look like a big patch of purple fur! Once you’re finished, refrigerate the tray briefly to set the purple coating, then break it up into small pieces by hand. Set aside for a moment.

Next, it’s time to make the monster fangs! Melt the white coating the same way you did the purple, and put it in a piping bag, paper cone, or just a plastic bag with a hole snipped in the corner. Cover another baking sheet with parchment, and pipe little triangles out, about 1/2-3/4 inch long. You’ll need about 15 for the bark, but make a few extras in case of breakage.
Use a toothpick to elongate the points of the fangs so they really look fierce. Refrigerate the tray briefly to set the fangs.


Combine the red coating and shortening in a small bowl, and melt in the microwave. (The shortening makes the red coating more fluid, which will be important later. If you don’t want to use shortening, coconut oil or vegetable oil will also work.) Dip the tips of the fangs in the red coating so they look like they’re covered with blood, and refrigerate again until set.

Next, melt the chocolate coating in the microwave. (Are you seeing a pattern with this recipe? Thank goodness for microwaves!) Cover a baking sheet with parchment, and spread the chocolate out into a thin layer about 1/4-inch thick.
Take the red coating and drizzle and flick it all over the chocolate bark in a random pattern, so that it looks like blood splatters. If it’s too thick, re-warm it in the microwave, and add additional shortening if necessary, so that it flows smoothly.

Now for the fun part! Randomly place your pieces of monster fur, fangs, and eyeballs all over the bark. Press down on the fur so that it’s embedded in the chocolate and looks like it’s bursting out from underneath.

Once the bark is full decorated, refrigerate the tray to set it completely, for at least 20 minutes. When it’s set, cut it into small pieces to serve.
This bark makes a great party food or edible favor. Enjoy!

- 4 oz purple candy coating
- 2 oz white candy coating
- 2 oz red candy coating
- 1 tsp shortening
- 12 oz chocolate candy coating
- Large candy eyeballs
- Cover a baking sheet with waxed paper or parchment paper. Place the purple candy coating in a medium bowl and microwave until melted, stirring after every 30 seconds to prevent overheating.
- Scrape the purple coating out onto the prepared baking sheet and smooth it into a thin layer, less than ¼-inch thick. Let it sit for a moment, and once it just starts to thicken, take a fork and start tapping the top of the bark. The tines of the fork should grab the coating and pull it up into small spikes. If the coating immediately loses its shape, let it sit for a few more minutes until it is a little thicker, then try again. Tap the fork all over the top of the bark to give the purple coating a spiky texture like monster fur. Refrigerate the tray for 10 minutes to set the coating, then break it into uneven pieces by hand.
- Cover a baking sheet with parchment again. Place the white coating in a small bowl, and microwave until melted. Transfer the melted coating to a piping bag, paper cone, or just a plastic bag with a small hole cut in the corner. Pipe small triangles out onto the parchment, and use a toothpick to drag out the tip a little bit so they look like monster fangs. You’ll probably use 12-15 fangs, but make a few extra in case some of them break. Refrigerate until set.
- Combine the red candy coating and the shortening, and melt in the microwave. Stir until smooth and fluid. Dip the tips of each fang into the red coating, and place back on the baking sheet. Refrigerate briefly.
- Melt the chocolate candy coating in the microwave. Cover one last baking sheet with parchment or waxed paper. Pour the chocolate coating out onto the sheet and spread it into an even layer, about ¼-inch thick.
- Take the red coating, and drizzle and flick it all over the chocolate in a random pattern, so that it looks like blood splatters. If it doesn’t flow freely, warm it up again in the microwave, and stir in more shortening if necessary so it’s fluid.
- Place the purple monster fur pieces, bloody fangs, and candy eyeballs all over the bark in a random pattern. Make sure to press the fur down firmly to embed it in the chocolate and make it seem like it’s breaking through. Once your bark is finished, refrigerate it for 15-20 minutes until totally set.
- Break or cut it into small pieces, and serve!


All text and images (c) Elizabeth LaBau